
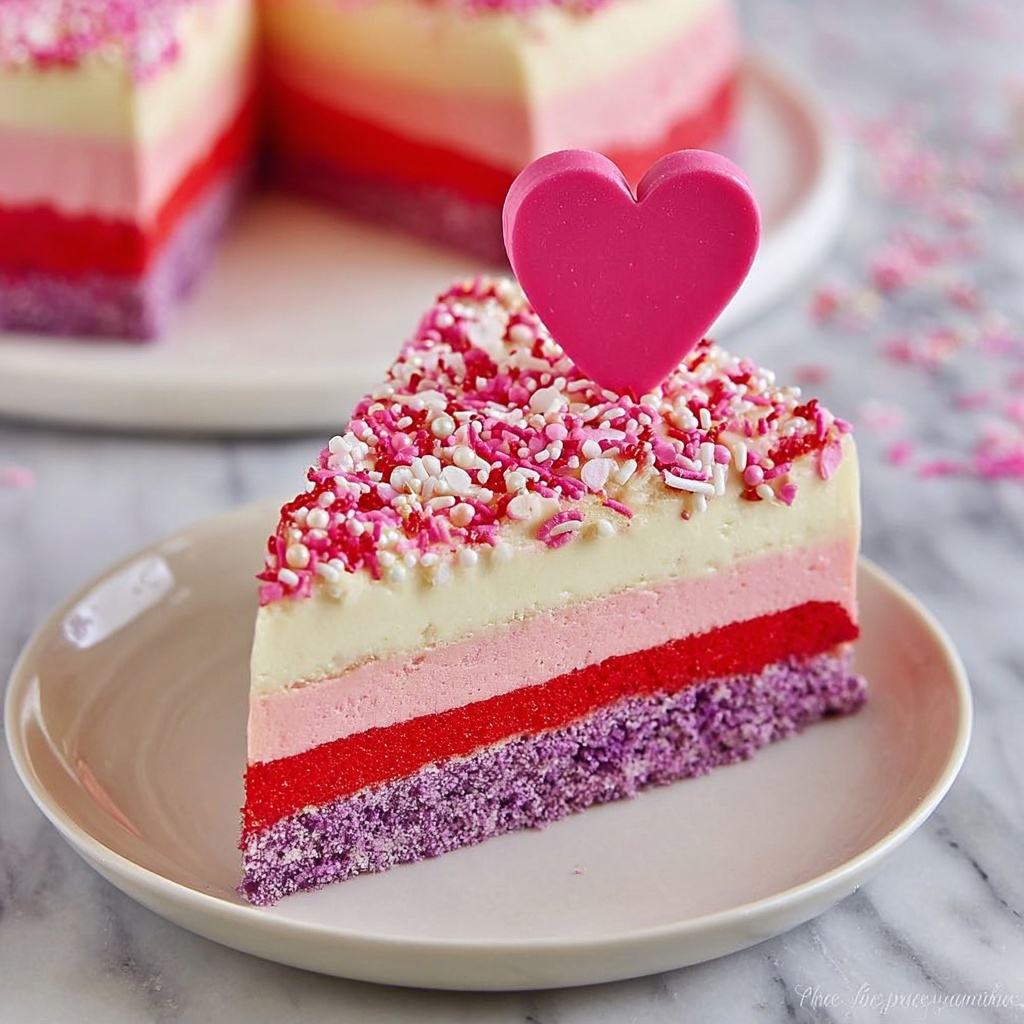
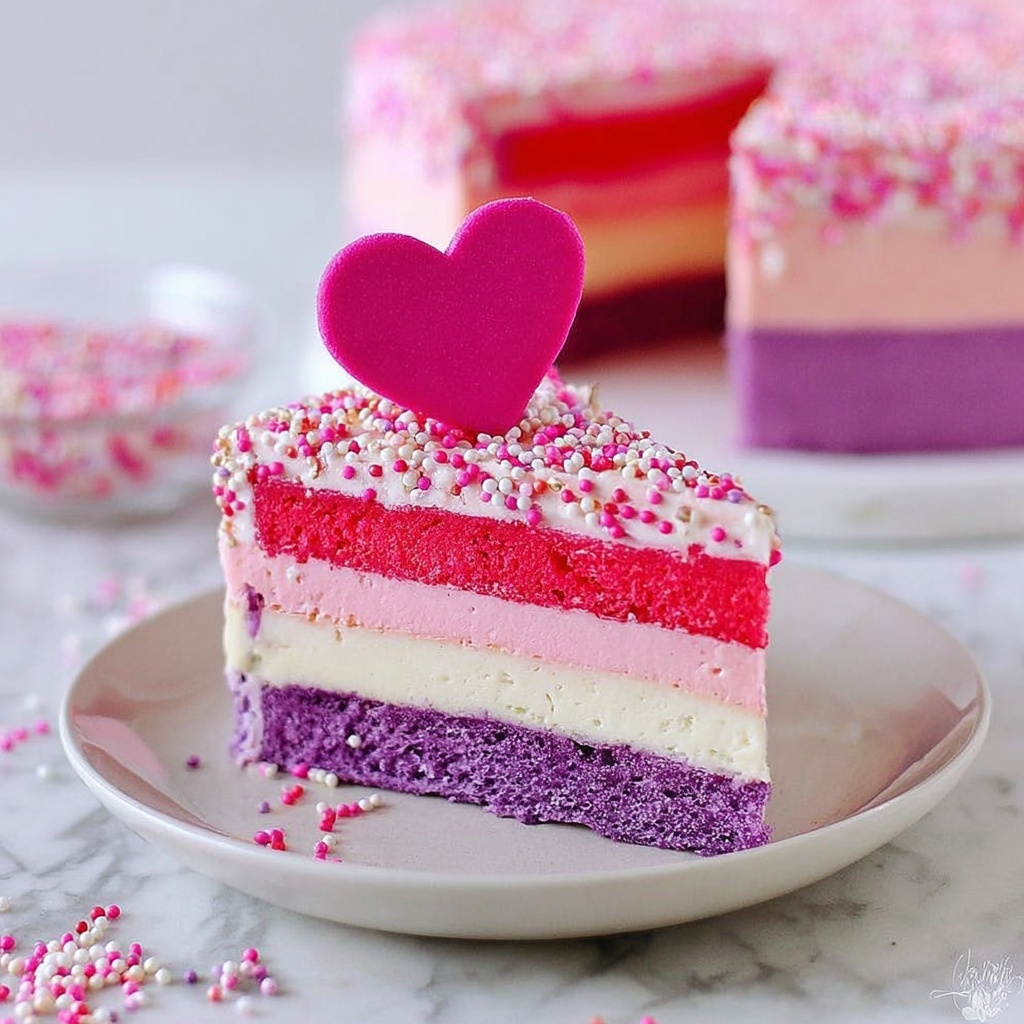
If you are looking to impress with a stunning, colorful, and utterly delicious dessert, this Valentine Cheesecake Recipe is exactly what you need. Imagine layers of creamy, luscious cheesecake tinted in shades of purple, white, red, and pink atop a flavorful purple shortbread crust. This cheesecake is not only a feast for the eyes, but every bite bursts with smooth, rich flavors and a hint of tartness from lemon and sour cream. Perfect for celebrating love or simply indulging yourself, this Valentine Cheesecake Recipe turns an ordinary dessert into a memorable experience.
Ingredients You’ll Need
The beauty of this Valentine Cheesecake Recipe lies in its straightforward and carefully chosen ingredients. Each one plays a special role in creating the perfect balance of texture, flavor, and color, making the preparation both manageable and exciting.
- 2 pie crusts (Keebler shortbread): These pre-made crusts form the buttery, crumbly base with just the right crunch.
- 32 oz cream cheese (softened): The creamy heart of the cheesecake, providing that rich, velvety body.
- 1 cup sugar: Sweetens the cheesecake without overpowering its natural tang.
- 2 tablespoons powdered sugar: Adds smooth sweetness and helps with structure.
- 1/2 cup sour cream: Lifts the flavor with a subtle tang and contributes to creaminess.
- 2 teaspoons lemon juice: Brightens the cheesecake with fresh acidity.
- 1 tablespoon vanilla extract: Adds warmth and depth to the flavor.
- Red, pink, and purple food coloring gels: Transform the cheesecake into a romantic, colorful creation.
- 2 cups heavy whipping cream: Whipped to fluffy perfection, it lightens the texture of the dessert.
- 1/4 cup powdered sugar: Sweetens the whipped cream topping and stabilizes it.
- 1 teaspoon vanilla extract (for whipped cream): Ensures every layer is infused with lovely vanilla notes.
How to Make Valentine Cheesecake Recipe
Step 1: Prepare the Pan and Crust
Start by lining a 9-inch springform pan with parchment paper; this little trick guarantees your cheesecake will pop out cleanly after freezing. Then, break the two shortbread crusts into crumbs in a large bowl. Mixing in a teaspoon of purple food coloring gel gives the crust its unique color—this purple base sets the stage for the playful layers to come.
Step 2: Form and Chill the Crust
Press the colored crumbs evenly into the bottom of the springform pan. The crust will be your dessert’s flavorful foundation, so smoothing it out carefully is key. Pop it in the freezer to firm up as you move on to the cheesecake layers.
Step 3: Whip the Cream
In a clean mixing bowl, combine heavy whipping cream, powdered sugar, and vanilla. Start mixing on low speed to blend everything, then crank up to high until stiff peaks form. This fluffy whipped cream adds lightness and airiness to your cheesecake, making it heavenly rather than heavy. Store it in the refrigerator until you need it.
Step 4: Prepare the Cream Cheese Mixture
After rinsing and drying your mixing bowl, blend the softened cream cheese with sugar until creamy and smooth. Add powdered sugar, sour cream, lemon juice, and vanilla, mixing until all ingredients are fully incorporated. This mixture is the creamy core of the Valentine Cheesecake Recipe, ensuring each slice is rich yet balanced with a fresh zing.
Step 5: Fold in the Whipped Cream
Gently fold your chilled whipped cream into the cream cheese mixture. This step is crucial for maintaining the airiness you worked hard for, creating that perfect texture combination of silky and fluffy that cheesecake lovers dream about.
Step 6: Divide and Color the Mixture
Split the cheesecake batter into three equal parts. Leave one plain white in the bowl, put the others into separate containers. Add red food coloring gel to one and pink to the other, stirring each until the colors are evenly mixed. This layering of colors is what makes this Valentine Cheesecake Recipe a festive showstopper perfect for the occasion.
Step 7: Layer the Cheesecake
Remove the purple crust from the freezer and pour the white cheesecake layer on top, spreading it smoothly. Freeze for about an hour until firm to the touch but not fully frozen. Repeat this process with the red layer, freeze again, and follow with the pink layer. After the final layer, cover the pan tightly with parchment paper and foil, then freeze until fully set.
Step 8: Slice and Serve
Once completely chilled, slice your Valentine Cheesecake Recipe into generous 2-inch pieces. The colorful layers create a delightful visual surprise with every slice—ready to enjoy and share with loved ones!
How to Serve Valentine Cheesecake Recipe
Garnishes
While this cheesecake is stunning on its own, adding fresh raspberries, edible rose petals, or a drizzle of white chocolate sauce can elevate its look and flavor even further. A sprig of mint adds a pop of greenery and freshness to your plate, making each bite even more inviting.
Side Dishes
Pair this rich dessert with a light, refreshing side like a mixed berry salad or a citrus sorbet. These options balance the sweetness and richness of the cheesecake, helping cleanse the palate and extend your Valentine’s Day feast with complementary flavors.
Creative Ways to Present
For an extra special touch, serve individual cheesecake portions in pretty glass jars or mini trifle cups, layering the crumbs and cheesecake mixture instead of slicing. Alternatively, top with themed sprinkles or shaped chocolate pieces for a personalized Valentine’s treat. Presentation truly makes a difference when sharing this beloved Valentine Cheesecake Recipe.
Make Ahead and Storage
Storing Leftovers
Because this cheesecake is frozen to set the layers, it holds its shape and flavor beautifully in the refrigerator for several days. Store leftovers in an airtight container or keep them wrapped tightly in foil to prevent freezer burn and maintain freshness.
Freezing
This recipe was created to be frozen and served cold. Keep it tightly covered in your freezer, and it will stay delicious for up to two weeks, making it perfect for preparing well ahead of your celebration day without a worry.
Reheating
Cheesecake is best enjoyed chilled or slightly softened at room temperature. Allow frozen slices to thaw in the refrigerator for a few hours before serving. Avoid reheating as it can alter the texture, but bringing it to room temperature will unlock the full creamy goodness.
FAQs
Can I use a different crust instead of Keebler shortbread?
Absolutely! While the Keebler shortbread crust adds a lovely buttery crunch and pairs well with the coloring, a graham cracker crust or even a homemade cookie crust can work wonderfully if you prefer.
How do I prevent the colors from bleeding between layers?
The key is freezing each layer until it’s firm but not rock solid before adding the next layer. This keeps the layers distinct and vibrant, preserving the beautiful look of your Valentine Cheesecake Recipe.
Can this recipe be made without a stand mixer?
Yes, you can use a hand mixer or even beat by hand, though it will take more effort to achieve stiff peaks for the whipped cream and a smooth cream cheese mixture. Just take your time, and enjoy the process!
Is the cheesecake very sweet?
This Valentine Cheesecake Recipe balances sweetness perfectly with the tang from lemon juice and sour cream. It’s rich but not cloyingly sweet, making it enjoyable for all palates.
Can I substitute food coloring gels with natural alternatives?
Yes, natural colorings like beet juice powder for red or purple sweet potato powder for purple can be used, but keep in mind the colors may be less intense and flavors might shift slightly.
Final Thoughts
Making this Valentine Cheesecake Recipe is like giving yourself a big dessert hug filled with love, color, and flavor. Whether it’s for a special someone or a festive treat just for you, it’s a recipe that brings joy in every layer. Don’t hesitate to try it out and watch everyone’s faces light up when you serve this beautiful, delicious masterpiece.
Print
Valentine Cheesecake Recipe
- Prep Time: 20 minutes
- Cook Time: 0 minutes
- Total Time: 5 hours (including freezing time)
- Yield: 12 servings
- Category: Dessert
- Method: No-Cook
- Cuisine: American
Description
A festive Valentine Cheesecake featuring colorful layers of creamy cheesecake on a vibrant purple shortbread crust. This no-bake dessert boasts flavors of cream cheese, sour cream, and vanilla, whipped to perfection and colored with red, pink, and purple gels for a visually stunning treat perfect for any romantic occasion.
Ingredients
Crust
- 2 pie crusts (Keebler brand shortbread crusts, already prepared)
- 1 teaspoon purple food coloring gel
Cheesecake Filling
- 32 oz cream cheese (4 packages, softened)
- 1 cup sugar
- 2 tablespoons powdered sugar
- 1/2 cup sour cream
- 2 teaspoons lemon juice
- 1 tablespoon vanilla extract
- Red food coloring gel (4 drops)
- Pink food coloring gel (6 drops)
Whipped Cream
- 2 cups heavy whipping cream
- 1/4 cup powdered sugar
- 1 teaspoon vanilla extract
Instructions
- Prepare Pan: Line a 9-inch spring-form pan with parchment paper and set aside to ensure easy removal of the cheesecake later.
- Make Purple Crust: Break the two shortbread crusts into crumbs in a large bowl, then add about 1 teaspoon of purple food coloring gel and mix thoroughly until the crumbs are evenly colored.
- Set Crust: Press the purple crumbs evenly into the bottom of the prepared spring-form pan, then place the pan in the freezer to chill while preparing the filling.
- Whip Cream: In a stand mixer bowl, combine 2 cups heavy cream, 1/4 cup powdered sugar, and 1 teaspoon vanilla. Mix on low until blended, then increase speed to high and whip until stiff peaks form. Refrigerate the whipped cream until needed.
- Blend Cream Cheese Mixture: Clean and dry the mixing bowl, then add softened cream cheese and 1 cup sugar. Blend until creamy. Add 2 tablespoons powdered sugar, sour cream, lemon juice, and vanilla extract, and mix until fully incorporated and fluffy.
- Fold Whipped Cream: Gently fold the whipped cream into the cream cheese mixture until completely combined, maintaining a light, fluffy texture.
- Divide and Color Mixture: Divide the cheesecake mixture into three equal portions. Keep one portion white in the mixing bowl. Place the other two portions into separate containers. Add 4 drops red food coloring gel to one and 6 drops pink food coloring gel to the other. Stir each until uniform in color, then refrigerate the red and pink mixtures.
- Layer White Mixture: Remove the crust from the freezer and pour the white cheesecake layer on top. Spread evenly, then return the pan to the freezer for about an hour until the layer is almost set to the touch.
- Layer Red Mixture: Spread the red cheesecake mixture evenly over the white layer. Freeze again for about an hour until almost set.
- Layer Pink Mixture: Pour the pink cheesecake layer on top and spread evenly. Freeze for one more hour to set.
- Seal and Chill: Cover the cheesecake with parchment paper and foil to seal. Keep it in the freezer until ready to serve.
- Serve: Cut the cheesecake into 2-inch pieces and enjoy this festive, colorful dessert perfect for Valentine’s Day.
Notes
- This is a no-bake cheesecake; freezing is required to set each layer.
- Use gel food coloring for vibrant, intense colors without thinning the mixture.
- Softened cream cheese is essential for a smooth batter.
- Chill the whipped cream before folding to maintain volume.
- Ensure each cheesecake layer is nearly frozen before adding the next to keep clean, distinct layers.


