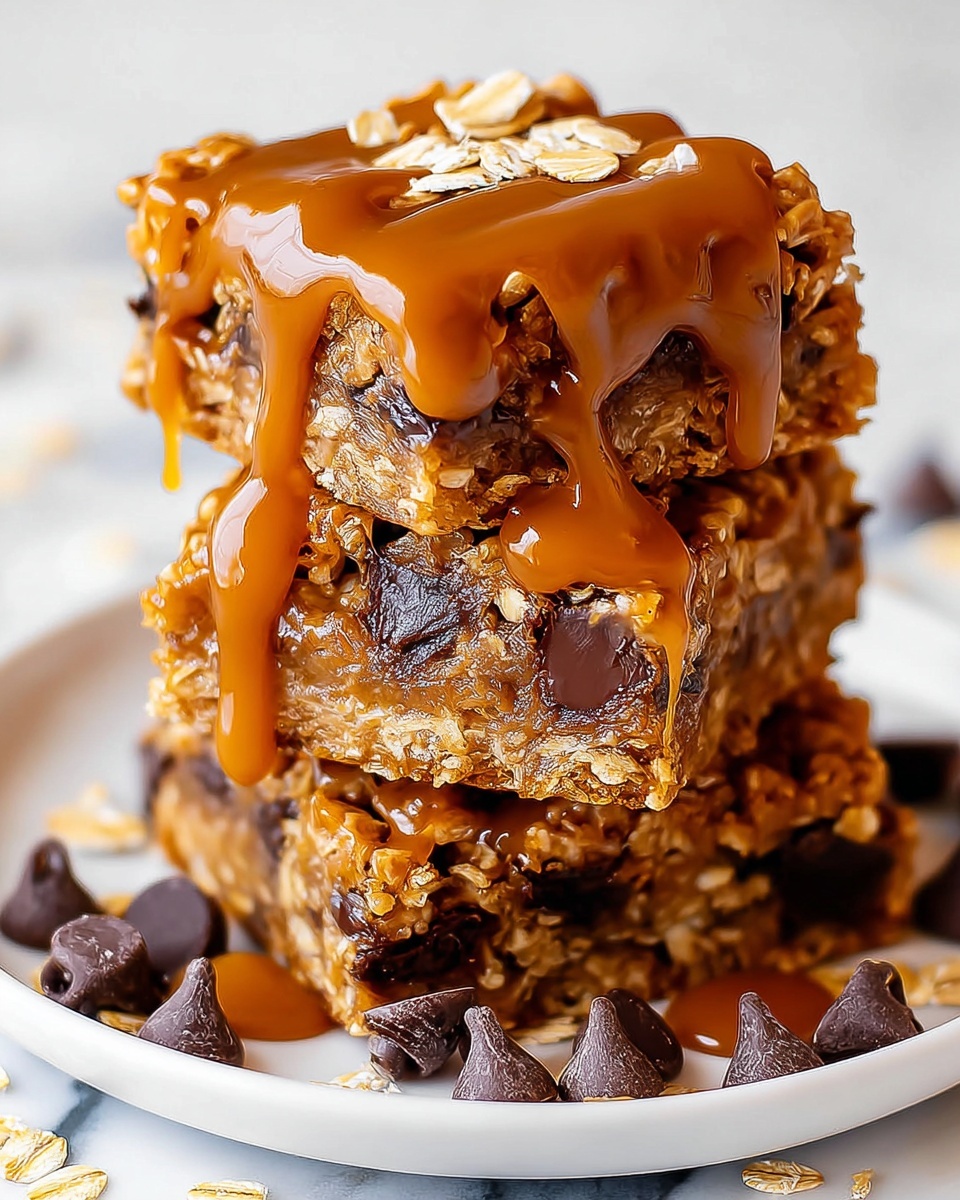
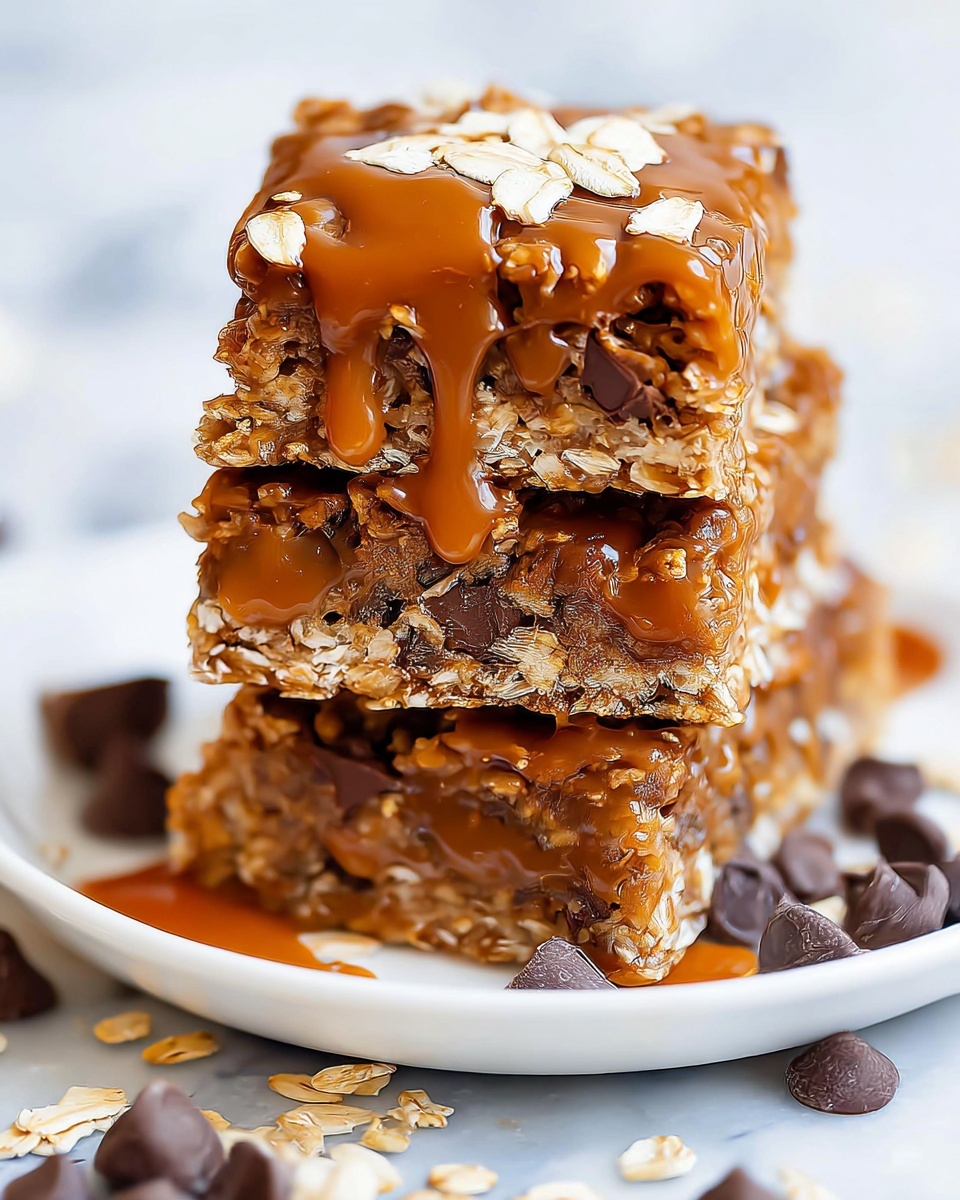
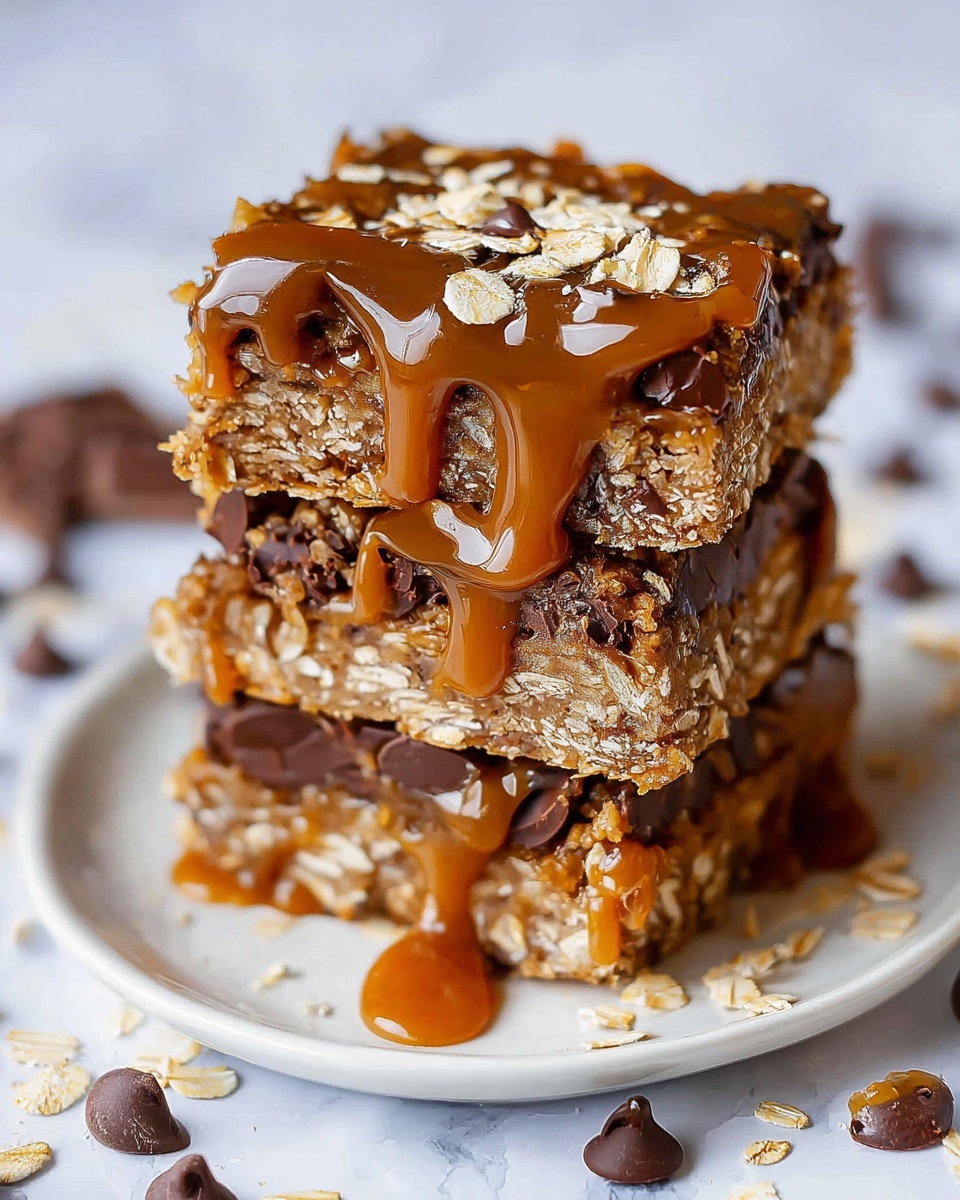
If you are on the hunt for a truly decadent treat that combines chewy oats, luscious caramel, and rich chocolate in every bite, you must try this Salted Caramel Chocolate Oat Bars Recipe. These bars are a beautiful marriage of textures and flavors: the crunchy oats provide a hearty foundation, the salted caramel adds just the right hint of buttery sweetness with a savory twist, and the chocolate brings that irresistible melt-in-your-mouth comfort. Whether you want a snack for afternoon tea or a stunning dessert to share, these bars deliver comfort and delight with every square.
Ingredients You’ll Need
Every ingredient in this Salted Caramel Chocolate Oat Bars Recipe plays a crucial role, making the final bars irresistibly tender, chewy, and full of flavor. Don’t let the simplicity fool you—each element carefully balances the others to create pure magic.
- Salted butter (3/4 cup, melted): Adds richness and moisture while helping the crust bind together.
- Brown sugar (2/3 cup, packed): Provides deep, caramel-like sweetness and chewiness.
- Vanilla extract (1 tablespoon): Enhances all the flavors with warm, comforting notes.
- All-purpose flour (1 1/4 cup): Gives structure and the perfect balance for the oat crust and topping.
- Rolled oats (1 1/4 cup): Brings heartiness and chewy texture; old fashioned oats work beautifully here.
- Baking soda (1 teaspoon): A little lift to keep things light.
- Salt (1/2 teaspoon, divided): The secret ingredient that amplifies all the sweet flavors, especially the caramel.
- Carmel squares (40 pieces): The star ingredient for that luscious, gooey caramel layer.
- Heavy cream (1/3 cup): Creates a smooth, creamy caramel sauce when melted with the caramel squares.
- Semi-sweet chocolate chips (1 1/2 cup): Adds rich, melty pockets of chocolate that contrast the salty caramel and oat layers perfectly.
How to Make Salted Caramel Chocolate Oat Bars Recipe
Step 1: Prepare Your Pan and Crust
Start by preheating your oven to 350°F (177°C). Line and grease an 8×8 inch baking pan—parchment paper works wonders here for easy removal and to make sure that caramel doesn’t stick. In a large bowl, melt the salted butter, then whisk in brown sugar and vanilla until it’s smooth and fragrant. Next, add the dry ingredients—flour, oats, baking soda, and part of the salt—and mix until crumbly yet combined. Press half of this mixture evenly into your prepared pan to form the crust, and bake it for 10 minutes until it just starts to set. This step sets the perfect base that’s tender yet sturdy enough to hold the luscious fillings.
Step 2: Make the Caramel Sauce
While the crust bakes, melt the caramel squares with heavy cream and the remaining salt in a microwave-safe bowl. Heat in short bursts, stirring well each time until you have a smooth, silky caramel sauce. Patience is key here—only melt what you need to prevent the caramel from seizing. The salted caramel sauce you create will be the gooey, dreamy heart of these bars and the perfect foil to the dark chocolate.
Step 3: Layer the Chocolate and Caramel
Once the crust is out of the oven, sprinkle the semi-sweet chocolate chips evenly over the warm crust. The heat will begin softening the chocolate chips, creating a perfect melt later. Immediately pour the smooth caramel sauce on top, spreading it evenly. This layering ensures every bite has a harmonious mix of chocolate and caramel that is simply irresistible.
Step 4: Add the Oat Topping and Finish Baking
Sprinkle the remaining oat mixture over the caramel layer and gently press it down with your hands or tap the pan to create a cohesive topping. Pop the pan back into the oven and bake for another 15 minutes. This step lets the top firm up and turn a delicate golden brown, sealing that perfect chewy-crispy texture we all crave in oat bars.
Step 5: Cool and Slice with Care
Remove the pan and let it cool on a wire rack, but here is the most important tip: for neat slices without the caramel oozing everywhere, allow the bars to set completely. I like to leave mine overnight at room temperature or chill for at least 3 hours before cutting. This patience rewards you with clean, gorgeous bars that hold together and look as stunning as they taste.
How to Serve Salted Caramel Chocolate Oat Bars Recipe
Garnishes
Elevate your presentation with a sprinkle of flaky sea salt or a drizzle of melted chocolate over the bars for an extra touch of glam. A light dusting of powdered sugar can also make them feel extra special and festive.
Side Dishes
These bars are heavenly on their own, but serving them alongside a scoop of vanilla ice cream or a dollop of whipped cream can take the experience to a whole new level. A hot cup of coffee or a creamy latte pairs beautifully to balance the sweetness.
Creative Ways to Present
Cut these into bite-sized squares and arrange on a pretty platter for parties or gift them packed in decorative boxes for a thoughtful homemade treat. Layer them in parfait glasses with yogurt and fresh berries for a funky twist on dessert.
Make Ahead and Storage
Storing Leftovers
You can store these Salted Caramel Chocolate Oat Bars in an airtight container at room temperature for up to 3 days without losing any texture or flavor. After that, refrigeration is best for keeping the caramel firm.
Freezing
These bars freeze wonderfully. Wrap them tightly in plastic wrap and foil to prevent freezer burn. When you’re ready to indulge, thaw overnight in the fridge and bring to room temperature before slicing for the best texture.
Reheating
If you prefer a warm treat, briefly microwave a bar for about 10-15 seconds to soften the chocolate and caramel layers, creating an indulgent molten effect. Just be careful not to overheat.
FAQs
Can I use dark chocolate instead of semi-sweet chips?
Absolutely! Dark chocolate adds a richer, slightly more bitter contrast that complements the salted caramel nicely. Just choose a quality chocolate with at least 60-70% cacao for the best flavor balance.
What oats are best for this recipe?
Old fashioned rolled oats work perfectly here, offering the ideal chewy texture and structure. Instant oats tend to be too fine and won’t provide the satisfying bite these bars are known for.
Can I make these bars gluten-free?
Yes! Substitute the all-purpose flour with a gluten-free flour blend designed for baking. Make sure the oats you use are certified gluten-free to avoid cross-contamination.
How do I prevent the caramel from sticking to the pan?
Line your pan with parchment paper that extends beyond the edges and grease it lightly. This extra step makes removing your bars a breeze and keeps the caramel from sticking or tearing during cutting.
Is it necessary to chill the bars before cutting?
Chilling is highly recommended to get clean slices and prevent the gooey caramel from oozing. If you’re short on time, refrigerate for at least 3 hours, but overnight resting is best if possible.
Final Thoughts
Trust me when I say these Salted Caramel Chocolate Oat Bars Recipe will quickly become a beloved addition to your dessert repertoire. The perfect harmony of sweet, salty, chewy, and melty elements is absolutely unforgettable. Once you give these bars a try, you’ll want to make them again and again to share with friends, family, or just to treat yourself on any cozy day. Grab your ingredients, and let the magic bake!
Print
Salted Caramel Chocolate Oat Bars Recipe
- Prep Time: 15 minutes
- Cook Time: 25 minutes
- Total Time: 40 minutes plus chilling time
- Yield: 16 squares
- Category: Dessert
- Method: Baking
- Cuisine: American
Description
These Carmelitas are delightful layered dessert bars featuring a buttery oat crust, a rich caramel layer, and a luscious chocolate topping. Perfectly chewy and gooey, with the perfect balance of sweet and salty, these bars make an irresistible treat for any occasion.
Ingredients
Crust and Topping
- 3/4 cup salted butter, melted
- 2/3 cup packed brown sugar
- 1 tablespoon vanilla extract
- 1 1/4 cup all-purpose flour
- 1 1/4 cup rolled oats or old fashioned oats
- 1 teaspoon baking soda
- 1/2 teaspoon salt, divided
Caramel Layer
- 40 caramel squares
- 1/3 cup heavy cream
Chocolate Layer
- 1 1/2 cup semi-sweet chocolate chips
Instructions
- Preheat Oven and Prepare Pan: Preheat your oven to 350°F (177°C). Line and grease an 8×8 inch baking pan, ideally using parchment paper to prevent sticking and ease removal of the bars.
- Melt Butter and Mix Sugar: In a large microwave-safe bowl, melt the butter. Whisk in the brown sugar and vanilla extract until well combined, creating a smooth base for the crust.
- Add Dry Ingredients: Add the flour, oats, baking soda, and 1/4 teaspoon of salt to the butter mixture. Use a pastry cutter or fork to mix until the mixture becomes crumbly and evenly incorporated.
- Form and Bake Crust: Press about half of the oat mixture evenly into the bottom of the prepared baking pan to create the crust. Bake for 10 minutes until it is slightly set but not fully browned.
- Prepare Caramel Sauce: While the crust bakes, combine the caramel squares, heavy cream, and the remaining 1/4 teaspoon salt in a large microwave-safe bowl. Heat on high for 1 minute, stir, then heat for an additional minute, stirring again until melted and smooth. Avoid overheating to prevent the caramel from seizing.
- Add Chocolate Chips: Immediately after removing the crust from the oven, evenly sprinkle the semi-sweet chocolate chips over the hot crust to allow them to start melting.
- Pour Caramel Layer: Pour the smooth caramel sauce evenly over the layer of chocolate chips, ensuring it spreads uniformly.
- Add Topping: Sprinkle the remaining oat mixture over the caramel layer, gently pressing or tapping down with your hand to create a firm and even topping.
- Bake Again: Return the pan to the oven and bake for another 15 minutes or until the top is lightly browned and set, indicating the bars are cooked through.
- Cool and Set: Remove the pan from the oven and transfer to a wire rack. Allow the bars to cool completely. For clean slicing and to prevent melting caramel from oozing out, let them set at room temperature overnight or chill in the refrigerator for at least 3 hours before cutting into 16 squares.
Notes
- Using parchment paper helps to easily lift the bars from the pan.
- Be cautious when melting caramel and cream to avoid overheating and seizing.
- For best results, let the bars set fully before slicing to maintain structure and prevent mess.
- You can substitute semi-sweet chocolate chips with dark or milk chocolate based on preference.
- Store leftovers in an airtight container; refrigerated bars will keep fresh up to 5 days.


