Description
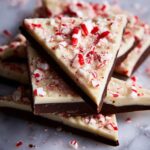
This Peppermint Bark Candy recipe offers a delicious holiday treat featuring layers of rich dark chocolate and creamy white chocolate infused with peppermint extract and sprinkled with crushed candy canes for added crunch and festive flair. Perfectly thin and easy to make, this bark is ideal for gifting or enjoying at home during the holidays.
Ingredients
Scale
Dark Chocolate Layer
- 12 ounces semi-sweet or dark chocolate (high quality, e.g., Ghirardelli, Guittard, Nestle)
- 1 teaspoon vegetable oil
- 1/2 teaspoon peppermint extract (not mint)
White Chocolate Layer
- 12 ounces high quality white chocolate (must contain cocoa butter, preferably a bar)
- 1 teaspoon vegetable oil
- 3 candy canes, finely crushed (to stir into white chocolate)
- 5-8 candy canes, coarsely crushed (to top bark)
Instructions
- Prepare the workspace: Line a baking sheet with parchment paper or wax paper to prevent sticking and allow easy removal of the bark.
- Crush candy canes: Finely crush 3 candy canes using a food processor or rolling pin and place them aside for stirring into the white chocolate. Coarsely crush 5-8 candy canes in a ziplock bag for sprinkling on top of the bark and set aside.
- Chop chocolate: Roughly chop 12 ounces of dark or semi-sweet chocolate if using a bar; otherwise, measure 2 cups of chocolate chips.
- Melt dark chocolate: In a medium microwave-safe bowl, combine the dark chocolate with 1 teaspoon vegetable oil. Microwave on high for 30 seconds, stir, then repeat. After 1 minute, continue heating in 15-second intervals, stirring thoroughly each time until the chocolate is glossy, mostly smooth but with a few lumps. Stir off heat until lumps fully melt.
- Add peppermint extract: Stir in 1/2 teaspoon peppermint extract evenly into melted dark chocolate.
- Pour and spread dark chocolate: Pour melted dark chocolate onto the prepared baking sheet, spreading it into a thin rectangle (approximately 11×15 inches) using an offset spatula. Drop the pan gently on the counter a few times to release air bubbles.
- Cool dark chocolate layer: Allow the dark chocolate to set at room temperature or place it in the refrigerator to speed up the process. Do not proceed until completely set.
- Chop white chocolate: Roughly chop 12 ounces of high quality white chocolate bar to ensure smooth melting.
- Melt white chocolate: In a clean, dry bowl, combine white chocolate with 1 teaspoon vegetable oil. Microwave in 30-second increments stirring well after each, switching to 15-second intervals as the chocolate softens, until mostly smooth with a few lumps. Stir off heat until fully melted, exercising caution as white chocolate seizes easily.
- Stir crushed candy canes into white chocolate: Mix finely crushed candy canes thoroughly into the melted white chocolate.
- Pour and spread white chocolate: Gently pour the white chocolate mixture over the cooled dark chocolate layer, spreading almost to the edges with an offset spatula. Take care to avoid mixing layers.
- Add coarse candy cane topping: Immediately sprinkle the coarsely crushed candy canes over the top of the white chocolate.
- Set the bark: Let the bark cool completely at room temperature or refrigerate for about 30 minutes until fully hardened.
- Slice the bark: Using a sharp chef’s knife, carefully slice the bark into approximately 40 pieces. Avoid breaking by hand to prevent separation of layers.
- Store and enjoy: Keep peppermint bark in a sealed container at room temperature for optimal freshness. It can also be frozen up to 3 months; thaw in refrigerator to prevent bloom and condensation.
Notes
- Use high quality chocolate bars with cocoa butter for best texture and flavor, especially the white chocolate layer.
- Be sure to distinguish peppermint extract from generic mint extract for authentic peppermint flavor.
- Microwave heating times may vary; stir frequently to avoid burning the chocolate.
- For thinner bark, spread chocolate over a larger surface area; adjust size according to desired thickness.
- Freezing may cause white spots (bloom) but does not affect taste.
- Use an offset spatula for even spreading and smooth layers.