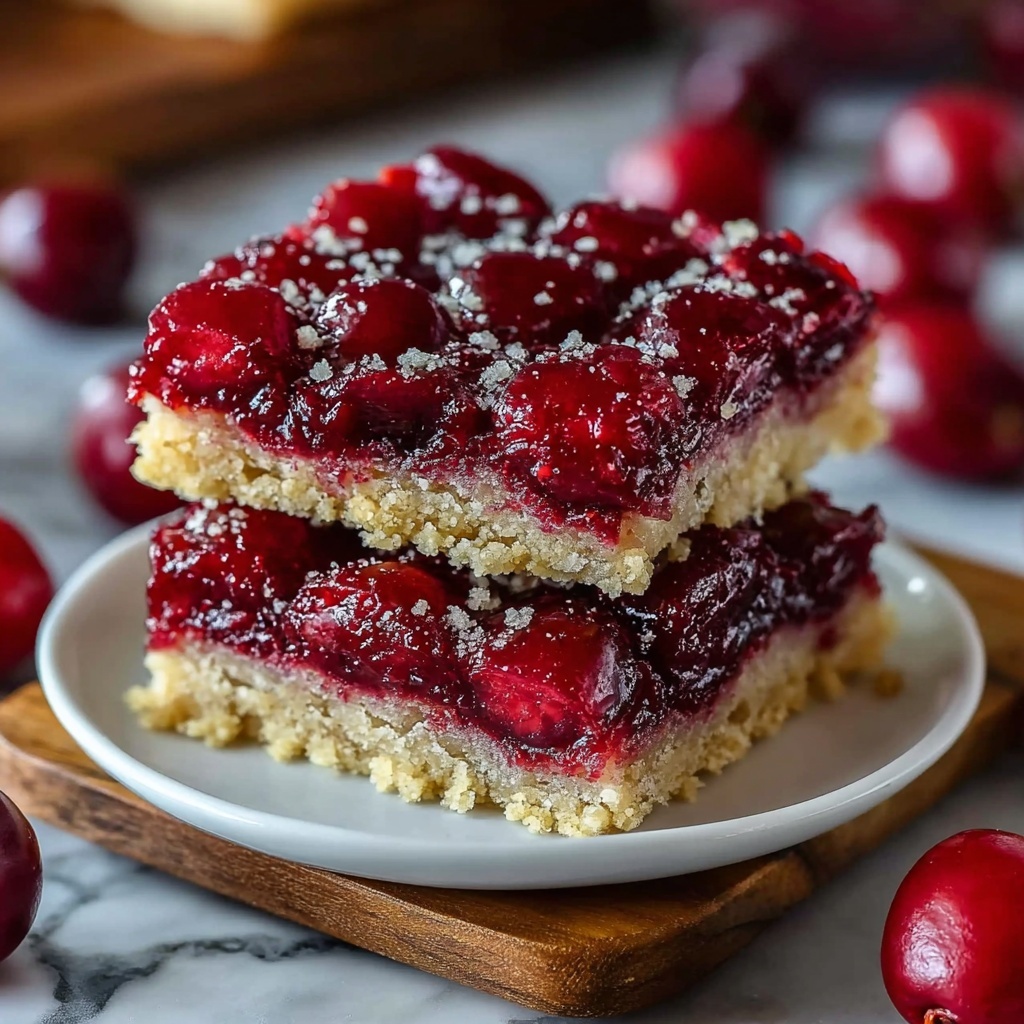
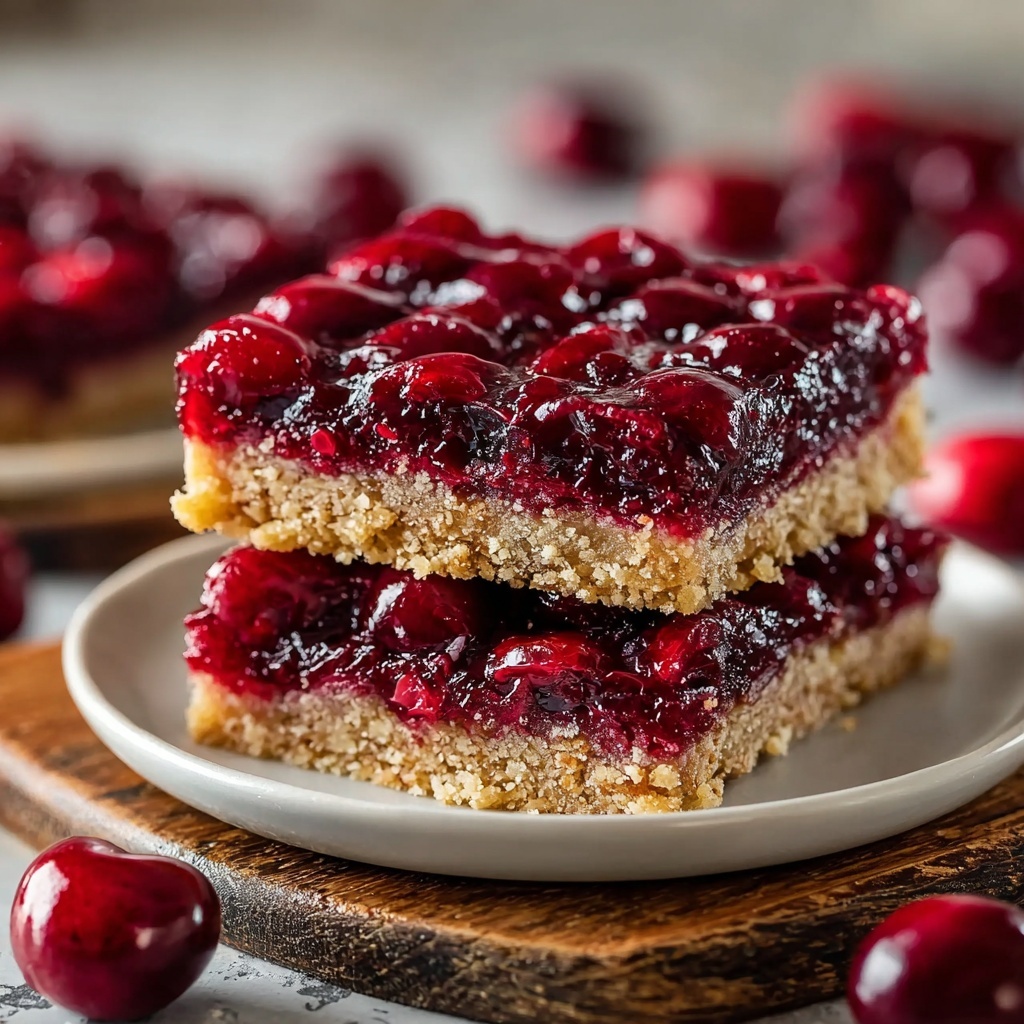
If you’re craving a dessert that bursts with the perfect balance of sweet, tart, and buttery goodness, you’ve come to the right place! This Irresistibly Easy Cherry Pie Bars Recipe takes all the classic charm of cherry pie and transforms it into a simple, handheld treat that’s just as delightful. With a tender, crumbly crust, a luscious cherry filling, and a dreamy almond-vanilla glaze, these bars are guaranteed to become your go-to dessert for any occasion. Trust me, once you try this recipe, you’ll wonder how you ever lived without these cherry bar delights in your life!
Ingredients You’ll Need
Don’t let the simplicity of these ingredients fool you. Each one plays a starring role in delivering the perfect combination of flavor, texture, and color that makes this cherry dessert truly special. From rich butter to the sweet and tangy cherry filling, every element adds to the magic.
- 1 cup Real Butter: Softened butter is essential for a tender and rich crust that melts in your mouth.
- 1 cup Granulated Sugar: Adds sweetness and helps create a light, fluffy texture when creamed with butter.
- 2 Eggs: They bind the dough and enhance the structure, giving the bars their perfect crumb.
- 2 ½ cups All-Purpose Flour: This is the base of your crust, providing just the right amount of chewiness.
- ½ teaspoon Salt: Balances sweetness and enhances all the flavors beautifully.
- 1 can (21 oz) Canned Cherry Pie Filling: The star of the show, packed with vibrant cherries and luscious syrup.
- 1 cup Confectioners’ Sugar: Used in the glaze to add a delicate sweetness and smooth finish.
- Milk (as needed): Just enough to thin the glaze to a perfect drizzle consistency.
- 1 teaspoon Pure Almond Extract: Adds a warm, nutty aroma that complements the cherries perfectly.
- 1 teaspoon Vanilla Extract: Rounds out the flavor with a sweet, fragrant note that ties everything together.
How to Make Irresistibly Easy Cherry Pie Bars Recipe
Step 1: Prepare Your Pan and Oven
Start by preheating your oven to 350°F (175°C). Grease a 15×10×1-inch baking pan thoroughly—this ensures your cherry pie bars release effortlessly after baking, preserving their gorgeous edges and shape.
Step 2: Cream Butter and Sugar
Using an electric mixer, beat together the softened butter and granulated sugar until the mixture becomes fluffy and light. This step is crucial because it aerates the butter, setting the foundation for a soft and tender crust with that perfect crumbly texture.
Step 3: Add Eggs and Flavor Extracts
Beat in the eggs one at a time at room temperature. Then, add in the almond and vanilla extracts, mixing well to infuse the dough with those warm, inviting flavors. These extracts lift the flavor profile and make the bars truly irresistible.
Step 4: Mix in Dry Ingredients
Gradually stir in the all-purpose flour and salt until the dough is just combined. The dough should be soft but not sticky—this balance helps you easily press it into the pan without losing that tender texture after baking.
Step 5: Form the Base Crust
Take half of your dough and press it evenly into the bottom of your prepared pan. This will serve as the sturdy yet buttery base for your cherry topping. Press it firmly but gently to create a smooth, even layer.
Step 6: Spread Cherry Pie Filling
Pour the entire can of cherry pie filling over the crust, gently spreading it until it covers the surface evenly. The bright red cherries will peek through the crust, promising that delightful fruity surprise in every bite.
Step 7: Top with Remaining Dough
Instead of rolling out the remaining dough, simply dollop small pieces evenly over the cherries. This rustic topping bakes to a golden brown and contrasts beautifully with the juicy cherry filling beneath.
Step 8: Bake to Perfection
Place your pan in the preheated oven and bake for 35 to 40 minutes, or until the crust turns a gorgeous golden brown. The aroma of buttery crust and sweet cherries bubbling is simply irresistible and will have everyone gathered around the oven!
Step 9: Cool Completely
Allow the bars to cool completely on a wire rack. Cooling is key to setting the filling and making sure every slice is neat, so patience here will reward you with perfect bars.
Step 10: Drizzle the Almond Vanilla Glaze
Whisk together confectioners’ sugar, almond extract, vanilla extract, and just enough milk to make a smooth glaze. Drizzle this over the cooled bars for a glossy, flavorful finish that adds a sweet, delicate touch and makes these bars truly shine.
How to Serve Irresistibly Easy Cherry Pie Bars Recipe

Garnishes
For an extra bit of flair, sprinkle a few toasted almond slices on top of the glaze or dust lightly with extra confectioners’ sugar. Fresh mint leaves or a handful of fresh cherries on the side also add visual appeal and a refreshing contrast.
Side Dishes
Pair your cherry pie bars with a scoop of vanilla ice cream or a dollop of freshly whipped cream to heighten that comforting, classic dessert feeling. It’s also amazing alongside a hot cup of coffee or tea, perfect for an afternoon treat or after-dinner indulgence.
Creative Ways to Present
Serve these bars on a rustic wooden board for a cozy home-style vibe or arrange them on delicate dessert plates for a special occasion. You can even cut them into bite-sized squares and serve them as sweet finger food at parties or gatherings—everyone will be reaching for seconds!
Make Ahead and Storage
Storing Leftovers
Keep any leftover cherry pie bars in an airtight container at room temperature for up to two days. After that, transfer them to the refrigerator to maintain freshness. Stored properly, they’ll stay delicious and moist so you can enjoy them for days.
Freezing
These bars freeze beautifully! Wrap individual slices tightly in plastic wrap and place them in a freezer-safe container or zip-top bag. They’ll keep well for up to three months. When you want a quick treat, thaw them overnight in the fridge.
Reheating
For warmed-up cherry pie bars, pop them into a preheated oven at 300°F for about 10 minutes or microwave for 20-30 seconds. This brings back the fresh-baked feeling, enhancing the gooey filling and buttery crust perfection.
FAQs
Can I use fresh cherries instead of canned cherry pie filling?
Absolutely! Fresh cherries can be used, but you’ll want to cook them down with sugar and a little cornstarch to thicken the filling before spreading it on the crust. This helps mimic that signature pie filling texture and ensures your bars hold together beautifully.
Is it necessary to use almond extract in this recipe?
While almond extract adds a lovely depth and classic flavor that pairs wonderfully with cherries, you can omit it if you prefer. Using just vanilla extract will still give you a delicious result — it’s all about personal taste!
Can these bars be made gluten-free?
To make the bars gluten-free, substitute all-purpose flour with a gluten-free baking blend that measures 1:1. Just make sure the blend contains xanthan gum to help keep the dough cohesive and the texture lovely.
What is the best way to cut the bars without them crumbling?
Use a sharp knife and cut the bars after they’ve completely cooled. For cleaner edges, you can chill them briefly in the fridge before slicing. Wiping the knife clean between cuts also helps keep slices neat and pretty.
Can I make these bars vegan?
With a few tweaks, yes! Use vegan butter and a flaxseed egg substitute in place of real eggs. Also, check that your cherry pie filling and powdered sugar are vegan-friendly. The flavor and texture may be slightly different, but still delightful!
Final Thoughts
This Irresistibly Easy Cherry Pie Bars Recipe is a delightful way to bring joy to any table with minimal effort and maximum flavor. The tender crust, vibrant cherry filling, and luscious glaze come together to create a dessert that’s both approachable and impressive. I’m confident these bars will become a cherished recipe in your collection, perfect for sharing with friends and family whenever you want to impress with a slice of sweet, cherry bliss.
Print
Irresistibly Easy Cherry Pie Bars Recipe
- Prep Time: 15 minutes
- Cook Time: 40 minutes
- Total Time: 55 minutes
- Yield: 12 servings
- Category: Dessert
- Method: Baking
- Cuisine: American
Description
Discover the delightful simplicity of these Irresistibly Easy Cherry Pie Bars, a perfect dessert combining a buttery, tender crust with vibrant cherry pie filling, topped with a sweet glaze. This recipe yields 12 generously sized bars, ideal for sharing at any gathering or enjoying as a sweet treat any time.
Ingredients
Crust and Dough
- 1 cup Real Butter, softened
- 1 cup Granulated Sugar
- 2 Eggs, room temperature
- 2 ½ cups All-Purpose Flour
- ½ teaspoon Salt
- 1 teaspoon Pure Almond Extract
- 1 teaspoon Vanilla Extract
Filling
- 1 can (21 oz) Canned Cherry Pie Filling
Glaze
- 1 cup Confectioners’ Sugar
- 1 teaspoon Pure Almond Extract
- ½ teaspoon Vanilla Extract
- Milk, as needed for glazing consistency
Instructions
- Preheat and Prepare Pan: Preheat your oven to 350°F (175°C) and grease a 15×10×1-inch baking pan to ensure easy removal of the bars after baking.
- Cream Butter and Sugar: Using an electric mixer, cream together 1 cup softened butter and 1 cup granulated sugar until the mixture is fluffy and light, crucial for a tender crust texture.
- Add Eggs and Extracts: Beat in 2 room-temperature eggs one at a time, then add 1 teaspoon almond extract and 1 teaspoon vanilla extract, mixing thoroughly after each addition to incorporate flavor and richness.
- Form the Dough: Gradually combine 2 ½ cups all-purpose flour and ½ teaspoon salt into the mixture, stirring until a soft dough forms.
- Press Base Layer: Press half of the dough evenly into the greased baking pan, forming the base layer for your cherry bars.
- Spread Cherry Filling: Evenly spread the entire 21 oz can of cherry pie filling over the dough layer in the pan.
- Add Top Dough Pieces: Dollop the remaining dough in small pieces over the cherry filling, distributing it evenly.
- Bake: Place the baking pan in the preheated oven and bake for 35 to 40 minutes, or until the crust turns golden brown.
- Cool: Allow the bars to cool completely on a wire rack after baking to set the filling and crust.
- Prepare Glaze: In a small bowl, mix 1 cup confectioners’ sugar with 1 teaspoon almond extract, ½ teaspoon vanilla extract, and enough milk to achieve a smooth, spreadable glaze consistency. Drizzle or spread over cooled bars as desired.
Notes
- Ensure butter and eggs are at room temperature for optimal mixing and texture.
- Do not overwork the dough once the flour is added to keep the crust tender.
- Adjust milk quantity in glaze slowly to avoid a glaze that’s too runny.
- Allow bars to cool thoroughly before glazing to prevent melting the glaze.
- Cherry pie filling can be substituted with your favorite canned fruit filling for variety.

