There is something incredibly heartwarming about baking treats specifically for your furry best friend, and this Homemade Peanut Butter Dog Treats Recipe is an absolute winner. Made with simple pantry staples like whole wheat flour and natural peanut butter, these chewy, flavorful treats are designed to delight your dog’s palate while being wholesome and nourishing. Whether you’re a seasoned dog parent or just looking to add a homemade touch to your pup’s snack time, these treats are easy to make, fun to customize, and sure to bring a wagging tail or two your way.

Ingredients You’ll Need
This recipe calls for straightforward ingredients that not only enhance taste but also ensure a good texture and nutrition for your canine companion. Each component plays a vital role, from binding the dough to adding natural sweetness and creating that perfect peanut butter flavor dogs adore.
- Whole wheat flour: Provides a wholesome base with a slightly nutty flavor and good texture for chewing.
- Egg: Acts as a binder to hold your treats together during baking.
- Peanut butter: Adds richness and irresistible taste; be sure to use unsweetened, xylitol-free peanut butter for safety.
- Water: Helps bring the dough together and keeps it moist without heaviness.
- Honey: Offers a touch of natural sweetness dogs love, just in small amounts.
- Cornstarch: Used in the frosting to get the perfect consistency without making it runny.
- Hot water: Melts and blends the peanut butter frosting smoothly for easy piping.
How to Make Homemade Peanut Butter Dog Treats Recipe
Step 1: Prepare Your Oven and Baking Surface
Start by preheating your oven to 350°F and lining a baking sheet with parchment paper. This simple prep step ensures your treats bake evenly and won’t stick, making cleanup a breeze.
Step 2: Combine Your Main Ingredients
In a large bowl, mix the whole wheat flour with the egg. Then, add in the peanut butter, water, and honey. You’ll notice the dough gets quite stiff and sticky — this is perfect! Using your hands or a mixer’s paddle attachment helps combine everything smoothly.
Step 3: Roll and Shape the Dough
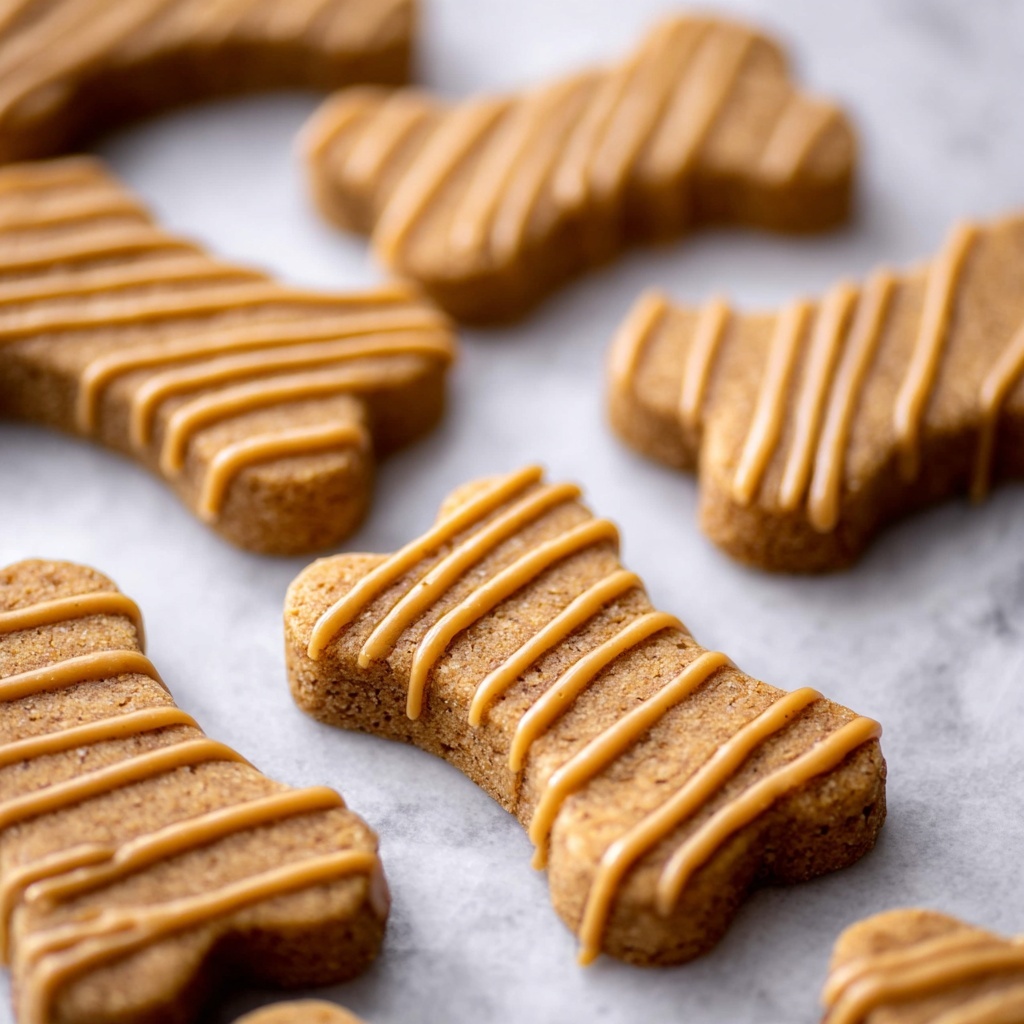
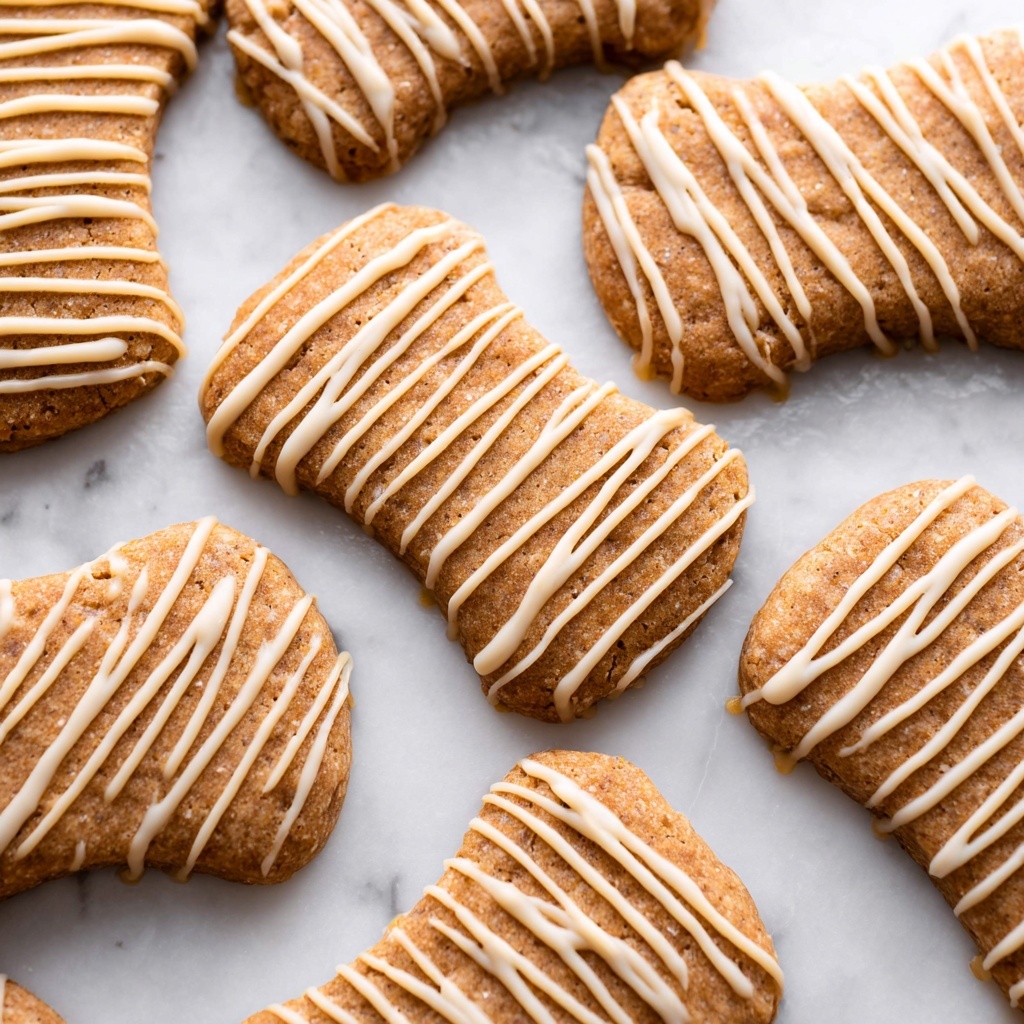
Lightly flour your surface and roll the dough out to about half an inch thick. Use cookie cutters to cut out fun shapes — dogs love variety, and these treats barely spread in the oven, so your shapes will stay nice and distinct.
Step 4: Bake Until Golden
Place your shaped dough on the lined baking sheet and bake for 18-20 minutes until they turn a lovely golden color. Keep an eye on smaller cookies as they may need less time to prevent burning on the bottom.
Step 5: Create the Peanut Butter Frosting
While the treats cool, warm up the peanut butter and honey mixture in a microwave-safe bowl in short increments, stirring frequently until melted and combined into a creamy frosting.
Step 6: Mix Frosting Base
Combine the melted peanut butter mixture with cornstarch, stirring gently until just mixed. This gives the frosting body and thickness.
Step 7: Adjust Frosting Consistency
Slowly add hot water, one tablespoon at a time, until the frosting reaches your desired consistency. Thinner frosting works well for smooth coats, whereas thicker makes for decorative piping.
Step 8: Decorate the Treats
Load your frosting into a piping bag and create fun designs on each treat. This is where you can get creative and add a personal touch that makes these treats extra special.
Step 9: Add a Final Frosting Layer
For an irresistible finish, brush on a thin layer of the peanut butter and honey mixture over the frosting. This seals in moisture and amps up the flavor profile to a new level of deliciousness for your pup.
How to Serve Homemade Peanut Butter Dog Treats Recipe
Garnishes
A little garnish can make these treats look as good as they taste. Consider sprinkling finely chopped parsley or a tiny bit of turmeric on top for an extra health boost and a pop of color that’s safe for dogs.
Side Dishes
While these peanut butter dog treats work perfectly as standalone snacks, pairing them with a small dollop of plain yogurt or mashed banana can create a delightful treat platter for your dog, especially on special occasions.
Creative Ways to Present
Present these treats in a cute mason jar tied with a ribbon or pack them in themed doggy gift boxes as charming gifts for fellow dog lovers. Using colorful piping adds a whimsical touch that makes each treat a miniature work of art.
Make Ahead and Storage
Storing Leftovers
Your homemade dog treats will keep well in an airtight container at room temperature for about a week. This keeps the texture just right while maintaining freshness. For longer storage, the fridge is a good option.
Freezing
To make batches ahead, freeze the treats in a sealed container or freezer bag for up to three months. Thawing them at room temperature before serving ensures your dog gets maximum yumminess.
Reheating
Reheat frozen or refrigerated treats gently in a warm oven for a few minutes to bring back their inviting aroma and soft texture, but avoid microwaving as it might overheat and degrade the peanut butter taste.
FAQs
Can I use any type of peanut butter for this recipe?
Choose natural peanut butter with no added sweeteners, salt, or xylitol, which can be toxic to dogs. Look for simple ingredients to keep your treats safe and healthy.
Are these treats suitable for puppies?
Yes, but always check with your vet first, especially for young puppies with dietary sensitivities. The ingredients are wholesome, but moderation is key until you know how your pup reacts.
Can I substitute the whole wheat flour?
Whole wheat flour offers fiber and structure, but you can experiment with oat or rice flour for dogs sensitive to gluten. Keep in mind that texture may vary slightly.
How long do these treats last?
Stored properly, they last about a week at room temperature and up to three months frozen. Always check for mold or off smells before giving them to your dog.
Can I add other flavors or ingredients?
Absolutely! Small amounts of pumpkin puree, grated carrots, or blueberries can add extra nutrition and interest. Just avoid ingredients toxic to dogs such as onion, garlic, or chocolate.
Final Thoughts
Making this Homemade Peanut Butter Dog Treats Recipe is such a rewarding way to spoil your furry friend with wholesome, homemade goodness. It’s easy, fun, and a sweet bonding experience that shows your pet just how much you care. Give it a try soon and watch those tails wag with pure delight!
Print
Homemade Peanut Butter Dog Treats Recipe
- Prep Time: 15 minutes
- Cook Time: 30 minutes
- Total Time: 45 minutes
- Yield: 24 treats
- Category: Pet Treats
- Method: Baking
- Cuisine: American
Description
These Homemade Peanut Butter Dog Treats are a healthy and delicious snack for your furry friend, made with wholesome ingredients like whole wheat flour, peanut butter, and honey. Easy to prepare and bake, they feature a fun frosting made from peanut butter and honey, perfect for adding a special touch to each treat. With simple steps and natural ingredients, these treats are a great way to show your dog some love.
Ingredients
Dough Ingredients
- 2½ cups whole wheat flour (300 grams)
- 1 large egg (50 grams)
- 1 cup peanut butter (270 grams)
- 1 cup water (227 grams)
- 2 tablespoons honey (43 grams)
Frosting Ingredients
- 2 tablespoons peanut butter (34 grams)
- 1 tablespoon honey (21 grams)
- ⅓ cup cornstarch (37 grams)
- 3–4 tablespoons hot water (43–57 grams)
Instructions
- Preheat Oven: Preheat your oven to 350°F (175°C). Line a baking sheet with parchment paper to prevent the treats from sticking.
- Prepare Dough: In a large bowl, combine the whole wheat flour and egg. Add the peanut butter, water, and honey, stirring until you form a stiff, very firm, and sticky dough. You may need to use your hands or a mixer with paddle attachment to incorporate the ingredients well.
- Roll and Cut Dough: Lightly flour your surface and roll out the dough to about ½-inch thickness. Use cookie cutters to cut the dough into fun shapes. Since these treats barely spread or rise, feel free to get creative with your designs.
- Bake Treats: Place the shaped dough onto the prepared baking sheet and bake for 18-20 minutes or until the treats turn golden. Adjust baking time for smaller cookies to prevent burning on the bottoms. Remove from oven and allow to cool completely.
- Make Frosting Base: In a microwavable bowl, combine 2 tablespoons peanut butter and 1 tablespoon honey. Heat in 15-second intervals in the microwave, stirring between each, until the mixture is melted and smooth.
- Combine Frosting Mixture: Add the melted peanut butter and honey mixture to the cornstarch in a bowl and stir until just combined.
- Adjust Frosting Consistency: Gradually add hot water, one tablespoon at a time, stirring until you achieve the desired piping consistency. Add more water for a thinner frosting if needed.
- Pipe Designs: Transfer the frosting into a piping bag and decorate each cooled dog treat with your desired designs.
- Optional Extra Frosting: For an even more tempting treat, frost the tops of the treats with the peanut butter and honey mixture before serving to your dog.
Notes
- Whole wheat flour adds fiber and nutrients but can be substituted with oat or rice flour for dogs with sensitivities.
- Ensure the peanut butter does not contain xylitol, which is toxic to dogs.
- These treats should be stored in an airtight container and can be refrigerated to maintain freshness longer.
- Adjust the size of the treats based on your dog’s size and chewing ability.
- Always consult your vet before introducing new treats into your dog’s diet, especially if they have allergies or health conditions.


