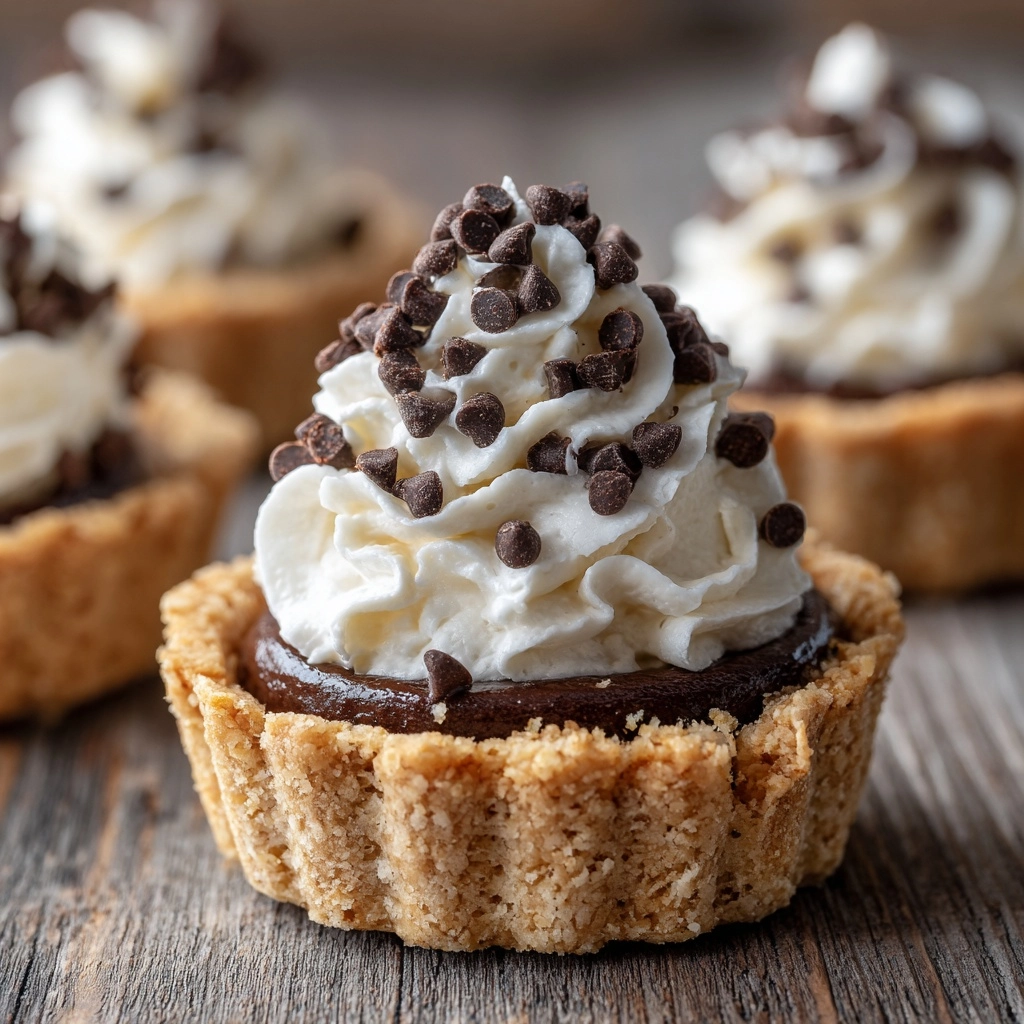
Imagine the classic Sicilian cannoli, beloved for its crisp shell and creamy ricotta filling, transformed into a playful, bite-sized treat—welcome to Cannoli Cookie Cups! These delightful morsels combine the soft, chewy goodness of chocolate chip cookies with a luscious mascarpone-ricotta filling, all dusted in a flutter of powdered sugar. They’re festive enough for a celebration, easy enough for a weeknight craving, and just plain fun to make. If you adore the fusion of Italian tradition and crowd-pleasing cookies, Cannoli Cookie Cups are about to become a regular fixture in your dessert rotation.
Ingredients You’ll Need
One of the best things about Cannoli Cookie Cups is how each simple ingredient builds layers of flavor and texture. Every element has a purpose—from the creamy cheeses to the melty chocolate chips—ensuring every bite is irresistibly good.
- All-purpose flour: Provides the perfect structure for the cookie cups, ensuring they hold their charming shape.
- Baking soda: Gives a slight lift, resulting in a tender, chewy cookie bite.
- Salt: Just a pinch enhances every other flavor and balances the sweetness.
- Unsalted butter (softened): Adds rich, creamy flavor and a soft, luscious texture to the cookie.
- Granulated sugar: Delivers classic sweetness and helps create those coveted crisp edges.
- Brown sugar: Introduces a hint of caramel depth and makes the cookies wonderfully moist.
- Large egg: Binds everything together and adds a touch of richness.
- Vanilla extract: Pops the flavor and brings comforting warmth to both the dough and the filling.
- Mini chocolate chips: Scattered through the dough and filling, these ensure chocolatey bliss in every mouthful.
- Ricotta cheese (well-drained): The star of the filling, bringing smooth, delicate creaminess—draining well is key!
- Mascarpone cheese: Adds velvety texture and subtle richness, making your filling undeniably luscious.
- Powdered sugar: Sweetens the filling and forms a beautiful dusting on top, just like a real cannoli.
- Cinnamon: A whisper of spice to evoke those classic Italian bakery notes.
- Powdered sugar (for dusting): The final snowy touch that makes each cup oh-so-inviting.
How to Make Cannoli Cookie Cups
Step 1: Prepare the Dough
Start by whisking your flour, baking soda, and salt together. This simple step keeps everything evenly distributed and guarantees perfectly risen, flavorful cookie cups. Next, cream softened butter with both sugars in a separate bowl until the mixture turns light and fluffy—it’s worth the extra minute! Blend in the egg and vanilla extract for a tender, aromatic dough. Gradually add your dry mixture to the wet ingredients, mixing just until combined. A generous handful of mini chocolate chips adds a touch of decadence to every bite.
Step 2: Shape and Bake the Cookie Cups
Grab your mini muffin tin and grease it lightly—think of it as prepping individual little cookie molds. Roll your dough into one-inch balls and nestle each into a muffin cup, gently pressing the dough up the sides to form a well. After a quick bake at 350°F for 10 to 12 minutes, the cookie cups will turn golden brown and begin to smell irresistible. Use the back of a spoon to carefully press down the centers while they’re still warm, creating perfect pockets for the luscious filling.
Step 3: Cool the Cookie Cups
Let the freshly baked cookie cups cool in the pan for about 10 minutes. This brief rest helps them hold their form and makes them super easy to transfer. Then, move them to a wire rack to cool completely. Resist the urge to fill warm cups—the secret to a velvety filling is a cool, stable base!
Step 4: Create the Cannoli Filling
While your cups are cooling, it’s time for the showstopper: that creamy, dreamy cannoli center. Whip together well-drained ricotta, mascarpone, powdered sugar, a splash of vanilla, and cinnamon until smooth and indulgent. Fold in more mini chocolate chips for bursts of flavor with every bite. This filling can be made ahead, letting the flavors mingle and deepen in the fridge.
Step 5: Fill and Finish the Cups
Spoon or pipe the cannoli filling generously into each cooled cookie cup. For a bakery-worthy finish, dust with powdered sugar. And as a bonus, a few extra mini chocolate chips, pistachios, or even chocolate shavings on top add visual flair and irresistible crunch.
How to Serve Cannoli Cookie Cups

Garnishes
For a festive touch, try sprinkling the tops with more mini chocolate chips, jewel-green chopped pistachios, or chocolate shavings. A final dusting of powdered sugar is a must—it transforms Cannoli Cookie Cups from everyday treat to showstopping dessert.
Side Dishes
These treats are fabulous with a little something to sip. Serve Cannoli Cookie Cups alongside espresso, cappuccino, or a sweet dessert wine like Moscato for an authentic Italian-inspired finale. A scoop of vanilla gelato also makes a dreamy pairing!
Creative Ways to Present
Try stacking the Cannoli Cookie Cups on a tiered dessert platter for a party, or nestle them in colorful cupcake liners for a playful look at potlucks and bake sales. You could even arrange them in mini paper cups and hand them out as party favors—everyone loves a pocket-sized cannoli!
Make Ahead and Storage
Storing Leftovers
Keep any leftover Cannoli Cookie Cups in an airtight container in the fridge for up to three days. The cookie base remains surprisingly crisp, and the filling stays cool and creamy. It’s best to hold off dusting with powdered sugar until just before serving to keep things looking fresh.
Freezing
To freeze, store just the cookie cups—unfilled—in a sealed container for up to two months. Simply defrost at room temperature when ready and fill with the cannoli cream before serving. Freezing the filling isn’t ideal, as ricotta and mascarpone can change texture once thawed.
Reheating
There’s really no need to reheat Cannoli Cookie Cups, but if you want to refresh the plain cups, pop them in a 300°F oven for about 3 minutes. Let them cool before adding the filling to preserve that smooth, creamy texture.
FAQs
Can I make Cannoli Cookie Cups in advance?
Absolutely! You can bake the cookie cups and prepare the filling a day ahead. Store the cups at room temperature and refrigerate the filling separately. When you’re ready to serve, fill and dust with powdered sugar for fresh, bakery-fresh results.
What’s the secret to a thick, creamy filling?
The most important tip is to drain the ricotta cheese very well—let it sit in a fine mesh strainer or cheesecloth to remove any excess moisture. The drier your ricotta, the thicker and creamier your cannoli center will be!
Can I substitute the mascarpone cheese?
If you don’t have mascarpone, you can use cream cheese for a slightly tangier filling. Just let it soften at room temperature first, and your Cannoli Cookie Cups will still taste absolutely delicious.
How should I store leftovers with the filling?
Store filled Cannoli Cookie Cups in a single layer in the fridge. Just be sure to enjoy within a couple of days for the best balance of cookie crunch and creamy filling.
Can I add other mix-ins to the filling?
Definitely! Finely chopped candied orange peel, roasted nuts, or even a splash of espresso powder can add a fun twist. Cannoli Cookie Cups are endlessly customizable to suit your favorite flavors.
Final Thoughts
Few desserts strike the perfect balance of playful and sophisticated like these Cannoli Cookie Cups. They’re easy to whip up, perfectly portioned for sharing, and always make a big impression. I hope you’ll give them a try—one bite, and they might just become your new favorite way to enjoy all the charm of cannoli!