Description
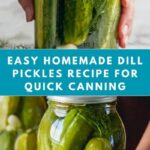
This Canned Dill Pickle recipe yields crisp, tangy pickles that are perfect for snacking or adding a flavorful crunch to your sandwiches. Using fresh dill, garlic, and optional horseradish root, these pickles are brined in a vinegar-based solution and canned in quart-sized jars for long-term storage. The process involves boiling the brine to infuse flavors and using a water bath canning method to preserve freshness and safety.
Ingredients
Scale
Spices and Flavorings
- 6 bay leaves (1 per jar)
- 1/2 Tbsp whole peppercorns (about 5 per jar)
- 6 dill stems with flowers, cut into 3″ pieces (1 full stem per jar)
- 12 garlic cloves, halved (2 cloves per jar)
- 2-inch horseradish root, chopped and divided (optional but nice)
Pickling Ingredients
- 6 lbs small cucumbers, well rinsed and ends trimmed
- 8 cups water
- 1/3 cup granulated sugar
- 6 Tbsp pickling salt (or 1/3 cup)
- 6 cups distilled white vinegar (5% acidity)
Equipment
- 6 quart-sized wide-mouth mason jars with rings and new lids
- 1 large stock pot (20 Qt or larger) with rack or canner
- 1 jar lifter to safely transfer the jars
Instructions
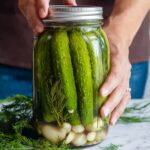
- Prepare Cucumbers and Jars: Rinse the cucumbers thoroughly and trim the ends. Ensure your quart-sized mason jars, rings, and lids are clean and sterilized. Set aside the dill stems, bay leaves, garlic cloves (halved), and horseradish root if using.
- Fill Jars with Flavorings and Cucumbers: Into each jar, place 1 bay leaf, about 5 peppercorns, 1 dill stem with flowers, 2 halved garlic cloves, and a piece of horseradish root if desired. Pack the cucumbers tightly into each jar but avoid crushing them.
- Make the Brine: In a large stockpot, combine 8 cups water, 1/3 cup granulated sugar, 6 Tbsp pickling salt, and 6 cups distilled white vinegar. Bring the mixture to a boil, stirring until sugar and salt dissolve completely.
- Fill the Jars with Brine: Carefully ladle the hot brine over the cucumbers in each jar, leaving about 1/2 inch headspace at the top. Remove any air bubbles by gently tapping the jars or using a non-metallic utensil. Wipe the rims clean to ensure a good seal.
- Seal the Jars: Place new lids on the jars and screw on the rings until fingertip tight—do not over-tighten.
- Process in Boiling Water Bath: Place jars in the large stockpot with rack, ensuring they are covered by at least 1 inch of water. Bring water to a boil and process the jars for 15 minutes to preserve and seal them safely.
- Cool and Store: Using a jar lifter, carefully remove the jars and place on a towel or cooling rack. Let them cool undisturbed for 12-24 hours. Check the seal—lids should not flex up and down when pressed. Store in a cool, dark place. Pickles improve in flavor after about 1-2 weeks.
Notes
- Use fresh, firm cucumbers that are small and suitable for pickling to ensure crispness.
- Adding horseradish root is optional but adds a nice spicy flavor and helps maintain crunch.
- Ensure vinegar used is 5% acidity for safe pickling.
- Do not skip the boiling water bath process to avoid spoilage and ensure shelf stability.
- Let pickles sit for at least 1-2 weeks before eating for best flavor development.
- Store sealed jars in a cool, dark place; refrigeration after opening is recommended.