
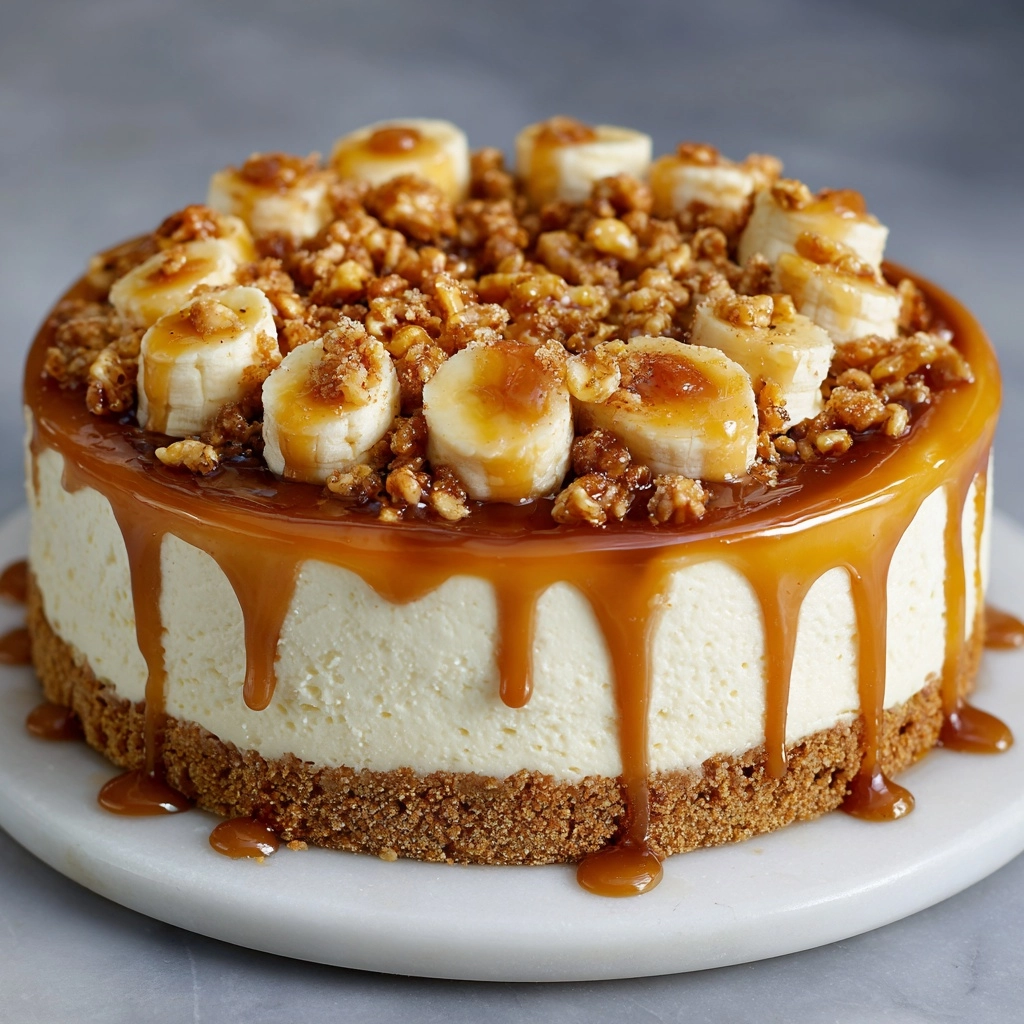
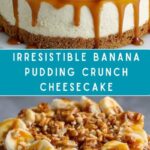
If you’re searching for a show-stopping dessert that brings together the nostalgic flavors of banana pudding and the creamy decadence of cheesecake, look no further than Banana Pudding Crunch Cheesecake. This ultimate fusion recipe layers a buttery vanilla wafer crust, rich banana-infused cheesecake, and clouds of whipped cream, all crowned with crunchy cookies and fresh banana slices. It’s the kind of treat that wows a crowd, makes any occasion feel special, and might just become your new go-to favorite.
Ingredients You’ll Need
Ingredients You’ll Need
Each ingredient in this Banana Pudding Crunch Cheesecake recipe is carefully chosen to bring out the best creamy, crunchy, and fruity elements, and you’ll appreciate how straightforward yet essential these staples are. Grab these from your pantry and fridge for a homemade dessert that truly tastes professional.
- Vanilla wafer crumbs: They’re the secret to a sweet, crunchy, and nostalgic crust that pairs perfectly with the filling.
- Granulated sugar: Used in both the crust and the cheesecake for perfectly balanced sweetness in every bite.
- Unsalted butter (melted): Binds the crumbs together into the base and adds a luscious, buttery flavor.
- Cream cheese (softened): The star of the show! Its rich, tangy creaminess creates that classic cheesecake texture.
- Eggs: Essential for structure and richness, helping to set the cheesecake beautifully.
- Vanilla extract: Just a teaspoon adds fragrant depth to every layer.
- Instant banana cream pudding mix: Brings the banana pudding element front and center with unbeatable flavor and smoothness.
- Sour cream: Adds tang and a silky finish, balancing out all the sweetness.
- Heavy whipping cream: Whips up light and fluffy to make a dreamy topping.
- Powdered sugar: Sweetens the whipped cream for a cloud-like finish.
- Bananas (sliced): The fresh, fruity highlight of the dessert—slice right before serving for best results.
- Crushed vanilla wafers: For a delightful, crunchy finish on top, adding even more cookie goodness.
- Whipped cream (for topping): The final flourish, giving the cheesecake a light, luxurious look and taste.
How to Make Banana Pudding Crunch Cheesecake
Step 1: Make the Vanilla Wafer Crust
Begin by preheating your oven to 325°F. In a medium bowl, combine the vanilla wafer crumbs, 1/2 cup granulated sugar, and melted butter. Stir until the mixture is evenly moistened—this is what gives you that signature cookie crunch. Press it firmly into the bottom of a 9-inch springform pan, making sure the crust is even. Bake for 10 minutes to set it, then pull it out and let it cool while you whip up the filling.
Step 2: Prepare the Cheesecake Filling
In a large bowl, beat the softened cream cheese with 1 cup of granulated sugar until it’s totally smooth—no lumps allowed. Add the eggs, one at a time, mixing just enough to incorporate each before moving on. Stir in the vanilla extract and the instant banana cream pudding mix, then blend in the sour cream. The result is a creamy, banana-scented batter that smells absolutely divine.
Step 3: Bake the Cheesecake
Gently pour the batter over your cooled crust and even it out with a spatula. Slide the pan into the oven and bake for 55 to 60 minutes. You’re looking for the center to be just set (it should still jiggle slightly). Once done, turn off the oven, crack open the door, and let the cheesecake cool inside for 1 hour. This slow cooling is the secret to a crack-free top!
Step 4: Chill Thoroughly
Once the cheesecake has cooled in the oven, remove it and pop it in the refrigerator for at least 4 hours, or (even better) overnight. This allows the flavors to meld and the texture to firm up, so your Banana Pudding Crunch Cheesecake slices up beautifully.
Step 5: Whip and Top
When you’re close to serving, beat the heavy cream with powdered sugar in a chilled bowl until you get stiff peaks. Dollop or spread this over your chilled cheesecake, then bring on the fun: artfully scatter banana slices, sprinkle crushed vanilla wafers, and add extra whipped cream if you’re feeling indulgent. If you want those bananas picture-perfect, add them right before serving to keep them from browning.
How to Serve Banana Pudding Crunch Cheesecake
Garnishes
With all those creamy, crunchy, and fruity elements, this cheesecake is practically begging for playful garnishes. Crown each slice with a flourish of whipped cream piping, a sprinkle of crushed vanilla wafers, and a few artfully arranged banana slices. A drizzle of caramel or chocolate sauce brings another level of decadence if you’re feeling fancy and want to dazzle your guests.
Side Dishes
Banana Pudding Crunch Cheesecake stands beautifully on its own, but pairing it with a refreshing side can enhance the experience. Consider serving it alongside a bowl of fresh mixed berries or a simple fruit salad for a burst of color and tartness that contrasts the cheesecake’s richness. A cup of coffee or glass of cold milk is always a comforting companion.
Creative Ways to Present
If you want your Banana Pudding Crunch Cheesecake to really steal the show, try serving it in individual parfait cups or mason jars for a fun, portable twist. Another show-stopper is to lay out a cheesecake bar, with toppings like toasted coconut, mini chocolate chips, or chopped nuts so guests can create their own topping masterpiece. Or, slice the cheesecake into bite-size squares for charming party-ready treats.
Make Ahead and Storage
Storing Leftovers
Don’t worry if you can’t finish every last crumb! This cheesecake holds up wonderfully in the fridge, tightly covered, for up to 3 days. Just make sure to add fresh banana slices right before serving, since bananas are best enjoyed when they’re newly sliced and at their brightest.
Freezing
Banana Pudding Crunch Cheesecake freezes like a dream if you want to make it ahead for a big occasion. For best results, freeze without toppings or fresh bananas: wrap the cheesecake tightly in plastic wrap and then in foil, and store for up to 2 months. Thaw overnight in the fridge, then decorate just before enjoying.
Reheating
This dessert is meant to be enjoyed chilled, so there’s no need to reheat. If you’ve frozen your cheesecake, simply allow it to thaw gently in the refrigerator overnight. It’ll be just as creamy and crave-worthy as the day you made it.
FAQs
Can I use graham crackers instead of vanilla wafers for the crust?
Absolutely! While vanilla wafers add that classic banana pudding nostalgia, graham cracker crumbs will also work beautifully and provide a slight honey flavor. Just swap them in at a 1:1 ratio.
Will the bananas turn brown if I add them too early?
Yes, bananas will start to brown after a little while when exposed to air. For the freshest look and taste, slice and arrange the bananas just before serving your Banana Pudding Crunch Cheesecake.
Can I make this dessert gluten-free?
You sure can! Just use gluten-free vanilla wafer cookies or graham crackers for the crust and topping. Make sure your pudding mix and all other ingredients are gluten-free, and the rest follows just the same.
Do I have to use a springform pan?
A springform pan really makes it easier to release and serve the cheesecake with those beautiful, clean slices. If you don’t have one, you can use a deep pie dish or a regular cake pan lined with parchment, but serving might be a bit trickier.
What’s the best way to slice and serve this cheesecake?
For picture-perfect slices, use a long, sharp knife dipped in hot water and wiped dry before each cut. Wipe the knife clean between slices for a neat presentation—your Banana Pudding Crunch Cheesecake will look as good as it tastes!
Final Thoughts
If you love bananas, cheesecake, or just desserts that turn heads at every gathering, this Banana Pudding Crunch Cheesecake is your dream come true. It’s the treat everyone will beg you to make again and again—so go ahead, gather those simple ingredients, and spread a little joy, one creamy, crunchy bite at a time!
Print
Banana Pudding Crunch Cheesecake Recipe
- Prep Time: 25 minutes
- Cook Time: 1 hour
- Total Time: 5 hours 30 minutes (including cooling and chilling)
- Yield: 12 servings
- Category: Dessert
- Method: Baking
- Cuisine: American
- Diet: Vegetarian
Description
Indulge in the perfect fusion of creamy cheesecake and classic banana pudding with this Banana Pudding Crunch Cheesecake recipe. A decadent dessert that combines the best of both worlds!
Ingredients
For the Crust:
- 2 cups vanilla wafer crumbs
- 1/2 cup granulated sugar
- 1/2 cup unsalted butter, melted
For the Cheesecake:
- 3 packages (8 oz each) cream cheese, softened
- 1 cup granulated sugar
- 3 large eggs
- 1 teaspoon vanilla extract
- 1 package (3.4 oz) instant banana cream pudding mix
- 1 cup sour cream
For the Topping:
- 1 cup heavy whipping cream
- 1/4 cup powdered sugar
- 2 bananas, sliced
- 1 cup crushed vanilla wafers
- Whipped cream for topping
Instructions
- Preheat oven and prepare crust: Preheat oven to 325°F. Mix vanilla wafer crumbs, sugar, and melted butter. Press into a springform pan and bake.
- Prepare cheesecake batter: Beat cream cheese and sugar, add eggs one at a time, then add vanilla and banana pudding mix. Mix in sour cream and pour over crust.
- Bake and cool: Bake cheesecake until set, then cool in the oven. Refrigerate for at least 4 hours.
- Whip cream and assemble: Whip heavy cream with powdered sugar until stiff peaks form. Spread over cheesecake and top with bananas, wafers, and additional whipped cream.
- Serve: Chill cheesecake and enjoy!
Notes
- Add bananas just before serving to prevent browning.
- Store leftovers in the refrigerator for up to 3 days.
- Substitute graham crackers for vanilla wafers if desired.
Nutrition
- Serving Size: 1 slice
- Calories: 480
- Sugar: 34 g
- Sodium: 310 mg
- Fat: 30 g
- Saturated Fat: 16 g
- Unsaturated Fat: 11 g
- Trans Fat: 0 g
- Carbohydrates: 46 g
- Fiber: 1 g
- Protein: 6 g
- Cholesterol: 110 mg