
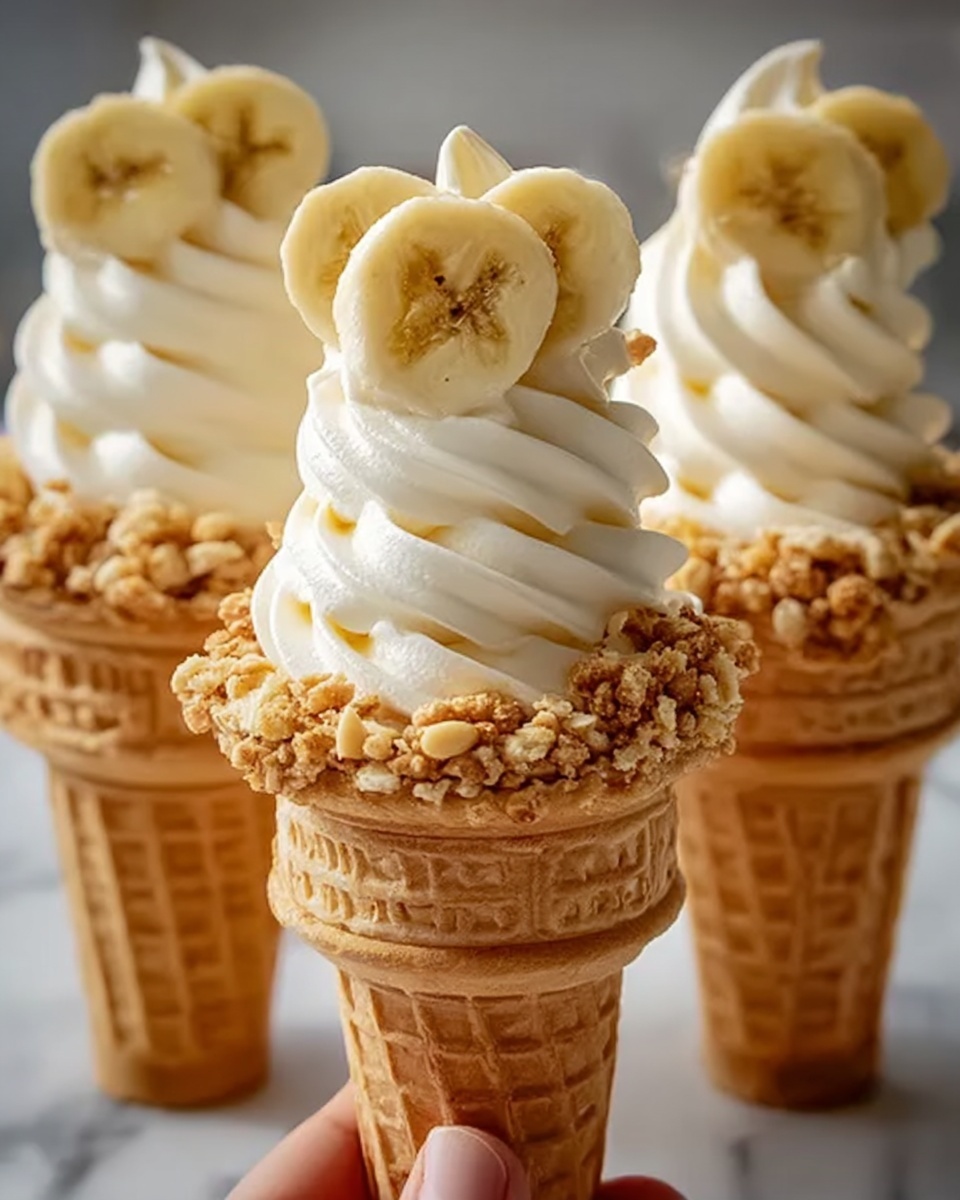
If you’re searching for a fun, crowd-pleasing dessert that’s both creamy and delightfully nostalgic, this Banana Pudding Cheesecake Cones Recipe is exactly what you need. Combining the rich tang of cheesecake with the sweet comfort of banana pudding, stuffed into crunchy cones, it’s a playful and portable treat that brings a smile with every bite. Whether it’s for a casual get-together or a special occasion, these cones strike the perfect balance of texture and flavor that’s sure to become an instant favorite.
Ingredients You’ll Need
The beauty of this Banana Pudding Cheesecake Cones Recipe lies in its simplicity. With just a handful of ingredients, each plays a special role—from the creamy cheesecake base to the crisp cones that hold everything together, making this dessert as easy to prepare as it is to enjoy.
- 6 sugar cones or waffle cones: These act as the crunchy, handheld vessel for the luscious filling.
- 1 (8 oz) package cream cheese, softened: Offers a smooth, rich foundation that gives the filling its creamy cheesecake texture.
- 1 (3.4 oz) package instant banana cream pudding mix: Infuses the dessert with that classic banana flavor and smoothness.
- 1 cup cold milk: Essential to dissolve the pudding mix and create a fluffy, pudding-like consistency.
- 1 cup whipped topping (e.g., Cool Whip): Lightens the mixture, adding airy softness that makes every bite melt in your mouth.
- ½ cup crushed vanilla wafers: Provides a sweet, crunchy topping that complements the creamy filling.
- 1 banana, sliced (optional, for garnish): Fresh slices add a natural fruity touch and pretty presentation.
- 1 tablespoon powdered sugar (optional): Adds a subtle sweet boost without overpowering flavors.
- ½ teaspoon vanilla extract (optional): Enhances the overall flavor with warm, aromatic notes.
How to Make Banana Pudding Cheesecake Cones Recipe
Step 1: Create the Creamy Base
Start by beating your softened cream cheese together with the instant banana cream pudding mix until you have a super smooth mixture. This step is crucial because it combines the tangy richness of cheesecake with that unmistakable banana cream taste, setting the stage for the rest of your dessert.
Step 2: Make it Fluffy with Milk
Slowly pour in the cold milk while continuing to beat the mixture. You’re aiming for a light, fluffy pudding-like texture here, so take your time to get it just right. This addition ensures the filling is creamy without being dense.
Step 3: Fold in the Whipped Topping
Gently fold in the whipped topping using a spatula to keep the filling airy and soft. This step transforms the filling into a dreamy, cloud-like consistency that will delight your taste buds and offer a wonderful contrast to the crunchy cones.
Step 4: Add Flavor Enhancements (Optional)
If you want to dial up the sweetness and complexity, now’s the time to stir in powdered sugar and vanilla extract. These extras make the flavor more rounded and irresistible, but even without them, the recipe delivers plenty of deliciousness.
Step 5: Prepare for Filling
Transfer your luscious filling into a piping bag or a zip-top bag with the corner snipped off. This makes filling the cones neat and easy, letting you swirl beautiful layers just like soft-serve ice cream.
Step 6: Fill the Cones
Pipe the creamy mixture into each cone, starting from the bottom so every bite has that perfect balance of filling and crunch. Swirl the top generously to create an enticing soft-serve look that’s super inviting.
Step 7: Add the Crunchy Topping
Sprinkle crushed vanilla wafers on top of each cone. This little touch adds texture and a hint of nostalgic sweetness—remember banana pudding with vanilla wafers? This topping seals the deal beautifully.
Step 8: Garnish and Serve
For an extra touch, adorn each cone with fresh banana slices. It’s a lovely pop of color and reinforces the banana flavor, perfect if you’ll be serving the cones immediately. Now, dig in and enjoy the delightful combination of creamy, crunchy, and fruity.
How to Serve Banana Pudding Cheesecake Cones Recipe

Garnishes
Enhancing these cones is fun and effortless. Fresh banana slices add a juicy sweetness and a pretty flourish, while a light dusting of powdered sugar offers a delicate sparkle. You can even try mini chocolate chips or a drizzle of caramel sauce for an indulgent twist that pairs surprisingly well with the banana cheesecake flavors.
Side Dishes
Serve these cones alongside a cold glass of milk or a cup of lightly brewed coffee for a comforting snack or dessert pairing. For a summer gathering, they’re perfect with fresh fruit salads or light, citrusy beverages that balance the dessert’s richness.
Creative Ways to Present
Elevate your Banana Pudding Cheesecake Cones Recipe presentation by placing them in decorative cone holders or inside small flower pots lined with parchment paper for a whimsical touch. You can also set up a DIY dessert station where friends and family pipe their own fillings and add toppings to make it interactive and fun.
Make Ahead and Storage
Storing Leftovers
If you have leftovers, keep the cones refrigerated in an airtight container to preserve freshness. Because the cones might soften over time, it’s best to enjoy them within a day or two for the ideal crunch and creamy texture.
Freezing
Freezing banana pudding cheesecake cones is not recommended because the cones will likely become soggy and lose their crispness. The creamy filling’s texture also changes after freezing, so it’s best to prepare and consume fresh.
Reheating
Since this is a cold dessert, reheating isn’t necessary. Simply let refrigerated cones sit at room temperature for a few minutes before serving to get the cream filling to a perfect softness if desired.
FAQs
Can I use regular pudding instead of instant banana pudding mix?
Instant pudding mix works best for this recipe as it sets quickly and holds the creamy texture needed to fill the cones perfectly. Regular pudding usually requires cooking and might alter the consistency and ease of assembly.
What can I substitute for whipped topping?
You can whip heavy cream until stiff peaks form for a homemade alternative. This adds a fresh, rich dimension but be sure to fold it in gently to keep the light texture.
Can I make these ahead of time for a party?
You can prepare the filling a day ahead and store it refrigerated. However, pipe the filling into the cones just before serving to maintain the cones’ crunch and freshness.
Are waffle cones better than sugar cones?
Both work wonderfully! Waffle cones are a bit sturdier and have a more buttery flavor, while sugar cones are lighter. Choose based on your texture preference or what you have on hand.
How do I keep the bananas from browning on top?
To prevent browning, toss the banana slices with a bit of lemon juice before placing them on the cones. This adds a slight tartness while keeping the fruit visually appealing longer.
Final Thoughts
I can honestly say that making the Banana Pudding Cheesecake Cones Recipe instantly brightens any dessert table and brings a burst of happiness with every bite. It’s an easy, creative twist on classic flavors that anyone can whip up quickly and share joyfully. Give it a try and watch how quickly these cones become your new go-to treat for gatherings and cozy nights in!
Print
Banana Pudding Cheesecake Cones Recipe
- Prep Time: 15 minutes
- Cook Time: 0 minutes
- Total Time: 15 minutes
- Yield: 6 cones
- Category: Dessert
- Method: No-Cook
- Cuisine: American
- Diet: Vegetarian
Description
Banana Pudding Cheesecake Cones are a delightful and creamy dessert that combines the smooth richness of cream cheese with the sweet, fruity flavor of instant banana pudding. Served in crunchy sugar or waffle cones, these cones make a fun and shareable treat perfect for parties, gatherings, or a simple indulgence at home. The dessert requires no baking and comes together quickly with easy-to-find ingredients.
Ingredients
Cones
- 6 sugar cones or waffle cones
Filling
- 1 (8 oz) package cream cheese, softened
- 1 (3.4 oz) package instant banana cream pudding mix
- 1 cup cold milk
- 1 cup whipped topping (e.g., Cool Whip)
- ½ cup crushed vanilla wafers
- 1 tablespoon powdered sugar (optional)
- ½ teaspoon vanilla extract (optional)
Garnish
- 1 banana, sliced (optional, for garnish)
Instructions
- Prepare the Cream Cheese Mixture: In a large bowl, beat the softened cream cheese and banana pudding mix using a hand mixer until smooth and creamy.
- Add Milk Slowly: Gradually pour in the cold milk while continuing to mix until the mixture is fluffy and has a pudding-like consistency.
- Fold in Whipped Topping: Gently fold the whipped topping into the mixture using a spatula to maintain an airy texture without deflating.
- Add Optional Flavorings: If desired, incorporate the powdered sugar and vanilla extract for additional sweetness and enhanced flavor, stirring gently.
- Prepare for Filling: Transfer the creamy filling into a piping bag or a zip-top plastic bag with the tip cut off for easy filling of the cones.
- Fill the Cones: Pipe the mixture into each cone, starting from the bottom and filling upwards, then swirl the top to resemble soft-serve ice cream.
- Add Crushed Vanilla Wafers: Sprinkle crushed vanilla wafers on top of each filled cone for texture and flavor contrast.
- Garnish and Serve: Optionally garnish with banana slices if serving immediately. Serve right away and enjoy this creamy and crunchy dessert.
Notes
- Use cold milk to help achieve a fluffy pudding consistency.
- Folding in the whipped topping gently keeps the dessert light and airy.
- For firmer cones, chill them briefly before filling.
- You can substitute sugar cones with waffle cones based on preference.
- This dessert is best served immediately to maintain the cone’s crispness but can be refrigerated for up to 2 hours if needed.
- Optional vanilla extract and powdered sugar enhance the flavor but can be omitted for a less sweet version.

