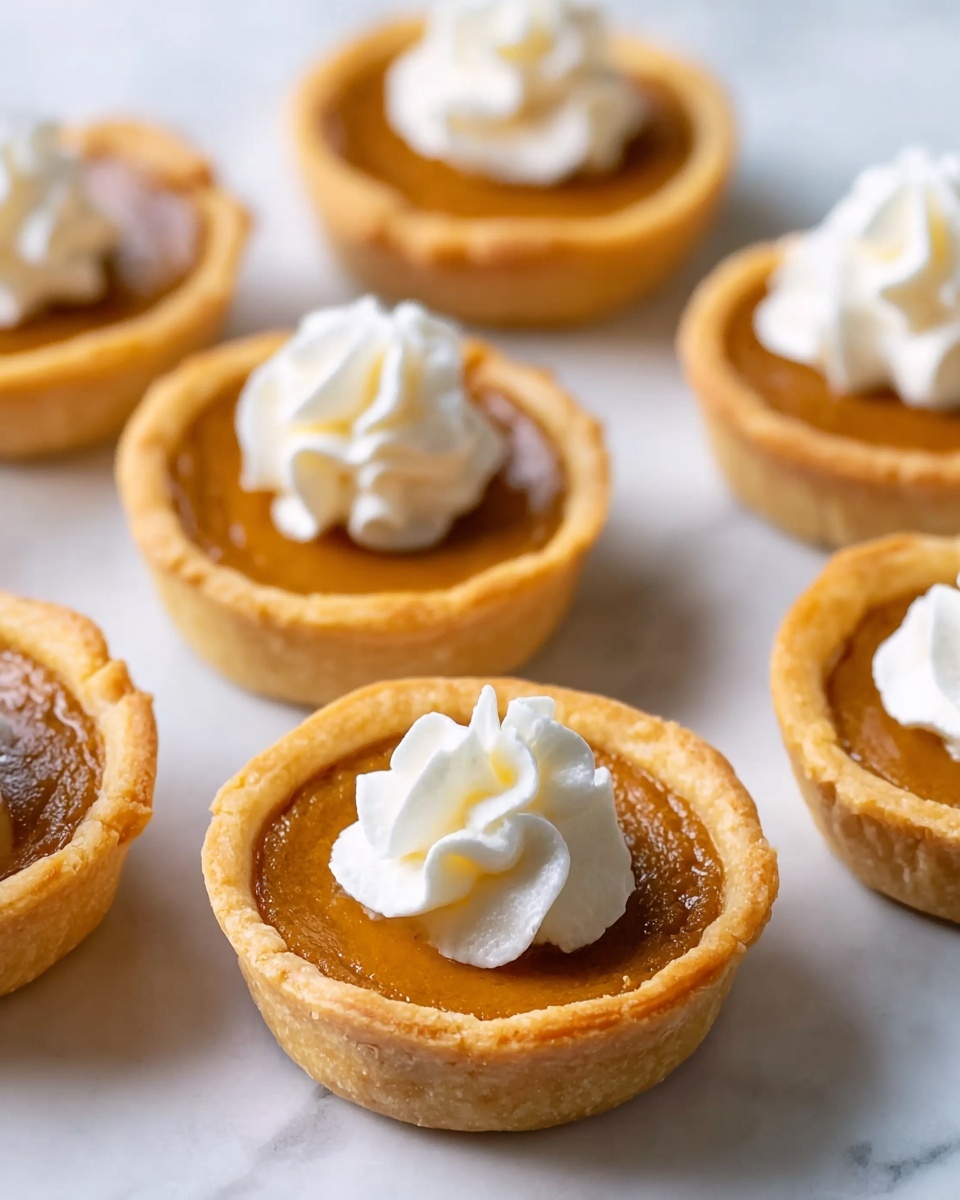
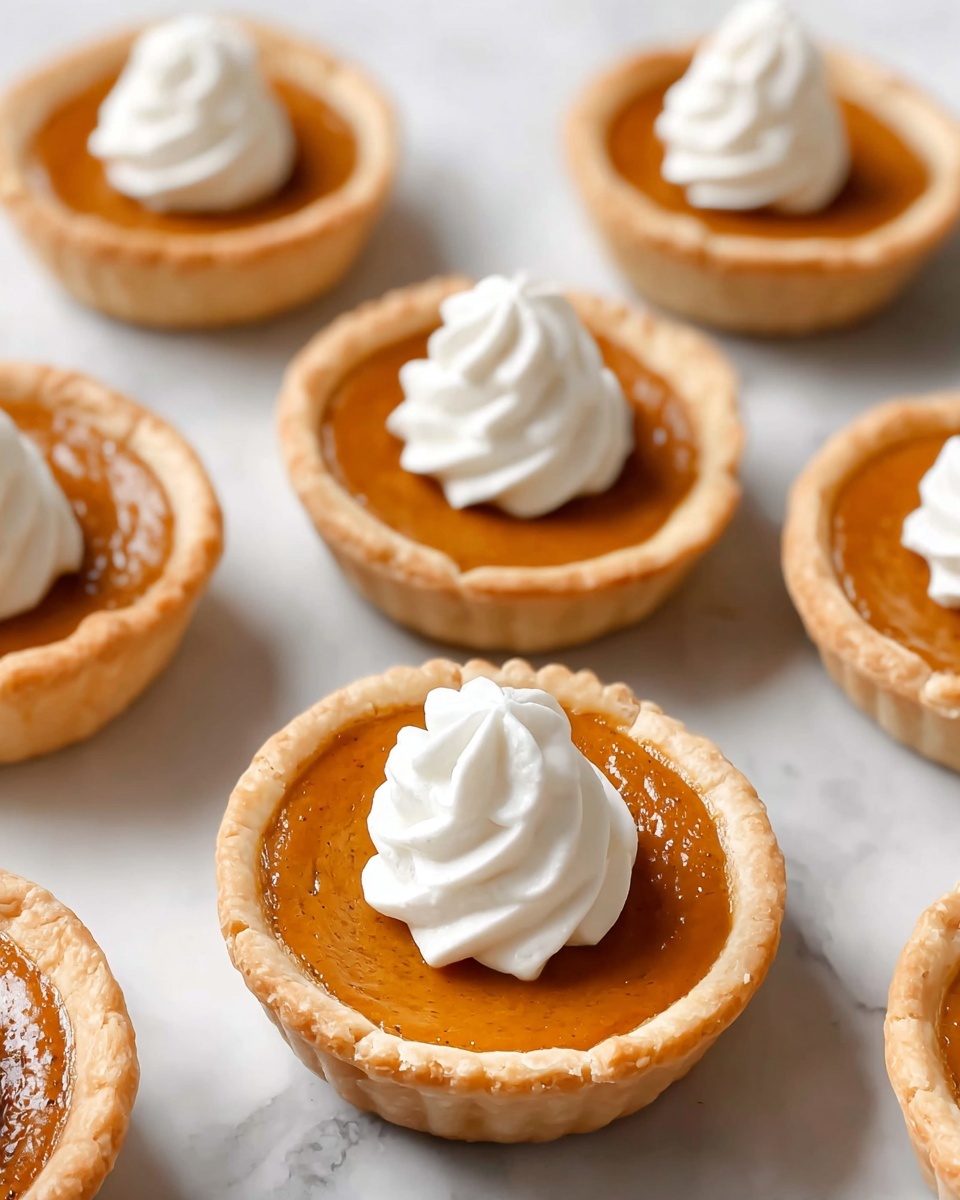
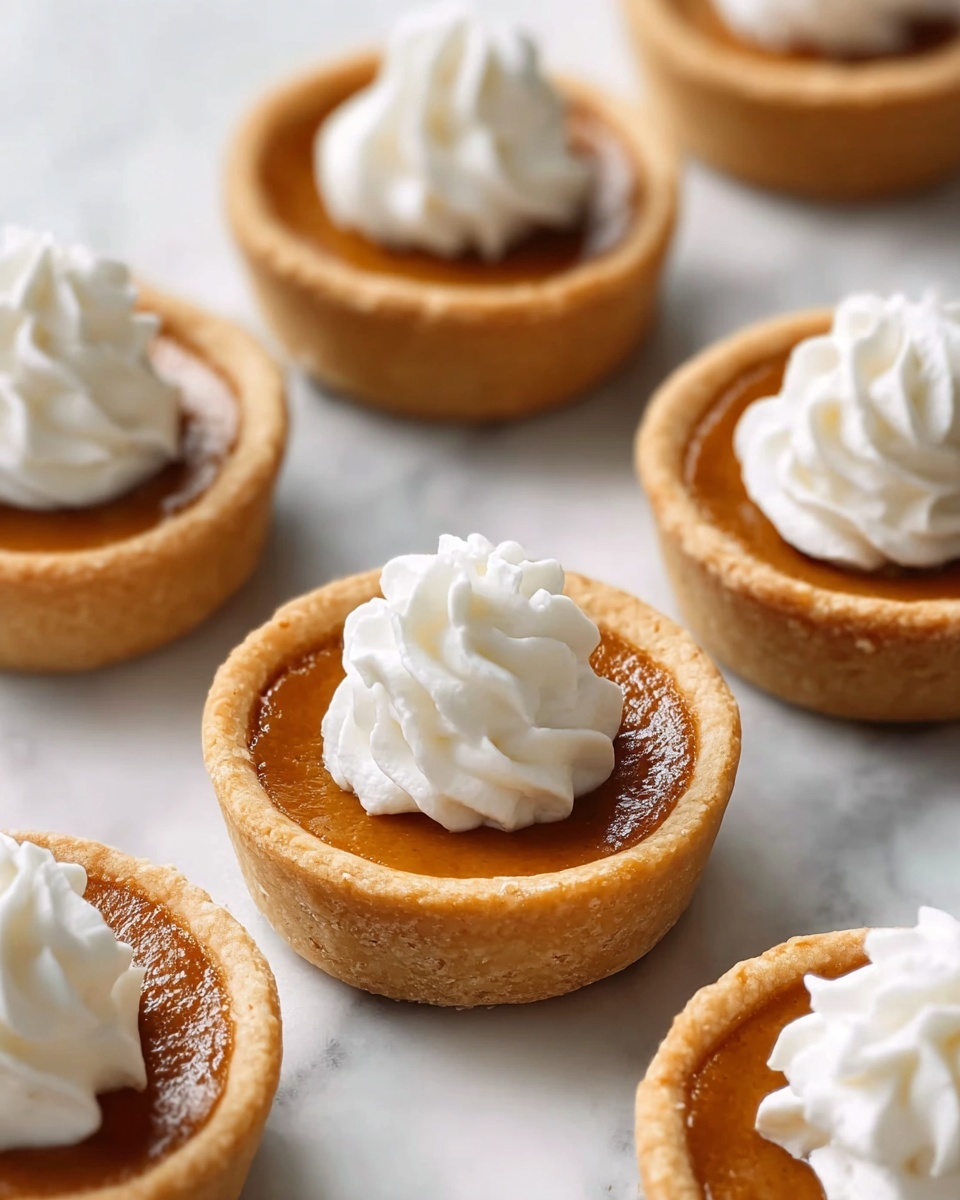
If you adore the cozy flavors of pumpkin spice and the rich sweetness of maple syrup, you are going to fall head over heels for this Mini Maple Pumpkin Pies Recipe. These perfectly portioned pies are bursting with autumn warmth, featuring a smooth pumpkin filling enhanced by a subtle hint of maple, all nestled in a buttery, flaky crust. They make an irresistible treat for gatherings or a comforting solo indulgence that feels just as special as any holiday dessert.
Ingredients You’ll Need
This recipe calls for simple, pantry-friendly ingredients that come together beautifully to create a luscious filling with a perfect crust. Each component plays a vital role, whether it’s adding sweetness, spice, creaminess, or that tender flake we love from a good pie crust.
- Store-bought pie crusts or homemade: The foundation of your mini pies, providing a buttery, flaky base for the filling.
- Pumpkin puree (15 oz. can): The star of the show, delivering that unmistakable velvety pumpkin flavor.
- Light brown sugar (1/4 cup, packed): Adds a rich, molasses undertone that deepens the sweetness.
- Granulated sugar (1/2 cup): Balances the sugars and enhances caramelization during baking.
- Pumpkin pie spice (2 teaspoons): A fragrant blend that brings warmth and complexity.
- Maple extract (1/2 teaspoon): Delivers that subtle, unmistakable maple essence that sets this recipe apart.
- Egg (1): Binds the ingredients and helps the filling to set perfectly.
- Evaporated milk (1 cup): Gives the filling a creamy texture without making it too heavy.
- Whipped cream (1/4 cup): Used for beautiful topping and an extra touch of indulgence.
- Non-stick cooking spray: Keeps the pies from sticking to the pan for easy serving.
How to Make Mini Maple Pumpkin Pies Recipe
Step 1: Preheat Your Oven
Start by warming your oven to 350 degrees Fahrenheit. This step is crucial because a fully preheated oven helps the pies bake evenly and develop that wonderful golden crust you’re aiming for.
Step 2: Prepare the Pie Dough
Lightly flour your countertop and roll out the pie dough to an even thickness. Grab a 4-inch round cutter and cut out 12 perfect circles. These little rounds will become your pie shells, so try to keep them uniform for even baking.
Step 3: Line the Muffin Tin
Spray a cupcake pan generously with non-stick cooking spray to prevent sticking. Press each dough round carefully into the cupcake cavities, making sure to smooth out any cracks or folds. Trim the excess dough that hangs over the edges for a neat finish.
Step 4: Mix the Filling
In a large bowl, combine pumpkin puree, light brown sugar, granulated sugar, and pumpkin pie spice. Stir everything together thoroughly until the sugars are dissolved and the spices are evenly distributed, forming a rich and fragrant base.
Step 5: Add Egg and Maple Extract
Incorporate the egg and maple extract into the pumpkin mixture. The egg adds structure while the maple extract infuses the filling with that special flavor twist which defines this Mini Maple Pumpkin Pies Recipe.
Step 6: Stir in Evaporated Milk
Pour the evaporated milk into the bowl and mix until the filling is silky smooth. This step makes the texture creamy without overwhelming the pumpkin’s natural flavor.
Step 7: Fill the Pie Crusts
Spoon the pumpkin filling gently into each crust-lined cavity, filling them all the way to the top but keeping the crust edges visible for baking. This helps achieve that iconic pie look with a luscious, plump filling.
Step 8: Bake the Mini Pies
Bake your pies for 25 to 30 minutes, until the filling is just set and no longer jiggles when you gently shake the pan. Keep an eye on the crust—it should have a lovely golden tint when the pies are ready.
Step 9: Cool Inside the Oven
Turn off the oven and crack the door open, then let the pies cool completely inside. This gradual cooling prevents the filling from cracking and ensures a silky smooth texture.
Step 10: Add Whipped Cream Topping
Once the pies are fully cooled, pipe a swirl of whipped cream on top of each using a 1M piping tip for a beautiful, professional touch. Store your mini wonders in the fridge until you’re ready to serve them up.
How to Serve Mini Maple Pumpkin Pies Recipe
Garnishes
While the whipped cream topping is classic and delicious, you can also sprinkle a bit of cinnamon or finely chopped toasted pecans on top to add texture and extra flavor contrast. A small drizzle of pure maple syrup elevates the presentation and aroma, making your guests’ mouths water before the first bite.
Side Dishes
These mini pies pair beautifully with a hot cup of chai tea or freshly brewed coffee. For a more indulgent treat, serve alongside vanilla ice cream or a dollop of crème fraîche. A light mixed green salad with a tangy vinaigrette can also balance the richness of the pies if served after a hearty meal.
Creative Ways to Present
Try arranging the pies on a rustic wooden board with fall-themed decorations like small pumpkins, dried leaves, and cinnamon sticks for a festive touch. You can also serve them in individual mini pie boxes for an adorable take-home favor at parties or as a charming gift wrapped with a ribbon.
Make Ahead and Storage
Storing Leftovers
Once baked and cooled, store the mini pies in an airtight container in the refrigerator. They will keep well for up to 4 days, maintaining their flavor and texture perfectly for snacking or dessert throughout the week.
Freezing
If you want to make these ahead for a special occasion, freeze the unbaked pies in the cupcake tin, covered tightly with plastic wrap and then foil. When ready, bake them straight from frozen, adding a few extra minutes to the baking time. For baked pies, wrap them individually in plastic wrap and foil to freeze and thaw in the fridge before serving.
Reheating
Reheat refrigerated or thawed pies in a preheated oven at 300 degrees Fahrenheit for about 10 minutes to warm through without drying out the delicate filling. Avoid microwaving to keep the crust crisp and the filling smooth.
FAQs
Can I use fresh pumpkin instead of canned puree?
Absolutely! If you want to use fresh pumpkin, roast and puree it until smooth. Keep in mind that fresh pumpkin might have a bit more moisture, so you may need to adjust the evaporated milk slightly to get the right filling consistency.
Is there a substitute for maple extract?
If you don’t have maple extract on hand, pure maple syrup can be used instead, though you might want to reduce the granulated sugar slightly to balance sweetness. The extract gives a concentrated flavor that syrup can only mildly imitate.
Can I make these pies gluten-free?
Yes, by using a gluten-free pie crust, you can enjoy these pies without gluten. Just choose a high-quality crust that handles rolling and baking well to maintain the right texture.
What size should the pie crust circles be?
Using a 4-inch round cutter is ideal for fitting them perfectly into the cupcake pan. This size provides the right crust to filling ratio for each mini pie.
Why cool the pies in the oven instead of on a rack?
Cooling the pies inside the turned-off oven with the door open allows them to set gently. This slow cooldown prevents cracks in the filling and helps maintain a luscious, smooth texture.
Final Thoughts
This Mini Maple Pumpkin Pies Recipe is pure autumn magic baked into bite-sized delights. With its comforting spices and just the right touch of maple sweetness, it’s a dessert that brings smiles and warmth to any occasion. I encourage you to give these mini pies a try—they’re charming, delicious, and so satisfying, they may just become your new fall favorite!
Print
Mini Maple Pumpkin Pies Recipe
- Prep Time: 15 minutes
- Cook Time: 25 minutes
- Total Time: 40 minutes
- Yield: 12 mini pies
- Category: Dessert
- Method: Baking
- Cuisine: American
Description
These Mini Maple Pumpkin Pies are a delightful twist on the classic fall dessert, featuring a smooth pumpkin filling infused with warm spices and a hint of maple. Perfectly portioned in bite-sized pies, they are ideal for holiday gatherings or any cozy occasion. Made with a buttery pie crust and topped with fluffy whipped cream, these mini pies are as charming as they are delicious.
Ingredients
Pie Crust
- 2 store-bought pie crusts or homemade
Filling
- 15 oz. can pumpkin puree
- 1/4 cup light brown sugar, packed
- 1/2 cup granulated sugar
- 2 teaspoons pumpkin pie spice
- 1/2 teaspoon maple extract
- 1 egg
- 1 cup evaporated milk
Topping
- 1/4 cup whipped cream
- Non-stick cooking spray (for cupcake pan)
Instructions
- Preheat Oven: Preheat your oven to 350°F (175°C) to ensure it is ready for baking the mini pies.
- Prepare Dough: Lightly flour your countertop and roll out the pie dough. Use a 4-inch round cutter to cut 12 rounds from the dough for the mini pie crusts.
- Line Pan: Spray a cupcake pan with non-stick cooking spray. Press each dough round into the cupcake cavities, smoothing out any ripples and trimming excess dough that hangs over the edges to create a neat crust.
- Mix Filling Base: In a large mixing bowl, combine the pumpkin puree, light brown sugar, granulated sugar, and pumpkin pie spice. Stir well until the mixture is evenly blended.
- Add Flavor & Egg: Thoroughly stir in the egg and maple extract, ensuring they are fully incorporated into the pumpkin mixture.
- Incorporate Milk: Pour in the evaporated milk and stir the filling until smooth and evenly blended for a creamy texture.
- Fill Crusts: Spoon the pumpkin filling into each prepared pie crust within the cupcake pan, filling to the top but leaving a visible crust edge for a beautiful finish.
- Bake Pies: Bake the mini pies in the preheated oven for 25 to 30 minutes until the filling is set, no longer jiggles, and the crust turns slightly golden brown.
- Cool in Oven: Turn off the oven, open the door, and allow the pies to cool completely inside the oven to prevent cracking and help them set properly.
- Add Whipped Cream & Store: Once cooled, use a piping bag fitted with an 1M tip to pipe whipped cream on top of each mini pie. Store the pies in the refrigerator until ready to serve.
Notes
- You can substitute store-bought pie crust with your favorite homemade recipe for a personalized touch.
- Make sure not to overfill the crusts to avoid spillage during baking.
- Cooling the pies in the oven helps prevent the filling from cracking and ensures a smoother texture.
- Use fresh whipped cream or stabilized whipped cream for better hold if serving later.
- These mini pies can be stored in the refrigerator for up to 3 days.
