“`html
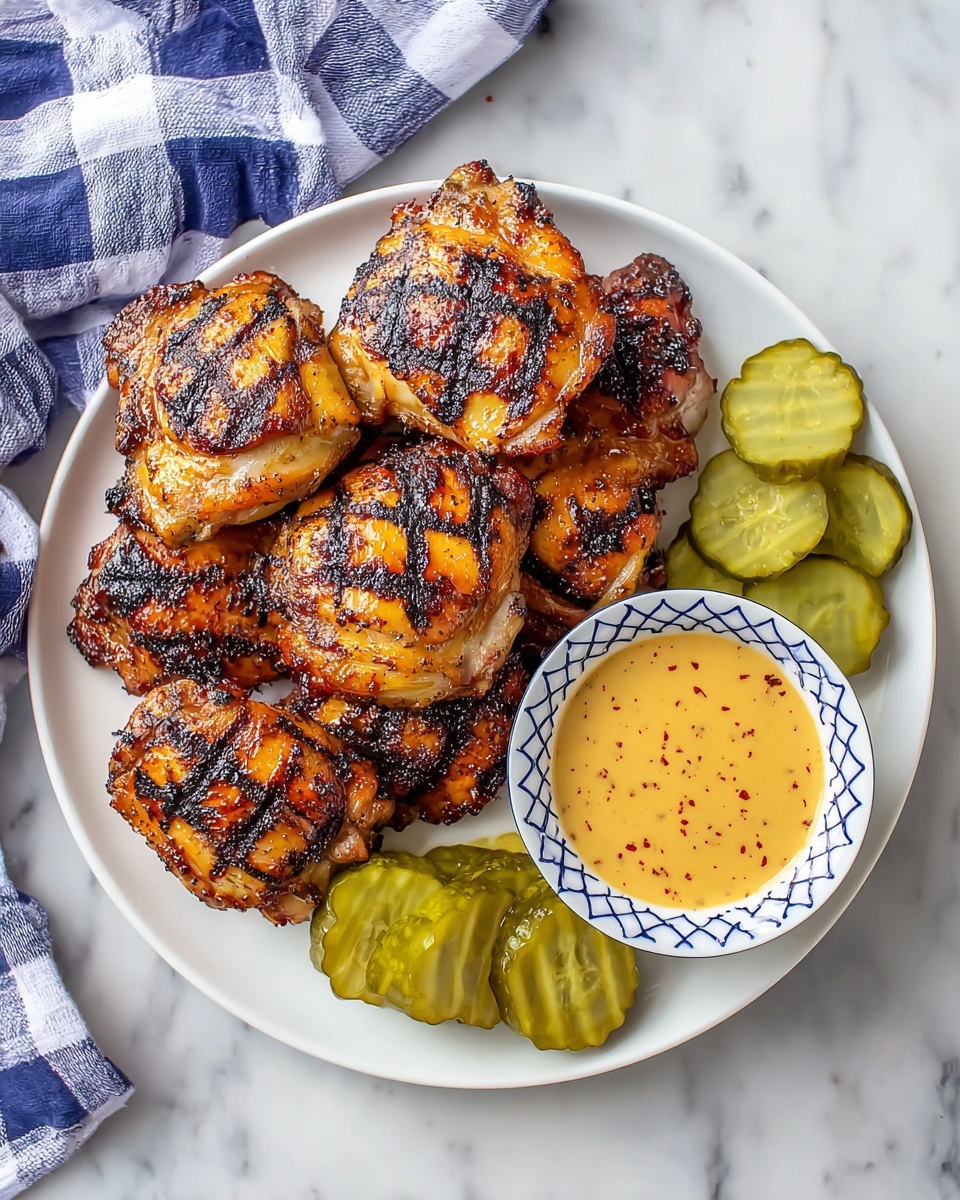
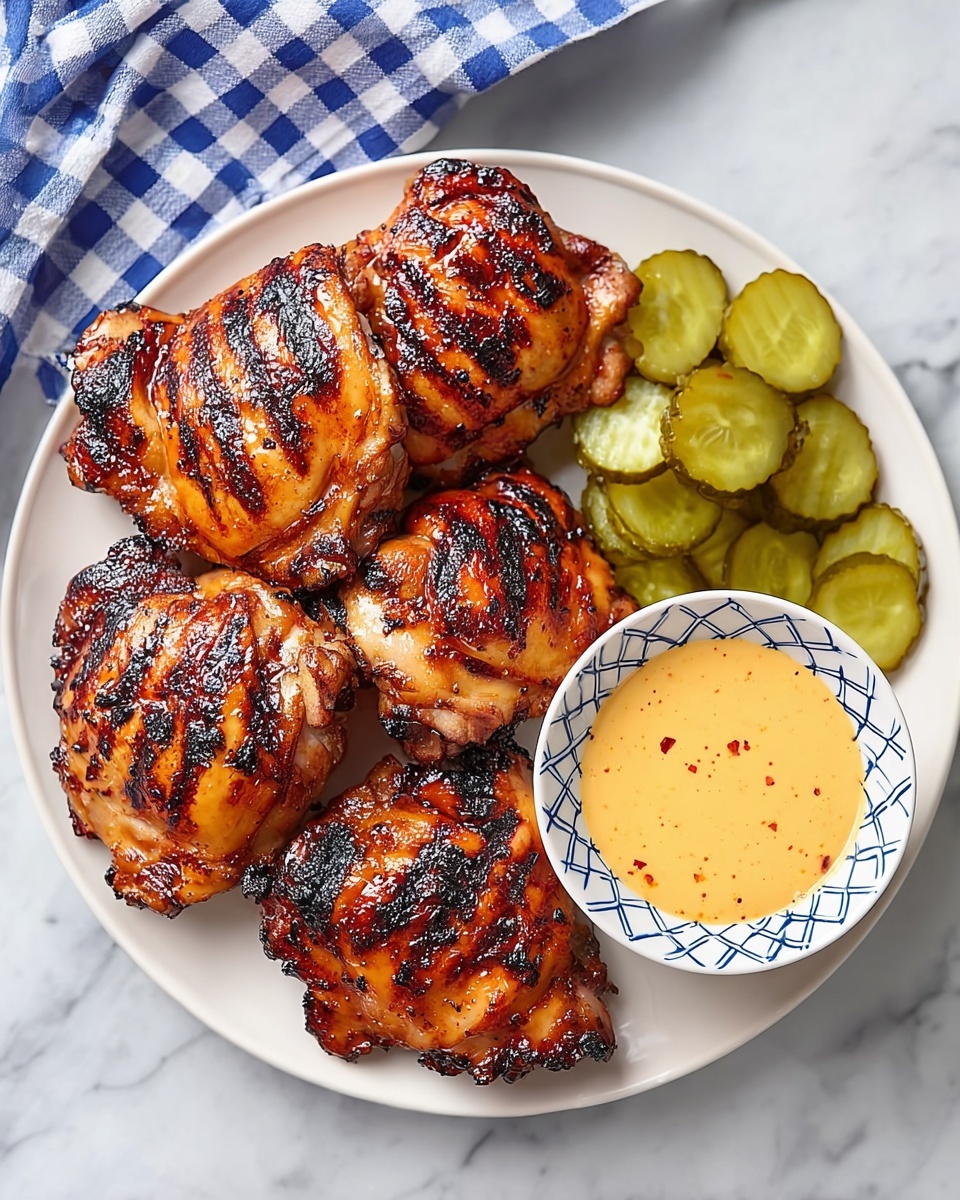
If you’re craving tender, juicy chicken with a surprisingly tangy twist, this Pickle Brined Grilled Chicken Thighs Recipe is just what you need to add excitement to your meal rotation. The magic happens when chicken thighs soak up the flavorful pickle juice, transforming every bite into a juicy, savory delight with a subtle lemony punch and just the right hint of dill. Whether you’re grilling for a casual backyard gathering or a simple family dinner, this recipe delivers mouthwatering results that your taste buds will thank you for.
Ingredients You’ll Need
This recipe is a perfect example of how simple ingredients combine to create a complex, vibrant flavor profile. Each item plays a key role, from tenderizing the meat to layering in seasoning and a golden sear on the grill.
- 1 1/2 lbs boneless skinless chicken thighs: The perfect cut for juicy, flavorful grilling without drying out.
- 24 oz jar Claussen Dill Pickles (pickle juice only): This is the star of the brine, packed with dill and tanginess that tenderizes and seasons simultaneously.
- 1 tbsp olive oil: Helps in achieving a nice grilled crust while keeping the chicken moist.
- 1/2 tsp Oh My Spice! Lemon Pepper Dill Seasoning: Adds a fresh citrusy and herbaceous kick that complements the pickle brine.
- 1/2 tsp sea salt: Enhances all the other flavors without overpowering them.
- 1/4 tsp black pepper: Adds just enough heat and earthiness to balance the bright flavors.
How to Make Pickle Brined Grilled Chicken Thighs Recipe
Step 1: Brine the Chicken
Start by placing your trimmed chicken thighs into an airtight container or a resealable bag. Pour the pickle juice generously over the chicken, then take a moment to massage and move the pieces around so every inch absorbs the briny goodness. Refrigerate for at least 1 hour, but for the juiciest, most flavorful results, aim for about 2 hours. This brining step is what sets this recipe apart, infusing the meat with subtle acidity and dill notes that really shine on the grill.
Step 2: Preheat the Grill
While your chicken is soaking up all that flavor, turn your attention to the grill. Get it hot—aim for a steady 450°F. This high heat is crucial for locking in juices and creating a nicely seared, slightly charred exterior that’s impossible to resist. A well-heated grill means better caramelization and that signature grilled flavor we all love.
Step 3: Prepare the Chicken
Once the brine time is up, remove the chicken from the container and lay it out on a paper towel-lined baking sheet. Pat each piece completely dry—this step helps the chicken develop a beautiful crust when grilled. Then, drizzle olive oil over the thighs and rub it evenly to coat every side. Sprinkle with the lemon pepper dill seasoning, salt, and black pepper. The combination of lemon and dill here perfectly complements the pickle brine, bringing brightness and layers of flavor to your chicken.
Step 4: Grill the Chicken
Arrange your seasoned chicken thighs on the hot grill, placing the smoother side down first for even contact. Grill for about 7 minutes without moving them—this patience rewards you with fantastic grill marks and beautiful texture. Flip the chicken and grill for an additional 4 to 6 minutes or until the internal temperature reaches 165°F in the thickest section. The result is juicy, flavorful grilled chicken thighs that taste like they’ve been marinated for hours.
How to Serve Pickle Brined Grilled Chicken Thighs Recipe

Garnishes
Keep it fresh and simple! A handful of chopped fresh dill or parsley sprinkled right before serving adds a burst of green color and an herbaceous lift that complements the pickle flavors. For a bit of zing, try a squeeze of fresh lemon juice on top—this will brighten each bite and enhance the natural lemon notes in the seasoning.
Side Dishes
This chicken pairs beautifully with light, fresh sides that don’t compete but rather balance its tangy intensity. Think crisp cucumber salad, garlic roasted potatoes, or a creamy coleslaw. You could also serve it alongside grilled corn or a fluffy quinoa salad with cherry tomatoes and herbs for a wholesome plate that feels like a true summer celebration.
Creative Ways to Present
For a fun twist, slice the grilled chicken thighs and serve them on top of hearty bowls of greens, avocado, and pickled veggies for a vibrant salad combo. Another idea is to stack them in a toasted bun with crisp lettuce, pickles, and a dollop of mayo or mustard for irresistible grilled chicken sandwiches. Whatever you choose, the unique flavor profile of this Pickle Brined Grilled Chicken Thighs Recipe adds instant excitement to any presentation.
Make Ahead and Storage
Storing Leftovers
If you have any leftovers, store them in an airtight container in the refrigerator within two hours of cooking. The chicken will keep well for up to 3 days, and the flavors often deepen overnight, making for delicious next-day meals.
Freezing
You can freeze leftover grilled chicken thighs by placing them in freezer-safe containers or zip-top bags, removing as much air as possible. When frozen, they maintain their quality for up to 2 months. Just be sure to label your container so you remember what tasty treasure awaits you!
Reheating
To reheat, gently warm the chicken in a skillet over medium heat or pop it into a preheated oven at 350°F until heated through. Avoid microwaving if possible to preserve the juicy texture and prevent drying out. Adding a light sprinkle of water or broth before reheating helps keep the chicken moist and succulent.
FAQs
Can I use bone-in chicken thighs for this recipe?
Absolutely! Bone-in thighs will add extra flavor and juiciness, but keep in mind they may require a few extra minutes on the grill to reach a safe internal temperature.
Is it necessary to brine the chicken in pickle juice?
The pickle brine is key to this recipe’s unique flavor and tenderness. While you could skip it, you’d miss out on that tangy, dill-infused magic that makes this dish stand out.
What if I don’t have the exact lemon pepper dill seasoning?
No worries! You can create a simple substitute with equal parts lemon zest, black pepper, and dried dill weed. Fresh herbs can also work beautifully to mimic the bright, zesty notes.
Can I grill this chicken recipe indoors?
Yes! If you have an indoor grill pan or grill machine, you can achieve fantastic results. Just watch your cooking times closely and get a good sear over medium-high heat.
How do I know when the chicken is fully cooked?
The safest and most reliable method is to use a meat thermometer—the internal temperature should reach 165°F in the thickest part of the chicken to ensure it is fully cooked and juicy.
Final Thoughts
There’s something utterly satisfying about the tangy brightness and juicy richness that comes from this Pickle Brined Grilled Chicken Thighs Recipe. It’s a fresh twist that breaks away from the ordinary and invites you to explore new flavor adventures with ingredients you might already have on hand. Whether for a weekend cookout or a simple dinner, give this recipe a try—you just might find it becoming one of your new favorite go-tos.
“`
Print
Pickle Brined Grilled Chicken Thighs Recipe
- Prep Time: 10 minutes
- Cook Time: 13 minutes
- Total Time: 2 hours 23 minutes
- Yield: 4 servings
- Category: Main Course
- Method: Grilling
- Cuisine: American
- Diet: Low Fat
Description
This Pickle Brined Chicken Thighs recipe features juicy, flavorful chicken thighs enhanced by a brine made from Claussen dill pickle juice. The brining process tenderizes the meat, while the lemon pepper dill seasoning adds a zesty, aromatic finish. Perfectly grilled for a crispy exterior and tender interior, this dish is a simple yet delicious way to enjoy chicken thighs, ideal for a quick weeknight dinner or a summer barbecue.
Ingredients
Brine
- 1 24 oz jar Claussen Dill Pickles, pickle juice only
Chicken
- 1 1/2 lbs boneless skinless chicken thighs, excess fat trimmed
- 1 tbsp olive oil
- 1/2 tsp Oh My Spice! Lemon Pepper Dill Seasoning
- 1/2 tsp sea salt
- 1/4 tsp black pepper
Instructions
- Brine the Chicken: Add the chicken thighs to an airtight container or resealable bag and pour the pickle juice over them. Move the chicken around to ensure it is fully submerged and evenly coated with the brine. Refrigerate for at least 1 hour, preferably about 2 hours, to tenderize and infuse flavor.
- Preheat the Grill: Preheat your grill to 450°F (232°C) to ensure it is hot enough for proper searing and cooking of the chicken thighs, which helps lock in moisture and creates a delicious crust.
- Prepare the Chicken: Remove the chicken thighs from the pickle brine and place them on a paper towel-lined baking sheet. Pat dry thoroughly with additional paper towels to remove excess moisture. Drizzle with olive oil and rub to evenly coat all sides. Season the chicken with lemon pepper dill seasoning, sea salt, and black pepper.
- Grill the Chicken: Place the chicken thighs, smoother side down, onto the preheated grill grates. Grill for 7 minutes on the first side until nicely seared, then flip and continue grilling for another 4 to 6 minutes. Cook until the internal temperature of the thickest part of the chicken reaches 165°F (74°C) to ensure it is fully cooked and safe to eat.
Notes
- Patting the chicken dry before grilling helps achieve a better sear and prevents sticking to the grill.
- Use a meat thermometer to check for doneness to avoid overcooking and drying out the chicken.
- The pickle brine adds a unique tangy flavor and tenderizes the chicken—do not skip this step for best results.
- Leftover grilled chicken thighs can be refrigerated for up to 3 days or frozen for longer storage.
- If you don’t have a grill, you can achieve similar results using a grill pan on the stovetop or broiling in the oven.


