
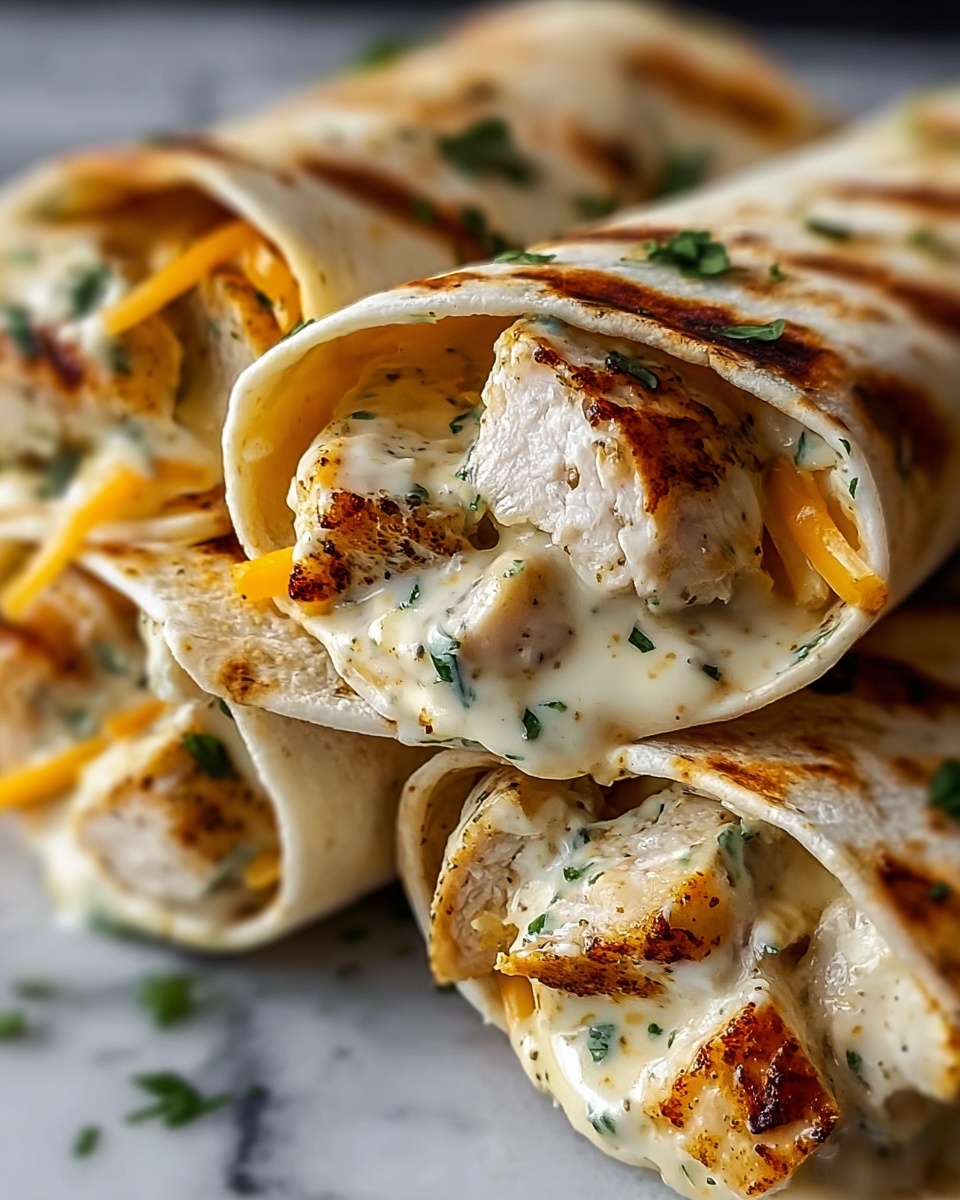
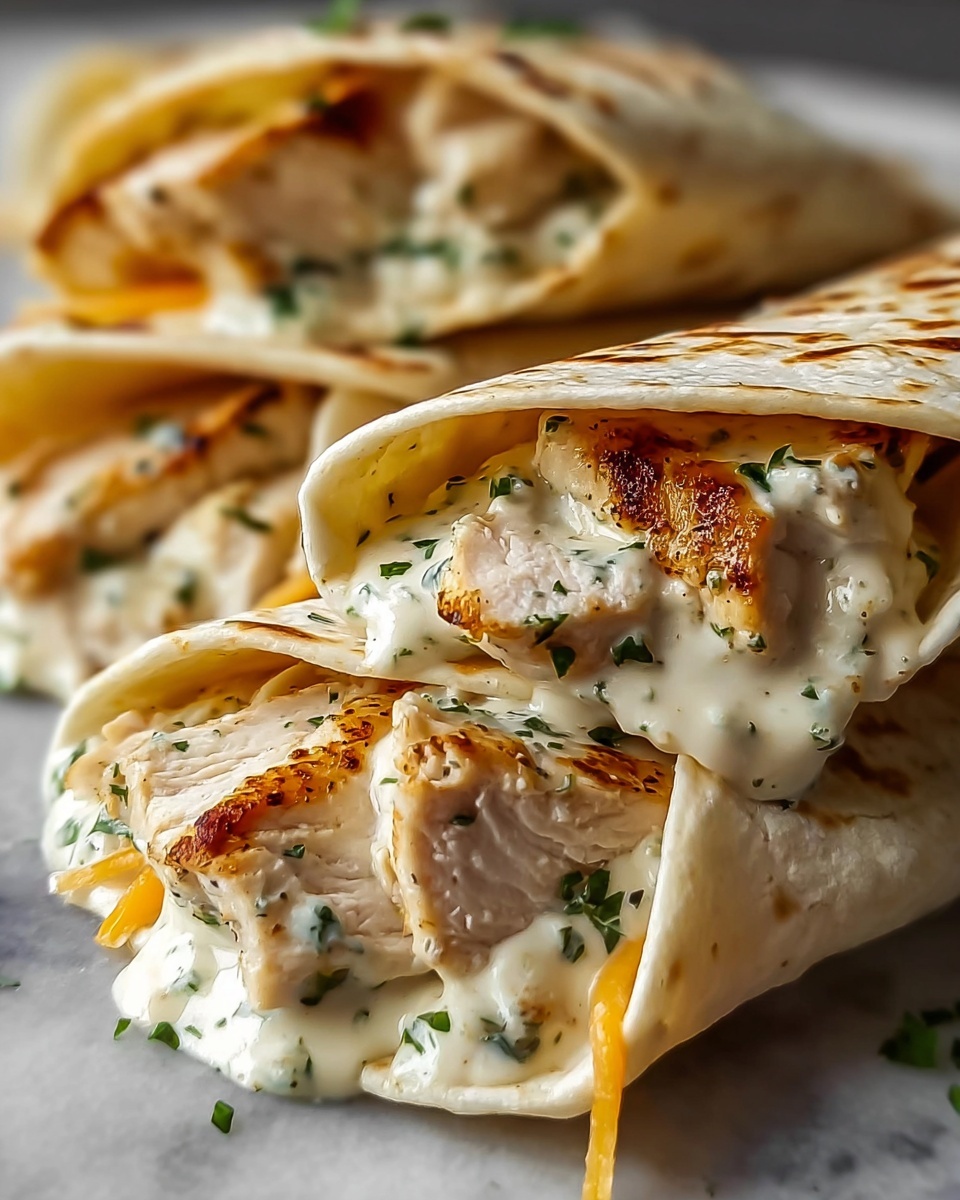
If you are craving something irresistibly flavorful and downright comforting, the Cheesy Garlic Chicken Wraps Recipe is going to become your new go-to. With juicy, tender chicken seasoned just right and enveloped in a golden, crispy tortilla loaded with melty cheddar and mozzarella cheese, this dish hits all the right notes. The creamy garlic sauce adds a luscious tang that ties everything together beautifully, making every bite a delicious celebration of simple ingredients working in harmony. Whether you’re whipping up a quick weeknight dinner or an impressive meal for friends, these wraps promise a satisfying experience that everyone will love.
Ingredients You’ll Need
This Cheesy Garlic Chicken Wraps Recipe shines because of its straightforward ingredients, each playing an essential role in flavor, texture, or color. From aromatic spices to gooey cheeses and fresh parsley for a vibrant finish, every item contributes to making this wrap an absolute delight.
- 2 large chicken breasts, diced: Provides tender, protein-packed bites that soak up all the delicious seasoning.
- 1 tablespoon olive oil: Helps cook the chicken evenly, adding a subtle rich flavor and golden color.
- 2 teaspoons garlic powder: Delivers savory depth and complements the creamy garlic sauce perfectly.
- 1 teaspoon onion powder: Adds a mild sweetness that rounds out the spices wonderfully.
- 1 teaspoon paprika: Brings a smoky warmth and beautiful color to the chicken.
- Salt and pepper, to taste: Essential seasonings that boost all the other flavors.
- 1 cup shredded cheddar cheese: Offers sharpness and creamy meltiness inside the wrap.
- ½ cup shredded mozzarella cheese: Adds gooey stretch and a luscious, mild creaminess.
- 4 large flour tortillas: The perfect soft but sturdy vessel for all that delicious filling.
- ½ cup creamy garlic sauce: Injects a smooth, flavorful punch that keeps the wraps moist and savory.
- Fresh parsley, chopped (for garnish): A fresh, bright herb that lifts the flavors and adds a pop of color.
How to Make Cheesy Garlic Chicken Wraps Recipe
Step 1: Season the Chicken
Start by tossing your diced chicken breasts in a bowl with olive oil, garlic powder, onion powder, paprika, salt, and pepper. Make sure every piece is thoroughly coated so that each bite bursts with flavor from the very first mouthful.
Step 2: Cook the Chicken
Warm a non-stick pan over medium heat and add the seasoned chicken. Cook for 6 to 8 minutes, stirring occasionally, until the chicken is cooked through and boasts a beautiful golden exterior. Once done, let it cool slightly to make wrapping easier and prevent any mess.
Step 3: Prepare the Tortillas
Lay your large flour tortillas flat on a clean surface. Spread a generous layer of that creamy garlic sauce over each tortilla—this creates a flavorful base that keeps every bite moist and delicious.
Step 4: Assemble the Wraps
Divide the cooked chicken evenly across the tortillas, then sprinkle both shredded cheddar and mozzarella cheeses on top. These cheeses melt perfectly to hold everything together and add that dreamy gooey texture we all adore.
Step 5: Fold and Grill
Fold each tortilla over the filling to form a neat wrap. Using the same pan you cooked the chicken in, grill the wraps for 2 to 3 minutes on each side, allowing the cheese to melt fully and the tortillas to develop a golden, crispy crust.
Step 6: Slice and Garnish
Remove the wraps from the pan, slice each one in half diagonally for a beautiful presentation, and sprinkle with freshly chopped parsley for a pop of fresh color and brightness. Your Cheesy Garlic Chicken Wraps Recipe is ready to savor!
How to Serve Cheesy Garlic Chicken Wraps Recipe
Garnishes
Simple garnishes like a sprinkle of chopped parsley or a few fresh basil leaves elevate the wraps both visually and taste-wise. A little extra drizzle of creamy garlic sauce on the side allows everyone to customize their garlicky goodness to their liking.
Side Dishes
These wraps pair marvelously with crisp salads, roasted veggies, or even some crunchy tortilla chips and salsa for that ultimate Tex-Mex vibe. A side of tangy coleslaw also balances the richness of the cheese and sauce perfectly.
Creative Ways to Present
For a party or casual get-together, arrange the wraps sliced on a platter with colorful vegetable sticks and dips scattered around. You can also wrap each half individually in parchment for easy handheld eating—perfect for picnics or lunches on the go.
Make Ahead and Storage
Storing Leftovers
If you happen to have leftovers, keep them in an airtight container in the refrigerator for up to 3 days. The flavors tend to deepen overnight, making for an even tastier meal the next day.
Freezing
While best enjoyed fresh, you can freeze the wraps individually by wrapping them tightly in foil and placing them in a freezer-safe bag. They’ll keep well for up to 2 months, perfect for easy lunches or unexpected guests.
Reheating
The best way to reheat these wraps is to gently warm them in a skillet over low heat to maintain that crispy tortilla and melty cheese. Avoid microwaving if you can, as it tends to make the tortillas soggy and less appealing.
FAQs
Can I use different types of cheese in this Cheesy Garlic Chicken Wraps Recipe?
Absolutely! Feel free to experiment with cheeses like pepper jack for a spicy kick, Monterey Jack for creaminess, or even feta for an extra tang. Just choose cheeses that melt well to keep that gooey texture.
Is it necessary to grill the wraps after assembling?
Grilling the wraps is key because it melts the cheese and crisps the tortillas, giving the wraps a delightful texture contrast. If you prefer, you can skip this step, but the experience won’t be quite the same.
Can I make these wraps vegetarian?
Yes! Replace the chicken with sautéed mushrooms, roasted vegetables, or seasoned tofu to keep the wraps satisfying while catering to a vegetarian diet.
What is the best type of tortilla to use for this recipe?
Large flour tortillas are ideal because they are pliable enough to fold without cracking and sturdy enough to hold the filling. However, you can try whole wheat or gluten-free tortillas based on your preference.
How spicy is this recipe?
This Cheesy Garlic Chicken Wraps Recipe is mild and friendly for most palates. If you enjoy more heat, adding a pinch of chili powder or some sliced jalapeños is an easy way to boost the spice level.
Final Thoughts
There is something so wonderfully satisfying about the Cheesy Garlic Chicken Wraps Recipe that makes it impossible not to smile while eating. It’s straightforward enough for a busy night yet impressive enough to share with company. The combination of succulent chicken, melty cheese, and rich garlic flavors wrapped up in a crispy tortilla is a guaranteed crowd-pleaser. Give this recipe a try and watch it quickly become a cherished favorite in your meal rotation.
Print
Cheesy Garlic Chicken Wraps Recipe
- Prep Time: 10 minutes
- Cook Time: 15 minutes
- Total Time: 25 minutes
- Yield: 4 servings
- Category: Lunch
- Method: Stovetop
- Cuisine: American
Description
Delicious and easy-to-make Cheesy Garlic Chicken Wraps featuring seasoned, pan-cooked chicken combined with melted cheddar and mozzarella cheese, all wrapped in warm flour tortillas and grilled to crispy perfection. Perfect for a quick lunch or dinner that satisfies your craving for savory and cheesy flavors with a hint of garlic.
Ingredients
Chicken and Seasoning
- 2 large chicken breasts, diced
- 1 tablespoon olive oil
- 2 teaspoons garlic powder
- 1 teaspoon onion powder
- 1 teaspoon paprika
- Salt and pepper, to taste
Cheese
- 1 cup shredded cheddar cheese
- ½ cup shredded mozzarella cheese
Wraps and Sauce
- 4 large flour tortillas
- ½ cup creamy garlic sauce
- Fresh parsley, chopped (for garnish)
Instructions
- Season the Chicken: In a bowl, mix the diced chicken with olive oil, garlic powder, onion powder, paprika, salt, and pepper. Ensure the chicken pieces are evenly coated with the seasonings for balanced flavor.
- Cook the Chicken: Heat a non-stick pan over medium heat. Add the seasoned chicken and cook for 6-8 minutes, stirring occasionally, until the chicken is golden brown and cooked through. Remove from heat and let it cool slightly to prevent the cheese from melting prematurely.
- Prepare Tortillas: Lay the flour tortillas flat on a clean surface. Spread a generous layer of creamy garlic sauce evenly over each tortilla, which will add moisture and zest to the wrap.
- Assemble Wraps: Evenly distribute the cooked chicken onto the tortillas over the sauce. Top with shredded cheddar and mozzarella cheeses to ensure a rich, gooey texture once melted.
- Fold the Wraps: Carefully fold each tortilla over the filling, forming a neat wrap that encases the chicken and cheese securely.
- Grill the Wraps: Reheat the same pan and grill each wrap for 2-3 minutes on each side. This step melts the cheese inside and crisps the tortilla, adding delicious texture and enhancing flavors.
- Serve: Remove the wraps from the pan, slice each in half diagonally, garnish with chopped fresh parsley for a touch of color and freshness, and serve immediately while warm.
Notes
- Use boneless, skinless chicken breasts for uniform cooking.
- Adjust garlic powder and paprika according to your taste preferences for a milder or spicier flavor.
- Substitute flour tortillas with whole wheat or gluten-free tortillas if desired.
- The creamy garlic sauce can be store-bought or homemade for enhanced flavor.
- For extra crispiness, press the wraps slightly while grilling in the pan.
- Serve with a side salad or chips for a complete meal.
