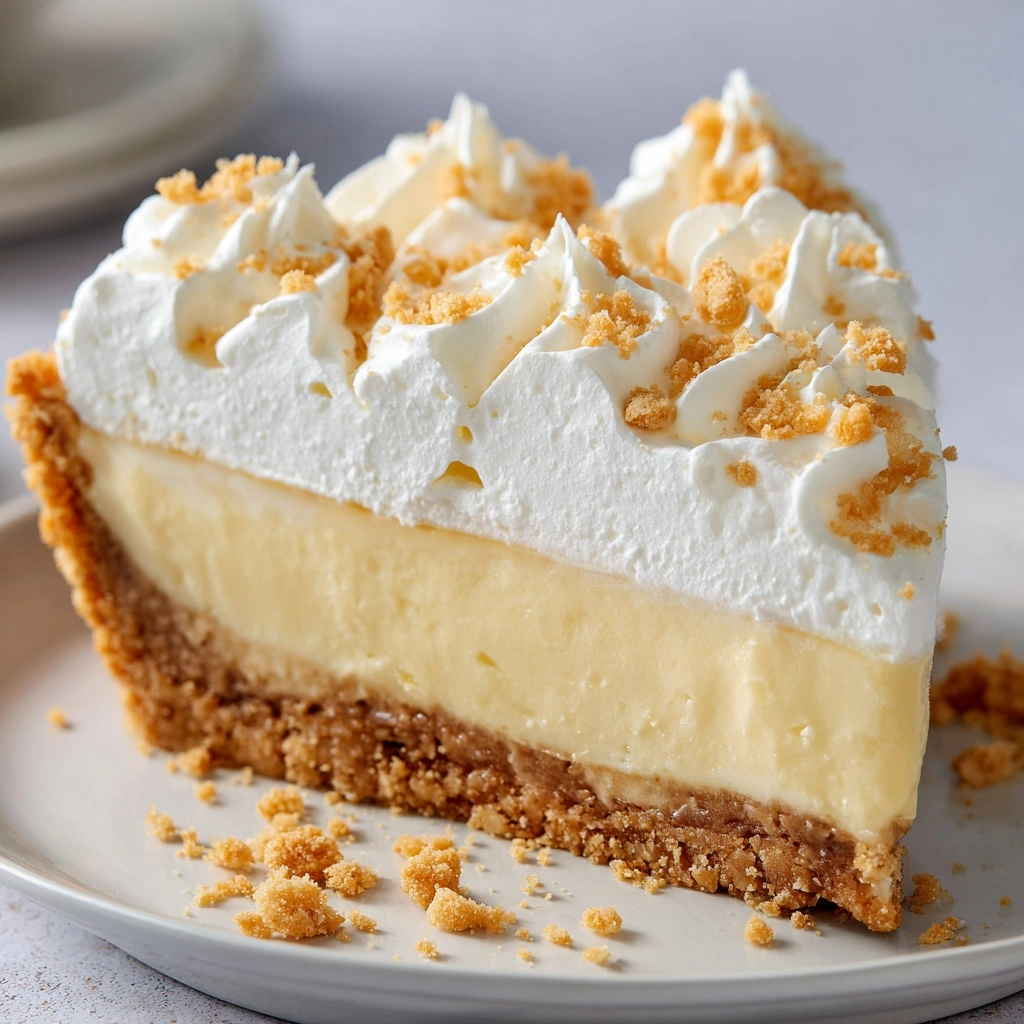
If you’re looking for a dessert that combines creamy, dreamy textures with the rich, roasted flavor of peanut butter, you have to try this Easy Peanut Butter Pie. It’s an absolute delight for peanut butter lovers and dessert enthusiasts alike, with a silky filling nestled in the classic crunch of a graham cracker crust. Plus, there’s no baking required! Just a handful of readily available ingredients come together to create a sweet treat that’s as impressive as it is foolproof—perfect for weeknights, holidays, or anytime you want to indulge your sweet tooth with minimal effort.
Ingredients You’ll Need
The fantastic thing about this Easy Peanut Butter Pie is that every ingredient truly matters—each one brings out the best in flavor, texture, and presentation. Let’s break down what you’ll need and why each element is essential for this irresistible dessert!
- Prepared graham cracker crust (9-inch): The foundation for that signature crumbly crunch, plus it saves tons of time and delivers the perfect contrast to the creamy filling.
- Creamy peanut butter (1 cup): The star of the show—choose your favorite brand for robust peanut flavor and the smoothest possible texture.
- Cream cheese (8 oz, softened): Adds rich creaminess and a subtle tang, balancing all the sweet, nutty notes in every bite.
- Powdered sugar (1 cup): This gives the pie just the right amount of sweetness while keeping the filling super smooth and lump-free.
- Vanilla extract (1 teaspoon): Don’t skip it! A splash of vanilla boosts the warmth and rounds out the dessert’s flavors.
- Whipped topping (8 oz container): This is the secret to the pie’s airy, fluffy bite—you’ll gently fold it in for a light-as-a-cloud texture.
- Additional whipped topping and chopped peanuts or chocolate shavings (optional): These are your go-to garnishes for a finishing touch of elegance and extra flair.
How to Make Easy Peanut Butter Pie
Step 1: Make the Filling
Start by grabbing a large mixing bowl and combining the softened cream cheese and creamy peanut butter. Beat them together until everything is silky smooth, with no lumps—this will make sure your Easy Peanut Butter Pie has the most luscious texture when you slice into it!
Step 2: Sweeten and Flavor
Add the powdered sugar and vanilla extract into your creamy mixture. Mix again until everything is fully incorporated. The powdered sugar will dissolve quickly and smoothly, leaving no gritty texture, and the vanilla will give your pie an irresistible aroma.
Step 3: Fold in the Whipped Topping
Next comes that irresistible fluffiness! Gently fold in the whipped topping (be careful not to overmix; you want airy, not dense). This step transforms the pie filling, making it ultra-light yet wonderfully rich. If you’re using homemade whipped cream, just make sure it’s whipped to soft peaks for best results.
Step 4: Fill the Crust
Spoon the finished filling into your prepared graham cracker crust. Use a spatula to spread it evenly, smoothing the top for a beautiful, bakery-style finish. There’s something deeply satisfying about watching that creamy filling settle into the crust!
Step 5: Chill to Set
Cover your pie gently (plastic wrap works best) and refrigerate for at least 4 hours. This helps everything firm up and lets the flavors mingle together. Feel free to let it chill overnight if you’re prepping in advance—it only gets tastier!
Step 6: Garnish and Serve
Just before serving, add extra whipped topping, a shower of chopped peanuts, or a sprinkle of chocolate shavings for that irresistible finish. Slice each piece with care, and serve cold for the creamiest result.
How to Serve Easy Peanut Butter Pie

Garnishes
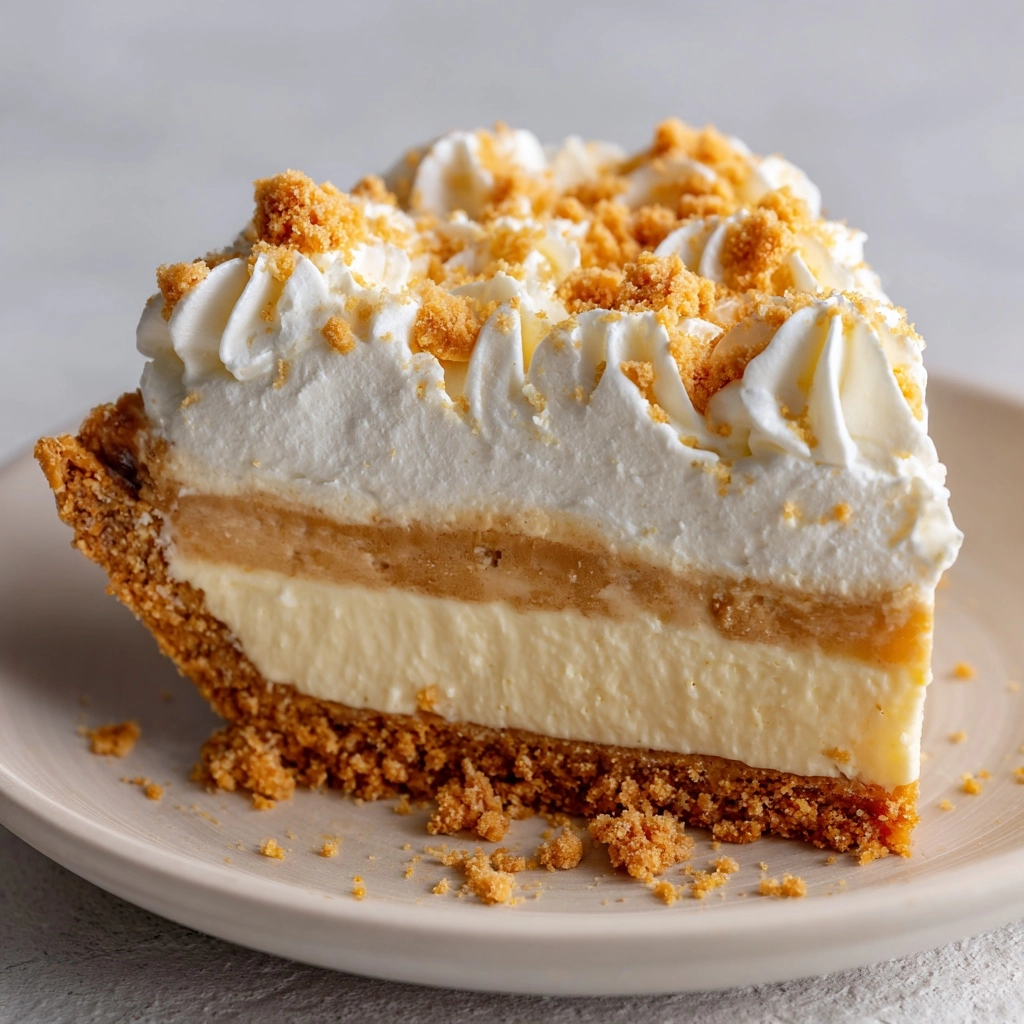
A pie this delicious deserves a joyous presentation! For maximum wow-factor, pile on extra whipped topping, scatter some salty chopped peanuts for crunch, or take it over the top with a generous sprinkle of chocolate shavings. You can even drizzle with a little chocolate or caramel sauce before serving if you’re feeling extra fancy.
Side Dishes
Easy Peanut Butter Pie is definitely rich enough to stand alone, but it pairs beautifully with simple sides. A scoop of vanilla ice cream makes it even more decadent, or try serving each slice with some fresh berries for a bright, fruity contrast that cuts through the richness.
Creative Ways to Present
This pie is as beautiful as it is tasty. Try making mini pies or parfaits in individual jars for a party-friendly treat. Alternatively, freeze the entire pie and slice it for a frosty, ice cream-style dessert that’s perfect for hot summer evenings. For a festive flair, layer with chocolate cookie crumbs or swirl a ribbon of caramel through the filling before chilling.
Make Ahead and Storage
Storing Leftovers
If you somehow find yourself with leftover Easy Peanut Butter Pie, just cover the dish tightly with plastic wrap or transfer slices to an airtight container. Store in the refrigerator for up to 4 days—though, in my house, it rarely lasts that long!
Freezing
This pie freezes like a dream. Wrap tightly in plastic wrap and foil, or store individual slices in airtight containers. It will keep well in the freezer for up to one month. When you’re ready to serve, let the pie thaw in the fridge for a few hours or enjoy it just slightly thawed for a firmer, frozen-treat texture.
Reheating
No reheating is needed (or recommended) for Easy Peanut Butter Pie; this cool, silky dessert is meant to be enjoyed straight from the fridge or after a short rest on the countertop if frozen. If you do freeze it, let the pie sit at room temperature for 10 minutes before slicing for the best texture.
FAQs
Can I make Easy Peanut Butter Pie ahead of time?
Absolutely! This pie actually gets better as it sits. You can make it up to 24 hours in advance and keep it chilled until you’re ready to serve, making it the perfect make-ahead dessert for busy days or special occasions.
What type Dessert
For the smoothest, creamiest texture, use a commercial creamy peanut butter. Natural peanut butters can separate and may result in a slightly gritty texture, but if you love a more rustic pie, go for it!
Can I use homemade whipped cream instead of store-bought whipped topping?
Yes, homemade whipped cream works beautifully. Just make sure you whip it to soft peaks before folding into the filling. Use about three cups of whipped cream to replace the 8-ounce container.
Is there a way to make this pie gluten-free?
Definitely! Swap the graham cracker crust with a certified gluten-free version, or make your own using gluten-free cookies. Just make sure your whipped topping and other ingredients are also gluten-free.
What’s the best way to get clean slices?
For picture-perfect slices, use a sharp knife dipped in hot water and wiped dry between each cut. Chilling or freezing the pie until very firm also helps create neater edges.
Final Thoughts
You don’t need to be a professional baker to whip up this Easy Peanut Butter Pie—it’s pure comfort and a crowd-pleaser, whether for a potluck, birthday, or a “just because” treat. Each creamy, nutty forkful feels like a hug from the inside out. I hope you give it a try soon and share the happiness around your table!
Print
Easy Peanut Butter Pie Recipe
- Prep Time: 15 minutes
- Cook Time: 0 minutes
- Total Time: 4 hours 15 minutes (includes chilling time)
- Yield: 8 servings
- Category: Dessert
- Method: No-Bake
- Cuisine: American
- Diet: Non-Vegetarian
Description
This Easy Peanut Butter Pie is a delightful no-bake dessert that combines creamy peanut butter with a smooth cream cheese filling, all nestled in a graham cracker crust. Perfect for any occasion!
Ingredients
Graham Cracker Crust:
- 1 prepared graham cracker crust (9-inch)
Peanut Butter Filling:
- 1 cup creamy peanut butter
- 8 oz cream cheese, softened
- 1 cup powdered sugar
- 1 teaspoon vanilla extract
- 1 container (8 oz) whipped topping (such as Cool Whip)
Garnish (optional):
- Additional whipped topping
- Chopped peanuts or chocolate shavings
Instructions
- Prepare Filling: In a large mixing bowl, beat cream cheese and peanut butter until smooth. Add powdered sugar and vanilla extract, mix until fully incorporated.
- Add Whipped Topping: Gently fold in the whipped topping until light and fluffy.
- Fill Crust: Spoon filling into graham cracker crust, spread evenly.
- Chill: Cover and refrigerate for at least 4 hours until set.
- Garnish and Serve: Before serving, top with additional whipped topping, peanuts, or chocolate shavings. Slice and serve chilled.
Notes
- For a richer flavor, use a chocolate cookie crust instead of graham cracker.
- For a firmer texture, freeze the pie and let sit at room temperature for 10 minutes before slicing if frozen.
Nutrition
- Serving Size: 1 slice
- Calories: 435
- Sugar: 22g
- Sodium: 320mg
- Fat: 30g
- Saturated Fat: 12g
- Unsaturated Fat: 15g
- Trans Fat: 0g
- Carbohydrates: 32g
- Fiber: 2g
- Protein: 8g
- Cholesterol: 35mg


