
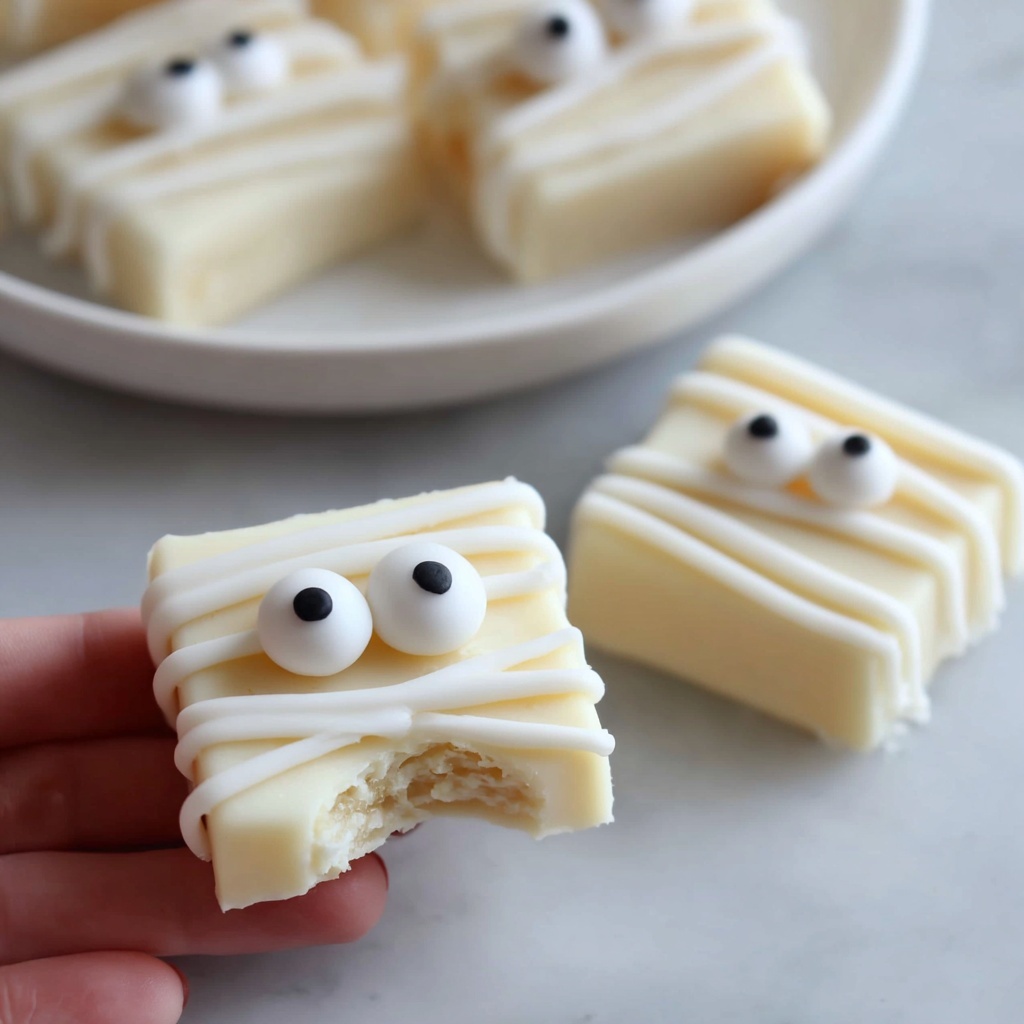
If you’re looking for a delightfully spooky yet utterly delicious treat to impress your friends and family this Halloween, you have to try this Mummy Fudge Recipe. It combines the creamy richness of white chocolate fudge with playful candy eyeballs and a fun mummy-inspired drizzle that turns an ordinary sweet into an eye-catching party favorite. With just a few simple ingredients and straightforward steps, this dessert brings joy and a touch of whimsy to any occasion, making it a fantastic choice for festive gatherings or even just a special homemade treat.
Ingredients You’ll Need
These ingredients are wonderfully simple but essential, each lending the fudge its creamy texture, sweet flavor, and standout look. From smooth white baking chips to the perfect hint of vanilla, every component plays a role in creating that irresistible Mummy Fudge Recipe.
- 2 cups white baking chips: The base for a creamy, melt-in-your-mouth fudge texture.
- 20 oz white almond bark (divided): Provides extra smoothness and a sturdy coating for decorating.
- 1 can sweetened condensed milk: Adds sweetness and helps bind the fudge into creamy perfection.
- 1 tsp vanilla: Enhances the sweetness with a warm, aromatic note.
- 1/8 tsp salt: Balances the sweetness and deepens the overall flavor.
- 32 candy eyes: Time to get spooky and add personality with these fun decorative touches.
How to Make Mummy Fudge Recipe
Step 1: Prepare Your Pan
Line a 9×9-inch square pan with parchment paper to prevent sticking and make removing the fudge a breeze later on. This simple step ensures clean, perfect edges and easier cleanup—always a win!
Step 2: Melt the Ingredients
Using a double boiler, gently melt together the white baking chips, 8 ounces of the almond bark, and sweetened condensed milk over medium heat. Stir constantly until the mixture is almost smooth but avoid overheating, which can ruin that silky texture.
Step 3: Stir to Finish Melting
Remove the mixture from heat just before it’s fully smooth. Keep stirring until everything finishes melting naturally—this careful attention prevents the fudge from burning and helps maintain its beautifully creamy consistency.
Step 4: Add Flavor Enhancers
Mix in the vanilla and salt thoroughly. These simple additions elevate the flavors, turning basic fudge into something rich and irresistibly tasty.
Step 5: Cool and Set
Pour the fudge mixture into your prepared pan and smooth the top. Let it harden for at least 2 hours in the refrigerator, or up to 4 hours at room temperature if you’re not in a hurry. Patience here means your fudge will be perfectly firm for cutting.
Step 6: Cut into Pieces and Prepare Drizzle
Once set, cut the fudge into 16 equal pieces. Meanwhile, heat the remaining 12 ounces of almond bark in the microwave in 20-second bursts, stirring until smooth. This almond bark will become your “mummy wrap” drizzle.
Step 7: Create Your Piping Bag
Transfer the melted almond bark to a zippered plastic bag. Snip a small hole in one corner—the size of this hole controls how thick or thin your mummy lines will be, so choose based on your decorating style.
Step 8: Add Those Creepy Eyes
Place two dots of melted almond bark on each fudge piece to act as glue, then press two candy eyes onto each one. This brings your mummy to life instantly and adds the perfect spooky touch.
Step 9: Drizzle the Mummy Wraps
Pipe drizzles of almond bark across each fudge piece in a crisscross pattern that mimics mummy wrappings. Feel free to get creative with your lines—no two mummies need to look exactly alike!
Step 10: Let Cool and Enjoy
Allow the drizzle to cool and harden completely so it stays perfectly in place. Once set, your Mummy Fudge Recipe is ready to wow at parties or to be packaged up as a fun homemade gift. Either way, prepare for plenty of compliments!
How to Serve Mummy Fudge Recipe

Garnishes
While the candy eyes and drizzled almond bark do most of the visual heavy lifting, consider sprinkling a bit of edible glitter or orange sanding sugar on top for extra festive shimmer. Tiny candy pumpkins nearby add a fun seasonal flair that makes your presentation pop.
Side Dishes
Serve your mummy fudge alongside warm beverages like spiced chai, hot chocolate, or a robust coffee. The creamy sweetness of the fudge pairs beautifully with warm drinks, especially on crisp fall evenings. For a party platter, add some fresh fruit or caramel dipped apples to keep the spooky spread balanced and inviting.
Creative Ways to Present
Display your mummy fudge on a black or orange serving tray for maximum Halloween vibes. Wrapping individual pieces in clear cellophane tied with festive ribbons makes fantastic party favors or gifts. You can even stick themed picks or tiny flags in each square to amp up the fun.
Make Ahead and Storage
Storing Leftovers
If you have leftovers from your mummy fudge adventure, store them in an airtight container at room temperature or in the refrigerator. This keeps the fudge fresh and maintains the perfect chewy texture for several days.
Freezing
Freeze extra fudge by placing pieces in a single layer on a baking sheet until solid, then transferring them to a sealed container or freezer bag. Frozen fudge keeps well for up to three months, so you can enjoy your Mummy Fudge Recipe long after Halloween.
Reheating
Fudge is best enjoyed chilled or at room temperature, but if you prefer it softer, simply let it warm at room temperature for 15-20 minutes before serving. Avoid microwaving directly to prevent melting the candy eyes or losing the crunchy drizzle texture.
FAQs
Can I use different types of chocolate instead of white baking chips?
Absolutely! While the white baking chips are key to the classic mummy look, you can experiment with milk or dark chocolate for a different flavor profile. Just keep in mind the visual changes to the mummy theme.
What if I don’t have candy eyes? Can I make my own?
Yes! You can use small dots of black icing or edible markers on white fondant to create homemade eyes. This is a fun way to personalize your mummy fudge and get creative.
Is it necessary to use a double boiler?
Using a double boiler helps melt the ingredients gently and evenly, preventing burning. If you don’t have one, you can use a heat-safe bowl over a pan of simmering water or melt carefully in short microwave bursts, stirring frequently.
Can I make the fudge vegan or dairy-free?
To make a vegan version, substitute sweetened condensed coconut milk and use dairy-free white chocolate alternatives. The texture may vary slightly, but you can still achieve a delicious mummy fudge treat.
How long does the fudge keep fresh after decorating?
Once decorated, the fudge is best enjoyed within 3 to 5 days when stored properly. The candy eyes and almond bark drizzle maintain their shape and taste best in that window.
Final Thoughts
I cannot recommend this Mummy Fudge Recipe enough for anyone wanting a playful, delicious, and easy-to-make Halloween treat. From the creamy fudge base to the whimsical mummy eyes and drizzles, it brings smiles and satisfaction in every bite. Trust me, once you try it, this recipe will become a seasonal favorite you’ll be excited to share year after year!
Print
Mummy Fudge Recipe
- Prep Time: 15 minutes
- Cook Time: 0 minutes
- Total Time: 2 hours 15 minutes
- Yield: 16 pieces
- Category: Dessert
- Method: No-Cook
- Cuisine: American
Description
This festive Mummy Fudge recipe is a delightful no-bake treat perfect for Halloween. Creamy and sweet, made with white baking chips, almond bark, and sweetened condensed milk, it’s decorated with candy eyes and drizzled almond bark to resemble spooky mummies, making it a fun and easy confection to enjoy or share at Halloween parties.
Ingredients
Fudge Base
- 2 cups white baking chips
- 20 oz white almond bark (divided)
- 1 can sweetened condensed milk
- 1 tsp vanilla extract
- 1/8 tsp salt
Decoration
- 32 candy eyes
Instructions
- Prepare Pan: Line a 9×9” square pan with parchment paper to prevent sticking and make it easy to remove the fudge later.
- Melt Ingredients: Using a double boiler on medium heat, melt together the white baking chips, 8 oz of the white almond bark, and the sweetened condensed milk until the mixture is nearly smooth, ensuring gentle heat to avoid burning.
- Finish Melting Off Heat: Remove the mixture from heat just before fully melted and continue stirring until completely smooth to prevent scorching.
- Add Flavor: Stir in the vanilla extract and salt evenly to enhance the fudge’s flavor profile.
- Set the Fudge: Pour the fudge mixture into the prepared pan and refrigerate for 2 hours or allow to stand at room temperature up to 4 hours until fully hardened.
- Cut Fudge: Once firm, cut the fudge into 16 equal pieces for individual servings.
- Melt Remaining Almond Bark: Microwave the remaining 12 oz of almond bark in 20-second intervals, stirring between each, until smooth and ready for decorating.
- Prepare Piping Bag: Transfer the melted almond bark into a zippered plastic bag and snip the tip to create a piping tool; the size of the cut will affect the drizzle thickness.
- Attach Eyes: Place two dots of melted almond bark on each fudge piece and press candy eyes onto these dots to secure them.
- Decorate as Mummies: Drizzle the melted almond bark around the candy eyes in a criss-cross pattern to mimic mummy bandages.
- Cool Completely: Let the decorated fudge pieces cool fully so the drizzle hardens, then enjoy or package as a festive Halloween treat.
Notes
- Use a double boiler or a heatproof bowl over simmering water to gently melt the fudge ingredients and prevent burning.
- Adjust the tip size of the piping bag to create thicker or thinner mummy bands as desired.
- Allow the fudge to fully set before cutting to ensure clean pieces.
- Store the fudge in an airtight container at room temperature or refrigerated for longer freshness.
- Be careful not to overheat the almond bark in the microwave as it can seize or burn quickly.


