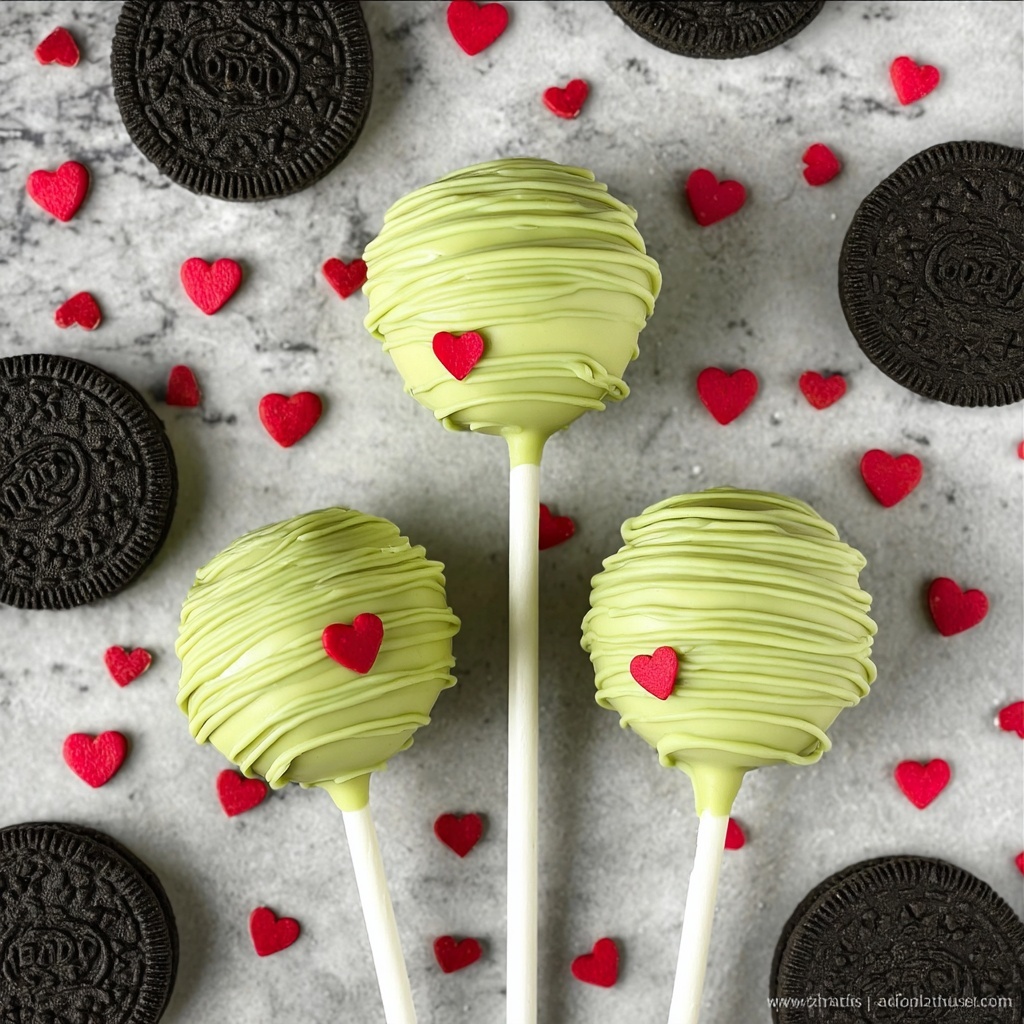
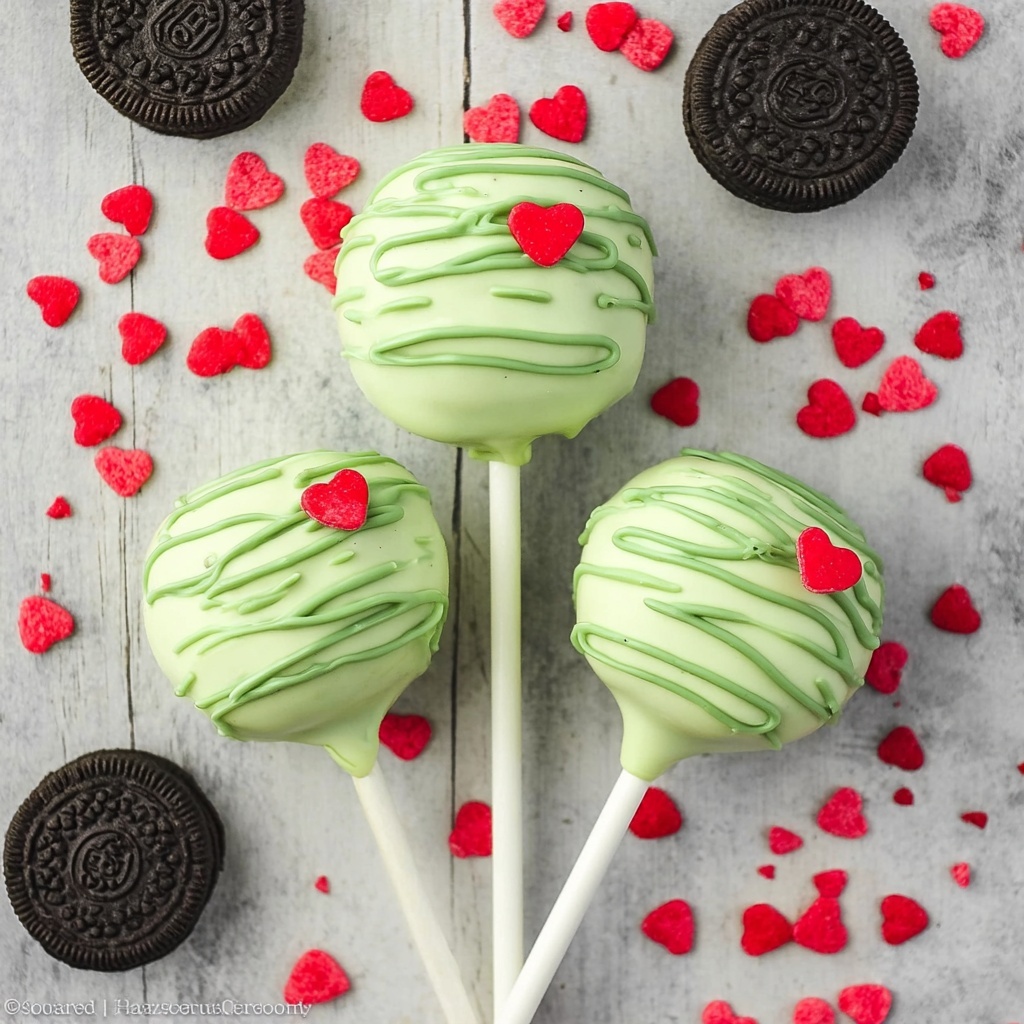
If you’re on the lookout for a whimsical and utterly delightful treat to brighten up your holiday gatherings, then you are going to adore this Grinch Oreo Pops Recipe. These little pops combine the rich, classic flavor of Oreos with a festive burst of vibrant green candy coating, turning snack time into a playful celebration. With their cute heart sprinkle accents and easy-to-make process, these Grinch-themed Oreo pops are sure to steal the show and your heart. Trust me, once you try making these, they’ll become a beloved tradition for all your seasonal festivities.

Ingredients You’ll Need
Gathering a handful of simple yet essential ingredients is all it takes to create these irresistible Grinch Oreo Pops. Each component plays its part, from the crunchy Oreo base to the silky green candy melts that bring the signature Grinch color and texture to life.
- 15 Oreos: These are the sturdy and delicious foundation for your pops, perfect for holding all the candy coating and decorations.
- 12 Ounces Vibrant Green Candy Melts: These candy melts provide that eye-catching color and smooth finish essential for creating the Grinch look.
- 1 Tablespoon Coconut Oil: Adding coconut oil to the candy melts makes the coating easier to dip and gives it a beautiful, glossy shine.
- Large Red Heart Sprinkles: These add the final festive flourish, bringing a pop of cheerful color and a sweet detail that mimics the Grinch’s little heart.
How to Make Grinch Oreo Pops Recipe
Step 1: Prepare Your Workspace
First things first, line a baking sheet with parchment paper. This will keep your Oreo pops from sticking and make cleanup a breeze, so you can focus more on the fun part of creating this holiday treat.
Step 2: Separate the Oreos
Carefully pull one side off each Oreo cookie and arrange the exposed filling side down on your prepared baking sheet. This allows you to properly secure the sticks in the next step without making a mess.
Step 3: Melt the Candy Melts
Place your vibrant green candy melts in a microwave-safe bowl. Heat them on high for around 3 minutes, stirring every 15 to 30 seconds to keep the chocolate smooth and prevent burning. This step is key to achieving that luscious texture for dipping.
Step 4: Mix in Coconut Oil
Add the tablespoon of coconut oil to the melted candy and stir until fully combined. The oil thins the candy melts just enough, making your dipping process smoother and your coating glossier.
Step 5: Insert the Sticks
Dip each sucker stick about half an inch into the melted candy, then gently push it into the center of the Oreo filling about halfway up. Place the other half of the Oreo on top, sandwiching the stick securely in the middle. This creates a sturdy handle for dipping and eating.
Step 6: Chill for Set Up
Pop the assembled Oreo pops into the refrigerator for about 5 minutes. This helps the candy to harden around the stick so everything stays in place when you dip the whole cookie.
Step 7: Dip the Oreo Pops
Pour the melted candy into a tall cup to make dipping easier. Dunk each Oreo pop into the candy coating until it is fully covered, turning as needed for an even coat. This step transforms your Oreo into the star of the show with that festive green glow.
Step 8: Remove Excess Coating
Lightly tap the stick on the side of the cup to shake off any extra coating, then tap the bare end of the stick on the counter to flatten the chocolate at the bottom slightly. This neat trick helps your pops stand upright and look professionally finished.
Step 9: Chill to Harden
Set your dipped Oreo pops back onto the parchment-lined baking sheet and chill for about 10 minutes until the coating is completely set. This step is essential for that satisfying snap when you bite into the pop.
Step 10: Prepare for Decoration
Transfer the remaining melted candy into a piping or frosting bag. Cut off a small tip at a 45-degree angle—this lets you drizzle the chocolate delicately for that extra touch of detail.
Step 11: Decorate with Drizzles and Sprinkles
Drizzle some of the melted candy over the top of each Oreo pop to create a fun, artistic pattern. While the drizzle is still wet, press a red heart sprinkle onto the upper-right corner of each pop. This is the iconic little heart that ties the whole Grinch theme together beautifully.
Step 12: Final Chill and Enjoy!
Pop your finished Oreo pops into the fridge one last time for about 5 minutes so that the drizzle and sprinkles firmly set. Then, it’s time to enjoy your festive, fun, and utterly delicious Grinch Oreo Pops Recipe with friends and family!
How to Serve Grinch Oreo Pops Recipe
Garnishes
Adding garnishes can elevate your Grinch Oreo Pops to another level. Consider sprinkling a bit of edible glitter or crushed peppermint on top for an extra festive sparkle that catches the eye and adds a hint of holiday flavor. The luscious green pop color paired with red hearts makes an ideal canvas for these charming additions.
Side Dishes
These Oreo pops pair delightfully with warm drinks like hot chocolate or spiced cider, balancing their sugary sweetness with cozy warmth. They also make a perfect companion to a vibrant fruit platter or light vanilla ice cream, offering a fun contrast in temperatures and textures.
Creative Ways to Present
Presentation can truly make your Grinch Oreo Pops the star of any party. Arrange them standing upright in a foam block covered in green tissue paper or place them in a decorated jar filled with red and green candy. Wrapping each pop individually in cellophane tied with a festive ribbon allows you to hand them out as charming homemade gifts that everyone will treasure.
Make Ahead and Storage
Storing Leftovers
If you have any Grinch Oreo Pops left after your celebration, store them in an airtight container at room temperature for up to 3 days to maintain that crunchy texture and crisp candy coating. Avoid refrigeration if you want to keep the coating from sweating or becoming sticky.
Freezing
You can freeze your Oreo pops by wrapping each one individually in plastic wrap and then placing them in a freezer-safe container. When you want to enjoy them again, let them thaw in the fridge for a couple of hours—this keeps the pops tasting just as fresh as the day you made them.
Reheating
Since these pops taste best chilled or at room temperature, reheating is generally not recommended. If you prefer the candy melts to be a bit softer before eating, just take them out of the refrigerator for 10 to 15 minutes to let them come to room temperature naturally.
FAQs
Can I use other types of cookies instead of Oreos?
Absolutely! While Oreos provide the perfect combination of crunch and creaminess, you can experiment with similar sandwich cookies. Just make sure they’re sturdy enough to hold the candy coating and stick.
What if I don’t have coconut oil? Can I skip it?
You can skip the coconut oil, but it helps thin the candy melts, making dipping smoother and the finish shinier. As an alternative, you might try vegetable oil in a small amount, but coconut oil tends to yield the best results.
How do I prevent the candy melts from burning in the microwave?
Heat the candy melts in short bursts (15-30 seconds) and stir in between. This even heat distribution protects the chocolate from scorching and ensures a smooth consistency perfect for dipping.
Can I make these pops without sticks?
Technically yes, but the sticks make these treats easier to handle and give them that fun “pop” feel. Without sticks, you lose some of the charm and ease of eating them at parties.
Are these Oreo pops gluten-free?
Traditional Oreos contain gluten, so these pops are not gluten-free unless you use a certified gluten-free cookie alternative. The candy melts and other ingredients are usually gluten-free, but always double-check labels to be sure.
Final Thoughts
Now that you have all the juicy details and cheerful steps for this Grinch Oreo Pops Recipe, I hope you feel inspired to dive into the kitchen and whip up some holiday magic. These playful treats combine charm, color, and incredible flavor into every bite, making them a perfect way to spread joy this season. Go ahead, share the love, and watch these pops disappear fast at your next gathering!
Print
Grinch Oreo Pops Recipe
- Prep Time: 20 minutes
- Cook Time: 3 minutes
- Total Time: 28 minutes
- Yield: 15 pops
- Category: Dessert
- Method: No-Cook
- Cuisine: American
Description
Celebrate the holiday season with these festive Grinch Oreo Pops, featuring vibrant green candy coating and charming red heart sprinkles. These easy-to-make treats combine the classic crunch of Oreos with a smooth, colorful candy shell, perfect for gifting or sharing at parties.
Ingredients
Ingredients
- 15 Oreos
- 12 ounces vibrant green candy melts
- 1 tablespoon coconut oil
- Large red heart sprinkles
Instructions
- Prepare baking sheet: Line a baking sheet with parchment paper to prevent sticking and make cleanup easier.
- Separate Oreos: Pull one side off each Oreo and arrange the separated halves on the lined baking sheet.
- Melt candy melts: Place the vibrant green candy melts into a microwave-safe bowl. Microwave on high for about 3 minutes, stirring every 15-30 seconds to ensure even melting and to prevent burning.
- Add coconut oil: Stir in 1 tablespoon of coconut oil thoroughly into the melted candy for a smooth dipping consistency.
- Insert sticks: Dip each sucker stick about half an inch into the melted candy, then insert it under halfway up the Oreo filling in the middle half. Press the Oreo tops back onto the filling to secure the stick inside.
- Chill Oreos with sticks: Place the Oreo pops in the refrigerator and chill for about 5 minutes or until the candy hardens and holds the sticks firmly.
- Dip Oreos: Transfer the melted candy to a tall cup. Completely dip each Oreo pop into the candy coating, ensuring full coverage.
- Drain excess: Lightly tap the stick on the side of the cup to remove excess chocolate, then gently tap the bottom of the stick on the counter to flatten the candy at the base.
- Chill dipped Oreos: Return the dipped Oreo pops to the baking sheet and chill for 10 minutes or until fully set and hardened.
- Decorate with drizzle: Pour any remaining melted candy into a piping or frosting bag and snip a small portion off at a 45-degree angle to create a thin drizzle.
- Add drizzle and sprinkles: Drizzle the candy over the top surface of each Oreo pop, then quickly press a large red heart sprinkle into the upper-right corner before the candy sets.
- Final chill: Chill the decorated Oreo pops for an additional 5 minutes or until the drizzle hardens completely. Enjoy your festive Grinch Oreo Pops!
Notes
- You can substitute coconut oil with vegetable oil if preferred.
- For easier melting, occasionally stir the candy melts in the microwave to avoid overheating.
- Make sure pops are fully chilled and hardened between steps for best results and easier handling.
- Use a piping or small zip-top bag for the drizzle for precision.
- Store in an airtight container at room temperature or in the fridge depending on ambient temperature.
