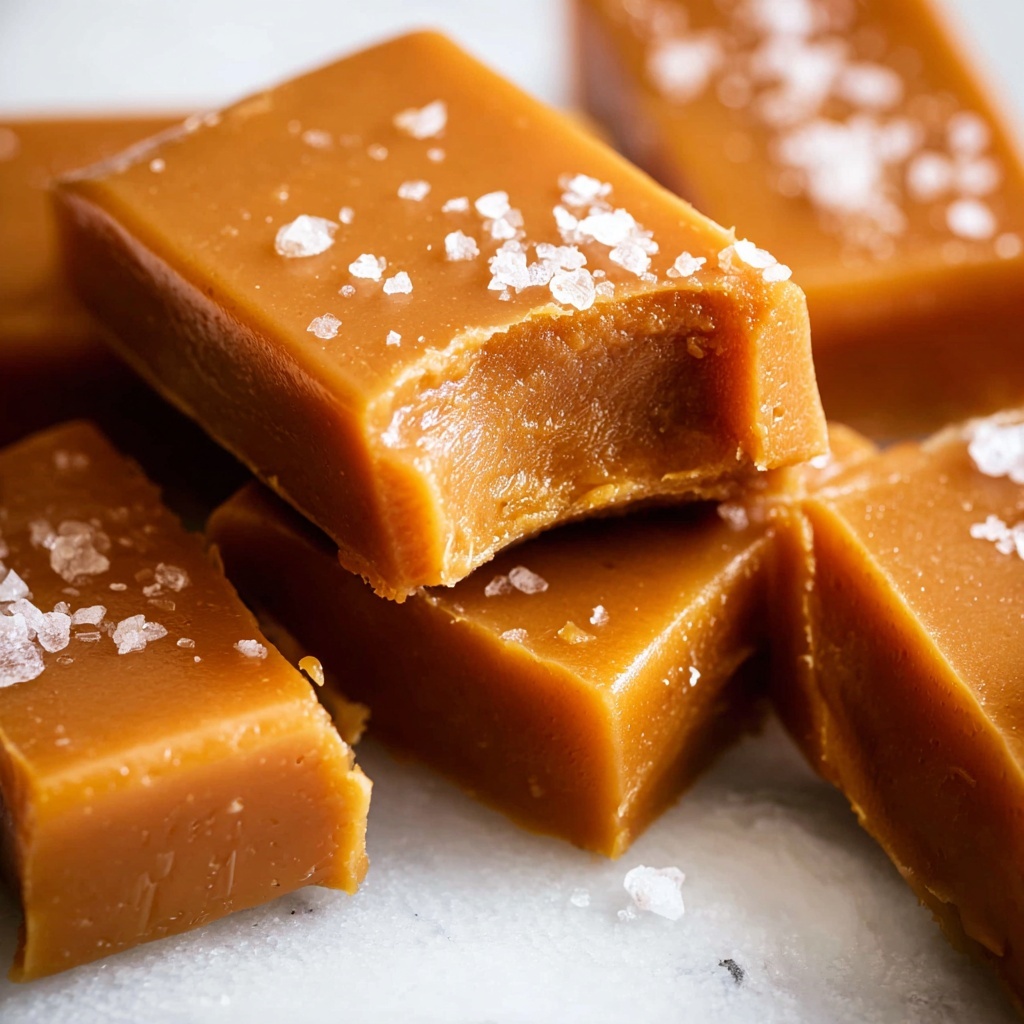
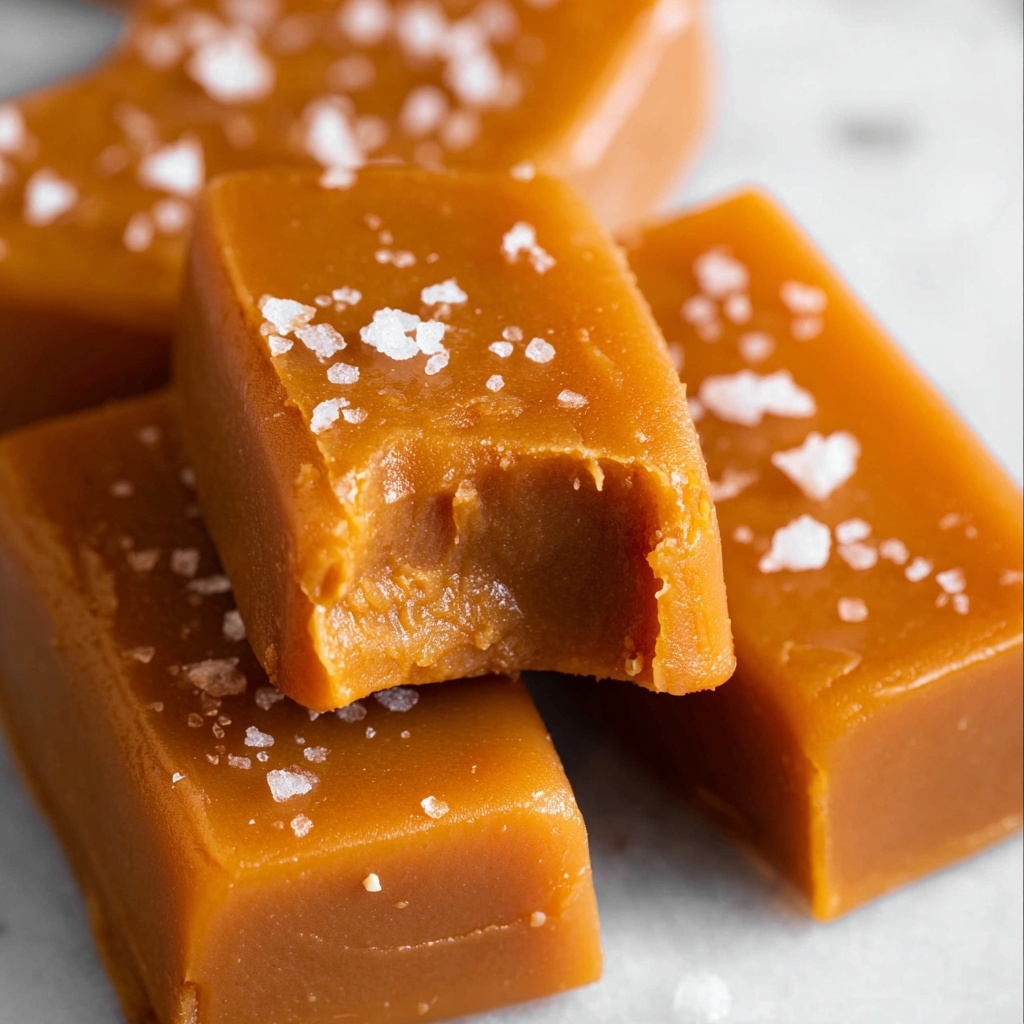
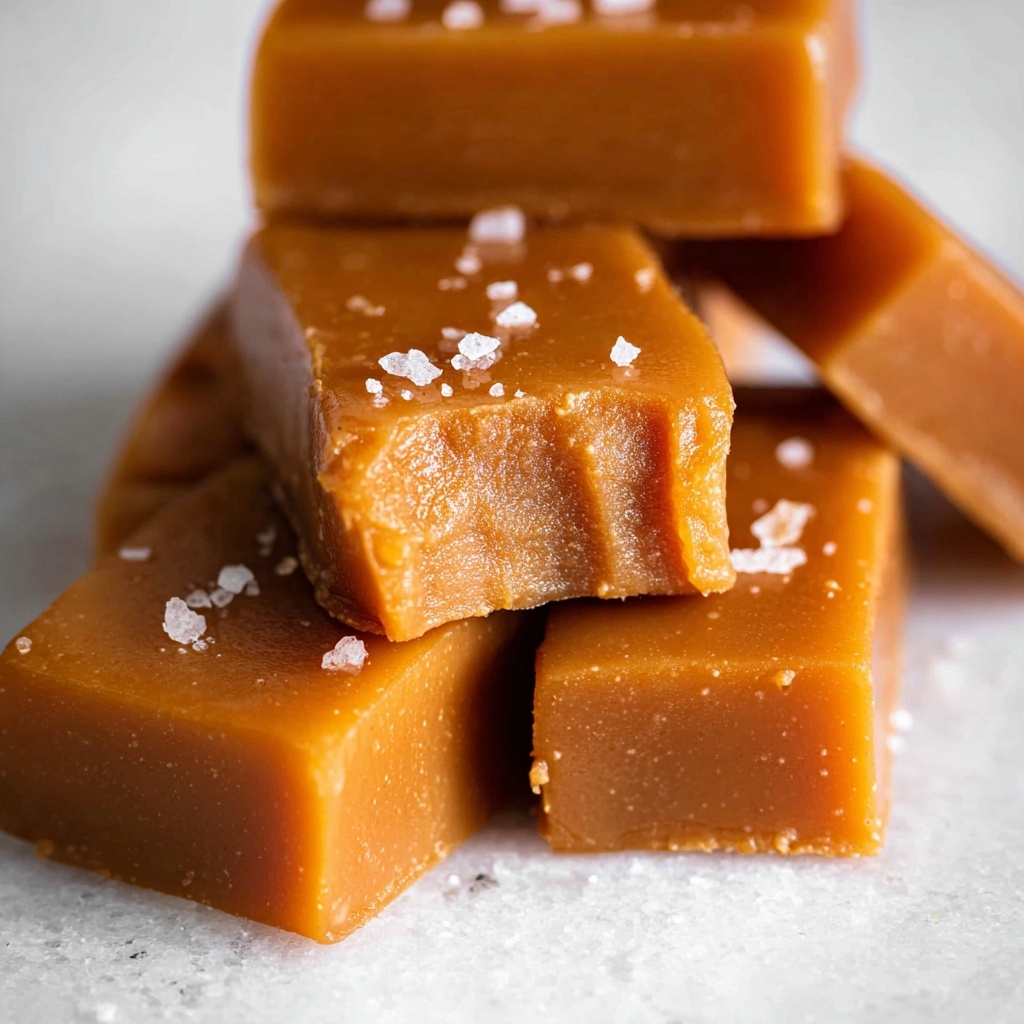
If you’ve ever dreamed of kitchen magic that ends with buttery, melt-in-your-mouth treats, then this Soft Homemade Caramels Recipe is calling your name. Imagine rich, gooey squares of caramel that perfectly balance sweetness with a touch of sea salt, made from scratch with simple ingredients you likely already have at home. These caramels are wonderfully soft yet hold their shape beautifully, making them an irresistible indulgence whether shared as gifts or savored slowly bite by bite. Trust me, once you master this recipe, store-bought caramels will be a distant memory!
Ingredients You’ll Need
To create these luscious Soft Homemade Caramels Recipe, you only need a handful of straightforward ingredients. Each one is crucial for delivering that perfect caramel texture, depth of flavor, and that irresistible golden hue.
- Water (1/4 cup): Helps dissolve the sugar evenly, setting the base for smooth caramel.
- Dark brown sugar (2 cups, packed): Provides a deep, molasses-rich sweetness that’s essential for flavor complexity.
- Light corn syrup (1 cup): Prevents crystallization, ensuring the caramels stay soft and chewy.
- Butter (1/2 cup/1 stick): Adds a rich creaminess and luscious mouthfeel.
- Heavy cream (1 cup) or evaporated milk: The secret to that silky softness and luxurious texture.
- Kosher salt (1.5 teaspoons): Balances the sweetness and enhances all the caramel’s notes.
- Vanilla extract or vanilla bean paste (1 tablespoon): Brings warmth and a fragrant finishing touch.
- Large flake sea salt (optional): To sprinkle on top for that striking salted-caramel contrast.
How to Make Soft Homemade Caramels Recipe
Step 1: Prepare Your Pan and Ingredients
Start by lining an 8×8 or 9×9 inch square pan with parchment paper. Take your time folding the corners neatly—this will help you lift the caramel out easily later. Next, get everything ready: measure out the corn syrup and cream, unwrap the butter, and keep your salt and vanilla nearby. It’s crucial to have all your ingredients at the ready because caramel goes from slow simmer to rapid boil very quickly!
Step 2: Wet the Sugar
Using a heavy 3-quart stainless steel saucepan, pour in the water and swirl it to wet the sides. Then add the packed dark brown sugar into the center, avoiding contact with the pan edges. Medium heat is your friend here, and use a flat whisk to gently pull the water toward the sugar so it dissolves evenly. This slow, careful coaxing sets the smooth base for your caramel.
Step 3: Caramelize the Sugar
The magic really starts once the sugar-water mixture begins bubbling. Keep whisking near-constantly and watch as it foams and releases smoke puffs. When consistent smoke appears, check your thermometer—you’re aiming for 260 to 265 degrees Fahrenheit. Once this temperature is reached and those flavorful browned aromas fill the kitchen, immediately remove the pan from heat to avoid burning. This intense moment shapes that rich caramel flavor you crave.
Step 4: Halt Cooking and Add Corn Syrup
While the pan is off the heat, whisk in the corn syrup without delay to stop further cooking, which helps prevent graininess. This splash of syrup is what keeps your caramels luxuriously soft — and trust me, rushing this part can cost you that smooth texture.
Step 5: Incorporate Butter and Return to Heat
Add the butter to the pot, whisking until it mostly melts, then set the pan back on medium. You’ll see the mixture bubbling again—stir until the butter is fully melted and blended. This step builds that velvety richness that makes every bite unforgettable.
Step 6: Slowly Add Cream
Here’s a trick to keep your caramel perfectly smooth: pour in the cream gradually over about five minutes. Adding it little by little while stirring prevents separation or a grainy texture, helping your Soft Homemade Caramels Recipe keep that beautiful creamy consistency.
Step 7: Finish Cooking to Target Temperature
Continue to stir over medium heat until your caramel reaches 240 degrees Fahrenheit, not a degree higher. This stage can take 5-10 minutes, so be patient and use your thermometer religiously — it’s the golden rule for soft, chewy caramels.
Step 8: Add Salt and Vanilla
Remove the pot from heat and immediately whisk in the kosher salt and vanilla extract or paste. Salt enhances the caramel’s deep notes and balances the sweetness, while vanilla adds that irresistible fragrant warmth. Customize the salt to your taste, though I recommend not skipping it entirely.
Step 9: Pour and Chill
Pour the caramel mixture into your prepared pan and – if you love that signature touch – sprinkle large flakes of sea salt on top. Let the caramel cool completely at room temperature for 2 to 4 hours, or pop it in the fridge to speed things up. Before slicing, chill it further in the freezer or fridge for 10-20 minutes so the caramels cut cleanly.
Step 10: Slice and Wrap
Lift the set caramel out of the pan using the parchment paper, then use a large sharp knife to cut into desired squares, usually between 48 and 56 pieces. Work quickly to separate each piece so they don’t meld back together. Wrap each caramel in parchment strips, rolling and twisting the ends — pre-cut wrappers can save you so much time here! This wrapping keeps them fresh and perfectly shaped.
Step 11: Store or Freeze
Store your wrapped caramels in an airtight container at room temperature if planning to eat within a week, or refrigerate if you love your caramels chilled. For longer storage, freeze them in a ziplock bag and thaw at room temperature for a few hours before enjoying. That’s how you keep your homemade Soft Homemade Caramels Recipe fresh, delightfully soft, and perfectly indulgent every time.
How to Serve Soft Homemade Caramels Recipe
Garnishes
Sprinkling your caramels with a hint of large flake sea salt just before serving adds a sophisticated crunch that elevates the caramel’s sweetness. You can also try a light dusting of cocoa powder or finely chopped nuts like toasted pecans for an extra special touch.
Side Dishes
Soft Homemade Caramels shine on their own but also pair beautifully with a warm cup of coffee or rich hot chocolate. Serve alongside fresh fruits like sliced apples or pears, which complement the caramel’s sweetness and provide a refreshing contrast.
Creative Ways to Present
Consider arranging your caramels in a decorative jar with fairy lights for gifting, or stake them on sticks for caramel lollipops. Wrapping each caramel individually in colored parchment makes them feel like tiny treasures, perfect for party favors or holiday treats.
Make Ahead and Storage
Storing Leftovers
Store leftover caramels wrapped tightly in parchment in an airtight container at room temperature for up to one week. This keeps them delectably soft, ready to savor anytime you need a sweet moment.
Freezing
For longer storage, freeze wrapped caramels in a ziplock bag. They can last up to six months this way. When you’re ready to indulge, simply remove them from the freezer and let them sit at room temperature for 2-4 hours until perfectly soft.
Reheating
If your caramel feels a bit too firm, gently warm pieces in the microwave for 10-15 seconds or in a low-temperature oven wrapped in foil. But be careful not to overheat, or you’ll lose that soft, chewy magic!
FAQs
Can I substitute evaporated milk for heavy cream in this Soft Homemade Caramels Recipe?
Absolutely! Using evaporated milk instead of heavy cream is a great option and will produce a slightly denser caramel but still deliciously soft and flavorful.
Why is my caramel grainy or crumbly?
Graininess often results from sugar crystallization, usually if the sugar isn’t fully dissolved, or if the mixture is stirred too aggressively at the wrong stage. Using corn syrup helps prevent this, as does adding cream slowly and carefully.
How do I know when the caramel is done?
The key indicator is temperature: your caramel should reach exactly 240 degrees Fahrenheit. If you go any higher, it can harden too much. The caramel should look thick and bubbly but still pourable before cooling.
Can I make these caramels vegan?
Traditional recipes rely on butter and cream for that classic texture and richness, but you can experiment with vegan butter and coconut cream. The texture may differ slightly, but it can still satisfy your caramel cravings.
What is the best pan to use for making these caramels?
A heavy, stainless steel saucepan is ideal because it provides even heat distribution and prevents hot spots that can burn your sugar. Avoid enameled or cheap pans to keep your caramel smooth and perfect.
Final Thoughts
Making your own Soft Homemade Caramels Recipe is a truly rewarding experience that fills your kitchen with the most addicting aromas and delivers a sweet, buttery treat like no other. Whether you’re gifting them, sharing with loved ones, or indulging solo, these caramels create smiles with every bite. So grab your ingredients, gather your patience, and dive into the wonderful world of homemade caramel magic—you won’t regret it!
Print
Soft Homemade Caramels Recipe
- Prep Time: 10 minutes
- Cook Time: 20 minutes
- Total Time: 30 minutes (plus 2-4 hours cooling time)
- Yield: 48 caramel pieces
- Category: Candy
- Method: Stovetop
- Cuisine: American
Description
This recipe yields soft, homemade caramels perfect for candy lovers who appreciate a rich, buttery texture with a hint of saltiness. Made with dark brown sugar, butter, cream, and a touch of sea salt, these caramels are easy to prepare in a stovetop saucepan and can be wrapped individually for gifting or snacking.
Ingredients
Caramel Base
- 1/4 cup water
- 2 cups dark brown sugar (packed)
- 1 cup light corn syrup
- 1/2 cup butter (1 stick)
- 1 cup heavy cream or 1 cup evaporated milk (see note)
- 1 and 1/2 teaspoons kosher salt (or sea salt; if using table salt, use half the amount)
- 1 tablespoon vanilla extract, vanilla bean paste, or seeds scraped from 1 vanilla bean
Topping (Optional)
- Large flake sea salt for sprinkling on top
Instructions
- Prepare pan: Line an 8×8 or 9×9 inch square pan with parchment paper, folding the corners as needed so the paper fits neatly. Set this aside for later.
- Setup ingredients: Measure out 1 cup light corn syrup and 1 cup heavy cream into separate measuring cups. Unwrap the stick of butter, and place the kosher salt and vanilla extract near your working space for quick access.
- Start caramel base: Pour 1/4 cup water into a heavy 3-quart stainless steel saucepan. Swirl the water to wet the sides of the pan evenly.
- Add brown sugar: Add 2 cups packed dark brown sugar directly into the center of the pan, avoiding the sides to prevent crystallization.
- Incorporate sugar and water: Set heat to medium and use a flat whisk to gently draw the water towards the center to dissolve the sugar, whisking only in the center until smooth.
- Boil and monitor: Allow the mixture to bubble and boil while attaching a candy thermometer to the pot if available.
- Caramelize sugar: Whisk nearly constantly for 6-8 minutes as the mixture foams and bubbles. Watch closely for the first wisps of smoke. Once consistent smoke puffs appear and temperature reaches 260-265°F, remove from heat immediately to avoid burning.
- Add corn syrup: Off the heat, quickly pour in 1 cup light corn syrup while whisking to halt further cooking.
- Mix in butter: Add the butter stick and whisk until mostly melted.
- Heat to combine: Return to medium heat and stir until butter is fully melted and the mixture bubbles again.
- Add cream gradually: Slowly pour 1 cup of cream into the bubbling caramel over about 5 minutes, stirring continuously to prevent separation and graininess.
- Cook to soft-ball stage: Continue stirring over medium heat until the mixture reaches 240°F (stop at 239°F if nervous). This takes roughly 5-10 minutes.
- Finish flavoring: Remove from heat and stir in 1 and 1/2 teaspoons kosher salt (or 3/4 teaspoon table salt), adjusting to taste. Then stir in 1 tablespoon vanilla extract or vanilla bean paste.
- Transfer to pan: Pour the hot caramel into the parchment-lined pan.
- Add topping: If desired, sprinkle large flake sea salt over the top for salted caramel flavor.
- Cool caramel: Let the caramel cool at room temperature for 2-4 hours until firm. To speed cooling, refrigerate the pan; if chilled, allow it to warm at room temperature 10-30 minutes before slicing.
- Prepare for slicing: Chill caramel in freezer for 10 minutes or fridge for 20 minutes to avoid sticking.
- Cut caramel: Lift caramel out with parchment paper onto a cutting board. Using a large chef’s knife, slice into 6-8 rows widthwise; if sticky, chill further and clean the knife as needed.
- Make squares: Immediately rotate and cut into 8 rows lengthwise, creating between 48 to 56 pieces depending on desired size.
- Separate pieces: Prevent caramel squares from sticking by separating them right away. Chill further if pieces soften or lose shape.
- Wrap individually: Cut parchment paper into 4×5 inch rectangles or use pre-cut parchment wrappers. Place each square on a wrapper, roll it tightly, and twist ends to seal.
- Store caramels: Store wrapped caramels in an airtight container. They can be kept at room temperature for up to a week or refrigerated if preferred colder.
- Freeze for long-term storage: Freeze wrapped caramels in a ziplock bag for up to 6 months. Thaw at room temperature for 2-4 hours before serving.
Notes
- Use a heavy stainless steel saucepan for best caramel results; avoid cheap or enameled pots.
- Adding corn syrup right after removing from heat prevents further cooking and burning.
- You may substitute heavy cream with evaporated milk, but cream yields a richer flavor and texture.
- To avoid grainy caramel, add cream slowly and stir continuously when mixing.
- The salt amount can be adjusted or omitted according to preference, but salt enhances caramel’s sweetness balance.
- If the caramel sticks to the knife while cutting, refrigeration or freezing improves ease of slicing.
- Use parchment paper rather than wax paper for wrapping to prevent sticking.


