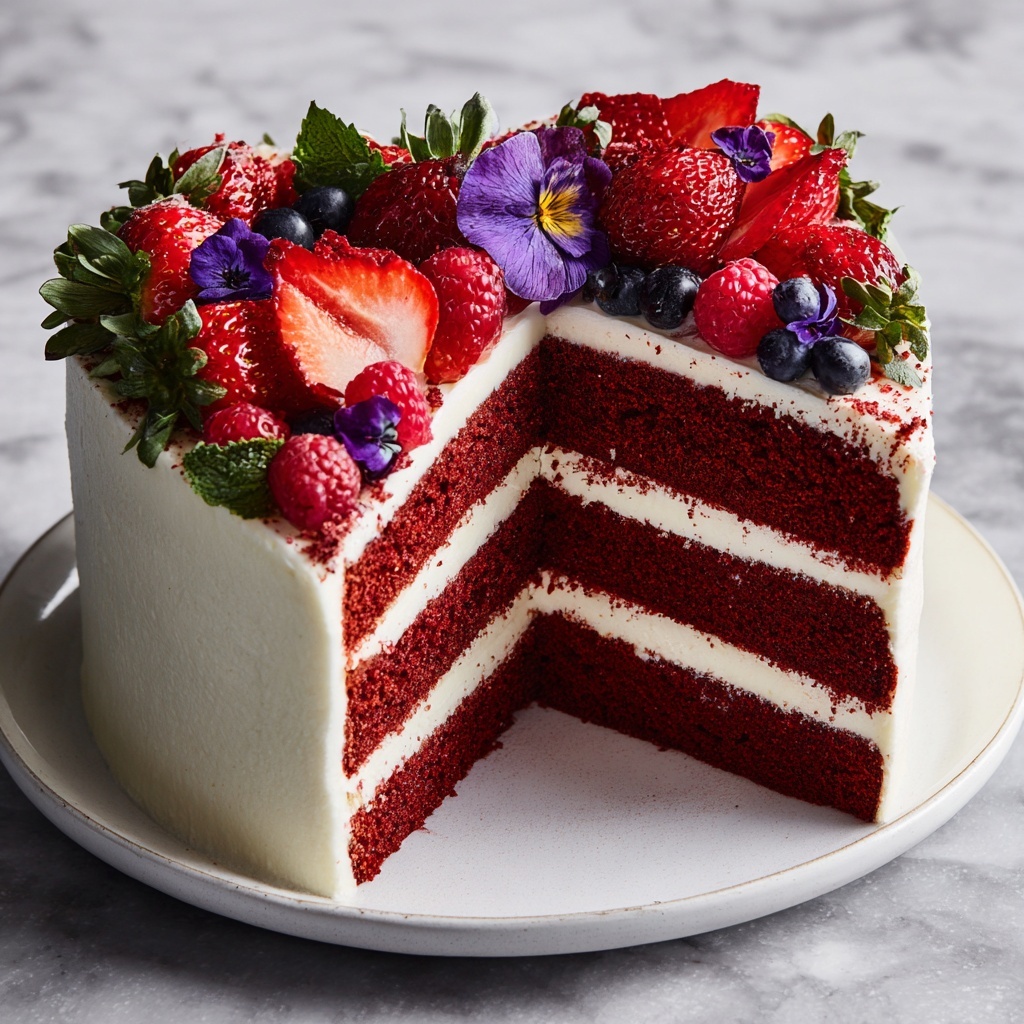
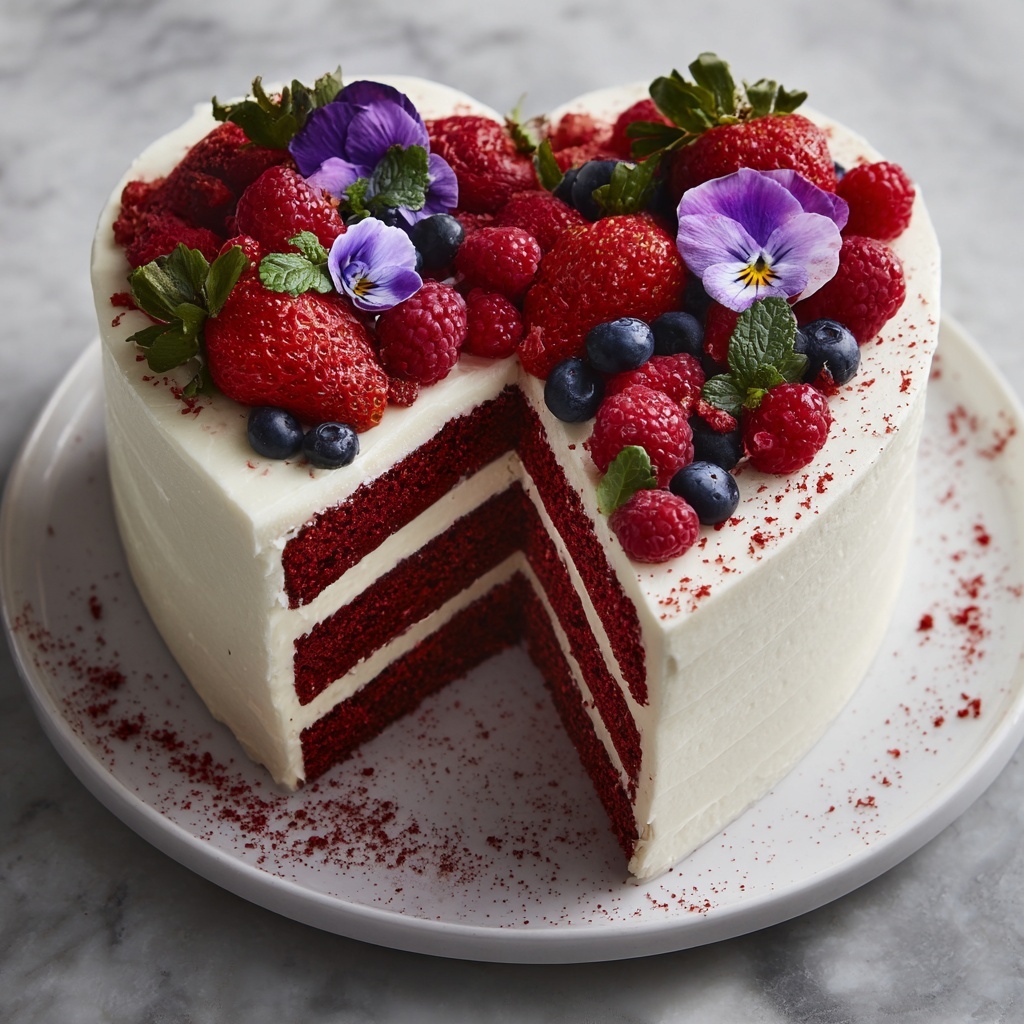
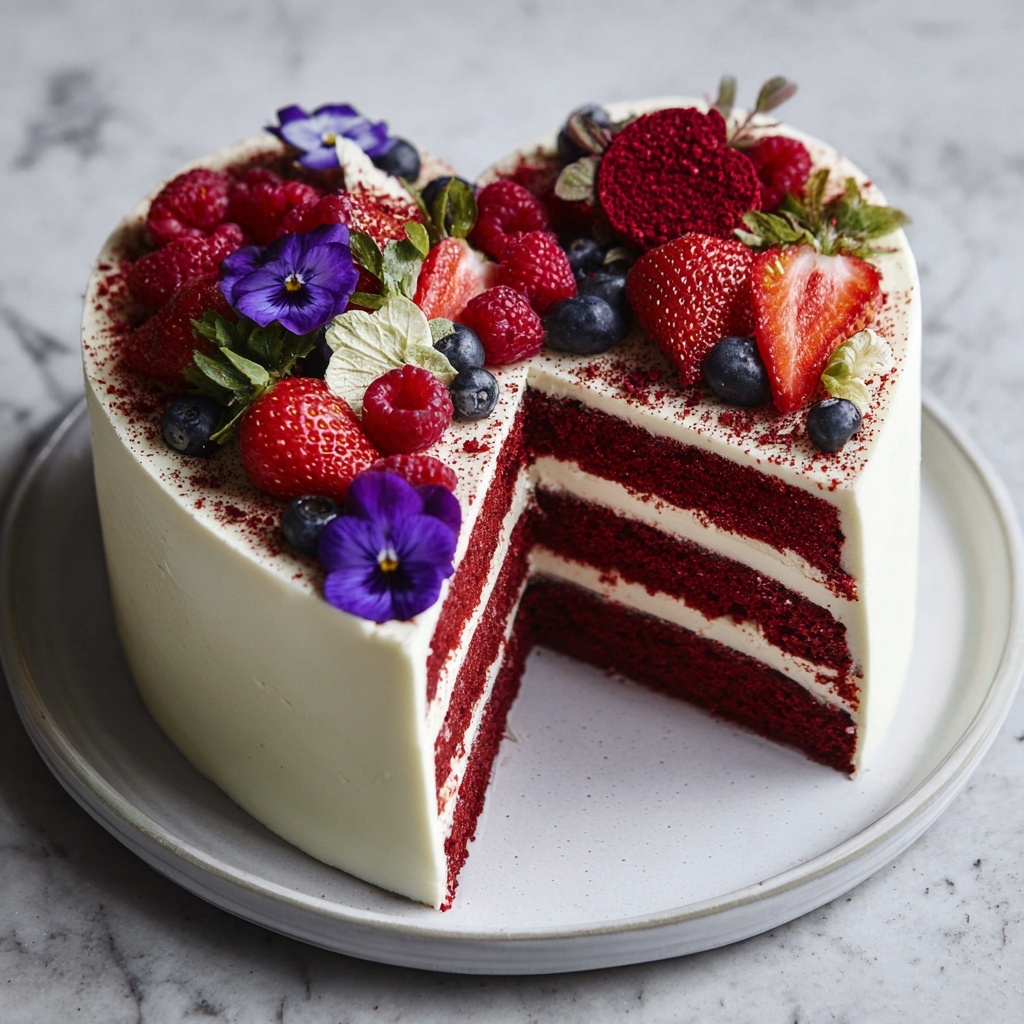
If you are looking to impress your loved ones with a show-stopping dessert, the Heart-Shaped Red Velvet Layer Cake with Berries Recipe is just the treat for you. This cake combines a vibrant red velvet sponge, velvety cream cheese frosting, and a bounty of fresh berries, all artistically layered into charming heart shapes. It’s perfect for celebrations, romantic occasions, or simply when you crave something irresistibly delicious with a touch of elegance. The delightful flavors and stunning presentation will surely become a favorite to make again and again.
Ingredients You’ll Need
This Heart-Shaped Red Velvet Layer Cake with Berries Recipe keeps things delightfully simple, relying on classic ingredients that work harmoniously. Each element contributes to the cake’s signature taste, moist texture, or vibrant red hue, making it a truly irresistible dessert.
- All-purpose flour: Forms the perfect sturdy yet soft base for the cake layers.
- Cocoa powder (unsweetened): Adds subtle chocolate undertones that characterize red velvet.
- Baking soda: Helps the cake rise beautifully and stay tender.
- Salt: Enhances all the flavors without overpowering them.
- Unsalted butter, softened: Offers richness and moisture to the crumb.
- Granulated sugar: Sweetens and balances the slight cocoa bitterness.
- Large eggs, room temperature: Bind everything together and contribute to texture.
- Buttermilk, room temperature: Keeps the layers moist with a gentle tang.
- Vanilla extract: Adds warmth and depth to every bite.
- White vinegar: Reacts with baking soda to leaven and maintain softness.
- Red food coloring (gel or liquid): Gives that iconic bold red appearance we all love.
- Cream cheese (cold): Creates a creamy, tangy frosting that complements the cake perfectly.
- Powdered sugar, sifted: Sweetens the frosting with smooth texture.
- Fresh berries (strawberries, raspberries, blueberries, blackberries): Provide bursts of freshness and beautiful, colorful topping.
- Optional garnishes: Edible flowers, cake crumbs, and mint leaves add elegance and extra layers of flavor.
How to Make Heart-Shaped Red Velvet Layer Cake with Berries Recipe
Step 1: Make the Cake Layers
Start by preheating your oven to 350°F (175°C) and preparing your heart-shaped cake pans by greasing and lining them with parchment paper. In a medium bowl, whisk together the flour, cocoa powder, baking soda, and salt—these dry ingredients create the foundation for tender, moist cake layers. Next, in a large bowl, cream the softened butter and sugar until fluffy; this airiness will give the cake a light crumb. Add eggs one by one, ensuring they incorporate fully, then mix in vanilla extract, red food coloring, and vinegar—the vinegar and baking soda create a tender crumb and help the red to pop. Alternate adding the flour mixture with buttermilk, beginning and ending with flour, for perfect batter consistency. Divide evenly into your pans and bake for 25 to 30 minutes. A toothpick inserted should come out clean. Let your cakes cool completely before leveling the tops if needed.
Step 2: Make the Cream Cheese Frosting
The frosting is a luscious complement to the red velvet and takes just a few minutes to prepare. Beat cold cream cheese until smooth, then add room temperature butter and continue beating until fluffy and combined—this creates a creamy texture that’s rich but not heavy. Gradually add sifted powdered sugar, beating until smooth and silky, then stir in vanilla extract along with a pinch of salt to brighten the flavor. Transfer the frosting to a piping bag fitted with a large round tip for easy assembly and beautiful application.
Step 3: Assemble the Cake
Begin by placing one cake layer on your serving board or plate. Pipe generous dollops of cream cheese frosting across the top—it’s okay to be indulgent here, as this frosting is magic. Gently place the second layer on top and repeat the frosting process. If you have three layers, continue layering and frosting. Finish with a final generous layer of frosting dollops and crown your creation with a vibrant assortment of fresh strawberries, raspberries, blueberries, and blackberries. Feel free to add edible flowers, mint leaves, or sprinkle with cake crumbs for an extra touch of charm. Chilling your layers before stacking can make assembly easier and reduce crumbling, plus using a serrated knife lets you cut round cakes into heart shapes if you don’t have the pans. For a subtle twist, add a hint of lemon zest to the frosting for an uplifting citrus note!
How to Serve Heart-Shaped Red Velvet Layer Cake with Berries Recipe
Garnishes
The fresh berries on top aren’t just beautiful—they add bright, juicy bursts that balance the richness of the cake and frosting. Edible flowers and mint leaves bring an elegant, garden-fresh feel, while a sprinkle of red velvet cake crumbs adds inviting texture and visual interest. These thoughtful touches will delight your guests and turn slicing the cake into a moment of joy.
Side Dishes
This Heart-Shaped Red Velvet Layer Cake with Berries Recipe stands splendidly on its own, but you can pair it with light accompaniments like a dollop of whipped cream, a scoop of vanilla bean ice cream, or even a tangy berry compote to echo the fresh fruit topping. A cup of rich coffee or a fruity tea also pairs wonderfully to balance the cake’s sweet richness.
Creative Ways to Present
For a stunning centerpiece, place the cake on a decorative cake stand surrounded by fresh berries and flower petals. Individual servings can be plated with extra berries and a drizzle of raspberry coulis. You can even create mini versions or cupcakes arranged as a heart for intimate celebrations—a creative way to enjoy all the signature flavors from this beloved Heart-Shaped Red Velvet Layer Cake with Berries Recipe.
Make Ahead and Storage
Storing Leftovers
If you have any cake leftovers, don’t worry—they keep beautifully. Store your Heart-Shaped Red Velvet Layer Cake with Berries Recipe tightly covered in the refrigerator to maintain freshness for up to three days. Before serving again, allow the cake to come to room temperature so the frosting softens and the flavors shine.
Freezing
You can freeze this cake to enjoy later! Wrap individual cake layers in plastic wrap and then foil, or store the whole assembled cake in an airtight container in the freezer. Thaw overnight in the refrigerator before serving. Keep in mind fresh berries are best added fresh after thawing rather than frozen with the cake.
Reheating
Because this cake is best enjoyed chilled or at room temperature, it’s not recommended to warm it in a microwave or oven. Instead, simply let the refrigerated cake sit out for 30–60 minutes before slicing to soften the frosting and bring out the delicious flavors.
FAQs
Can I make this cake without red food coloring?
Absolutely! The classic red velvet color comes from red food coloring, but if you prefer to avoid artificial dyes, you can experiment with natural colorants like beet juice. Just know the color might be less vibrant but the flavor will still be wonderful.
What can I use if I don’t have buttermilk?
You can make a simple buttermilk substitute by adding 1 tablespoon of white vinegar or lemon juice to 1 cup of milk. Let it sit for 5 minutes until it curdles slightly before using in the recipe.
How do I cut round cakes into heart shapes?
Use a serrated knife to carefully trim the round cake. Cut a V shape out of one side to form the indent and angle the opposite edges to create the bottom “point” of the heart. It takes a gentle hand but works beautifully if you don’t have heart pans.
Can I use frozen berries for the topping?
Fresh berries are best for the topping as they hold their shape and texture. Frozen berries release extra juice which can make the frosting soggy. If frozen berries are your only choice, thaw and drain them well before using.
How thick should each cake layer be?
Aim for about 1 to 1.5 inches thickness per layer. This gives a nice balance so the cake feels substantial but still light when stacked with frosting and berries.
Final Thoughts
There’s something genuinely magical about sharing this Heart-Shaped Red Velvet Layer Cake with Berries Recipe with people you care about. It’s as rewarding to make as it is to eat, combining classic flavors, beautiful presentation, and the joy of fresh berries. Whether it’s a special occasion or a sweet craving day, go ahead and bake this treat—you’ll create happy memories with every delicious slice.
Print
Heart-Shaped Red Velvet Layer Cake with Berries Recipe
- Prep Time: 45 minutes
- Cook Time: 30 minutes
- Total Time: 1 hour 15 minutes
- Yield: 10 to 12 slices (from 2 mini cakes or 1 large cake)
- Category: Dessert
- Method: Baking
- Cuisine: American
- Diet: Vegetarian
Description
This Heart-Shaped Red Velvet Layer Cake with Berries is a stunning and delicious dessert perfect for special occasions or festive celebrations. Featuring moist, tender red velvet layers baked to perfection and generously coated with smooth, creamy cream cheese frosting, this cake is beautifully crowned with a mix of fresh berries and optional edible flowers for a vibrant, elegant finish. The recipe includes detailed instructions to create either two mini heart-shaped cakes or one large heart-shaped cake, making it versatile and impressive for any gathering.
Ingredients
For the Red Velvet Cake
- 2 ½ cups (315g) all-purpose flour
- 2 tablespoons cocoa powder (unsweetened)
- 1 teaspoon baking soda
- ½ teaspoon salt
- 1 cup (226g) unsalted butter, softened
- 1 ¾ cups (350g) granulated sugar
- 2 large eggs, room temperature
- 1 cup (240ml) buttermilk, room temperature
- 2 teaspoons vanilla extract
- 1 tablespoon white vinegar
- 2 tablespoons red food coloring (gel or liquid)
For the Cream Cheese Frosting
- 6 oz (170g) cream cheese, cold
- 1 cup (226g) unsalted butter, room temperature
- 4 cups (500g) powdered sugar, sifted
- 1 ½ teaspoons vanilla extract
- Pinch of salt
Topping
- Fresh strawberries, halved
- Raspberries
- Blueberries
- Blackberries
- Optional: edible flowers, red velvet cake crumbs, mint leaves
Instructions
- Make the Cake Layers: Preheat your oven to 350°F (175°C). Grease and line 2 to 3 heart-shaped cake pans (or use round pans and cut cakes into hearts later). In a medium bowl, whisk together the flour, cocoa powder, baking soda, and salt, then set aside. In a large bowl, cream the softened butter and sugar together until light and fluffy, about 3 to 4 minutes. Add the eggs one at a time, beating well after each addition. Stir in the vanilla extract, red food coloring, and white vinegar. Gradually add the dry ingredient mixture in three parts, alternating with the buttermilk, beginning and ending with the flour mixture. Divide the batter evenly among the prepared pans and bake for 25 to 30 minutes, or until a toothpick inserted in the center comes out clean. Allow the cakes to cool completely and level the tops if necessary before assembling.
- Make the Cream Cheese Frosting: In a large bowl, beat the cold cream cheese for about 30 seconds until smooth. Add the room temperature butter and beat together until the mixture is fluffy and well combined, about 2 to 3 minutes. Gradually add the sifted powdered sugar and beat until the frosting is smooth and creamy. Stir in the vanilla extract and a pinch of salt. Transfer the frosting to a piping bag fitted with a large round tip for easy assembly.
- Assemble the Cake: Place one cake layer on a cake board or serving plate. Pipe large dollops of frosting evenly over the top. Gently place the second cake layer on top and repeat the frosting process. If you have a third layer, repeat adding cake and frosting layers once more. Finish with a final layer of frosting dollops on top. Garnish the top of the assembled cake generously with a mixture of fresh strawberries, raspberries, blueberries, and blackberries. Optionally, add red velvet cake crumbs, edible flowers, or mint leaves for extra decoration. Chill the layers before stacking to minimize crumbling and use a serrated knife to cut heart shapes from round cakes if needed.
Notes
- Chill cake layers before assembling to reduce crumbling during frosting.
- If you don’t have heart-shaped pans, bake in round pans and shape cakes using a serrated knife.
- Adding lemon zest to the cream cheese frosting can provide a fresh citrus flavor.
- Store the finished cake in the refrigerator for up to 3 days; bring to room temperature before serving for the best taste and texture.
- Make sure all ingredients are at room temperature for best mixing results, especially eggs and buttermilk.


