If you’ve been searching for a simple yet satisfying dessert that packs a punch of protein without sacrificing flavor, then you’re going to love this Easy High Protein Cheesecake Jars Recipe. Layers of creamy, tangy cheesecake filling nestled atop a crunchy base make this treat totally irresistible. Whether you want a post-workout boost or a guilt-free dessert, these cheesecake jars bring together health and indulgence in perfect harmony.
Ingredients You’ll Need
This Easy High Protein Cheesecake Jars Recipe relies on wholesome, straightforward ingredients you probably have or can easily find. Each component plays a crucial role, whether it’s building texture, adding creaminess, or providing that touch of natural sweetness.
- Almond flour (1 cup): A nutty, gluten-free base that creates a delightful crust texture.
- Melted coconut oil or butter (2 tbsp): Helps bind the crust while adding rich flavor.
- Sweetener of choice (1–2 tbsp): Customize the crust’s sweetness to your liking.
- Low-fat cream cheese, softened (8 oz): Provides the classic tang and creamy texture.
- Greek yogurt (1 cup, 2% or non-fat): Boosts protein content and adds freshness.
- Vanilla protein powder (1–2 scoops): The secret ingredient for elevated protein without compromising taste.
- Sweetener (2–3 tbsp maple syrup, honey, or sugar-free): Sweetens the filling naturally and balances flavors.
- Vanilla extract (1 tsp): Adds warmth and depth.
- Lemon juice (optional, 1–2 tbsp): Brightens the cheesecake with a zesty lift if desired.
How to Make Easy High Protein Cheesecake Jars Recipe
Step 1: Make the Crust
Start by combining almond flour, melted coconut oil or butter, and your chosen sweetener until the mix resembles damp sand. Press about 2 to 3 tablespoons of this crumbly mixture firmly into the bottom of each small jar—something around 4 to 6 ounces works perfectly. You can either chill the crust for 10 to 15 minutes to set it or bake it at 350°F for 8 to 10 minutes until it turns a beautiful golden color and has a slightly crisp texture.
Step 2: Mix the Filling
Next, whip the cream cheese until it’s silky smooth. Add Greek yogurt and keep blending until fully combined and creamy. Now, carefully fold in the vanilla protein powder one scoop at a time to avoid lumps. Sweeten the mixture with your selected sweetener and the splash of vanilla extract. If you want to add an extra pop of brightness, stir in lemon juice. This not only balances the richness but also makes every bite refreshingly delicious.
Step 3: Assemble the Jars
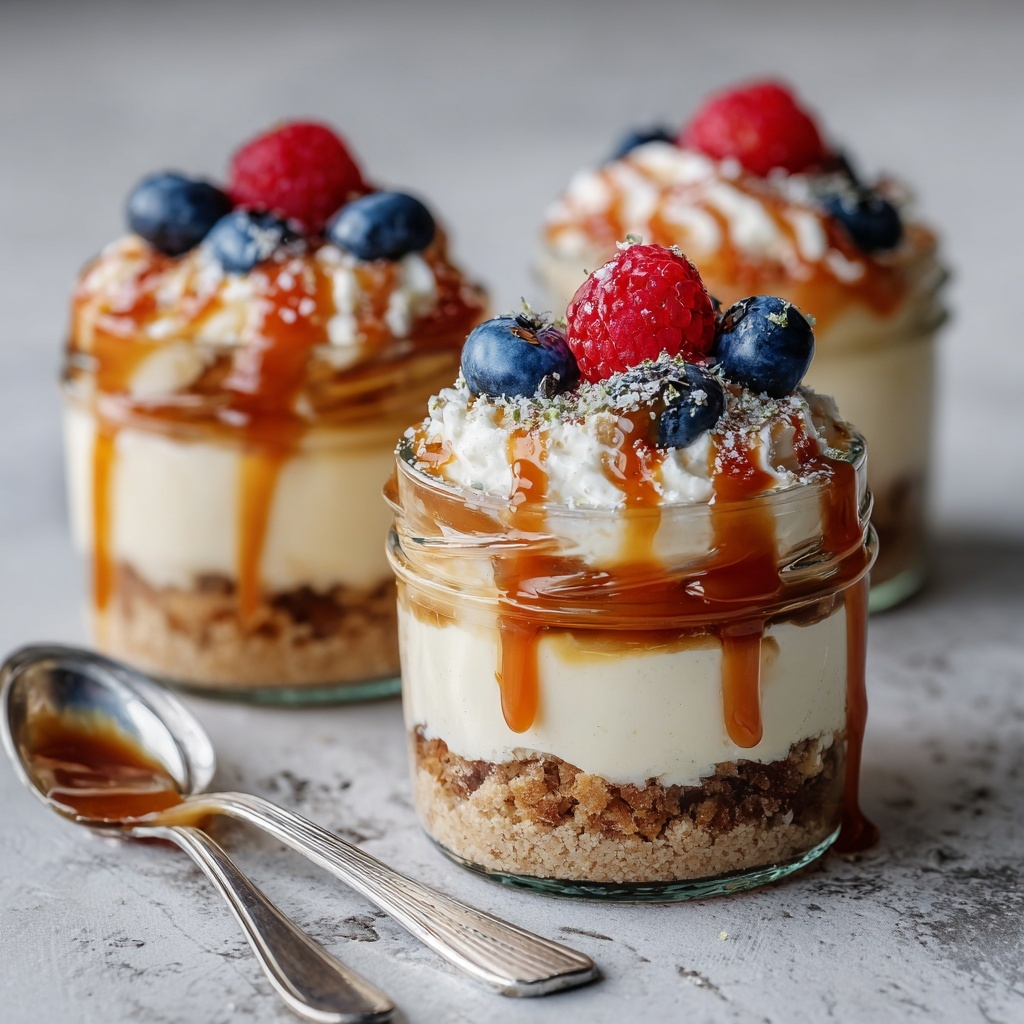
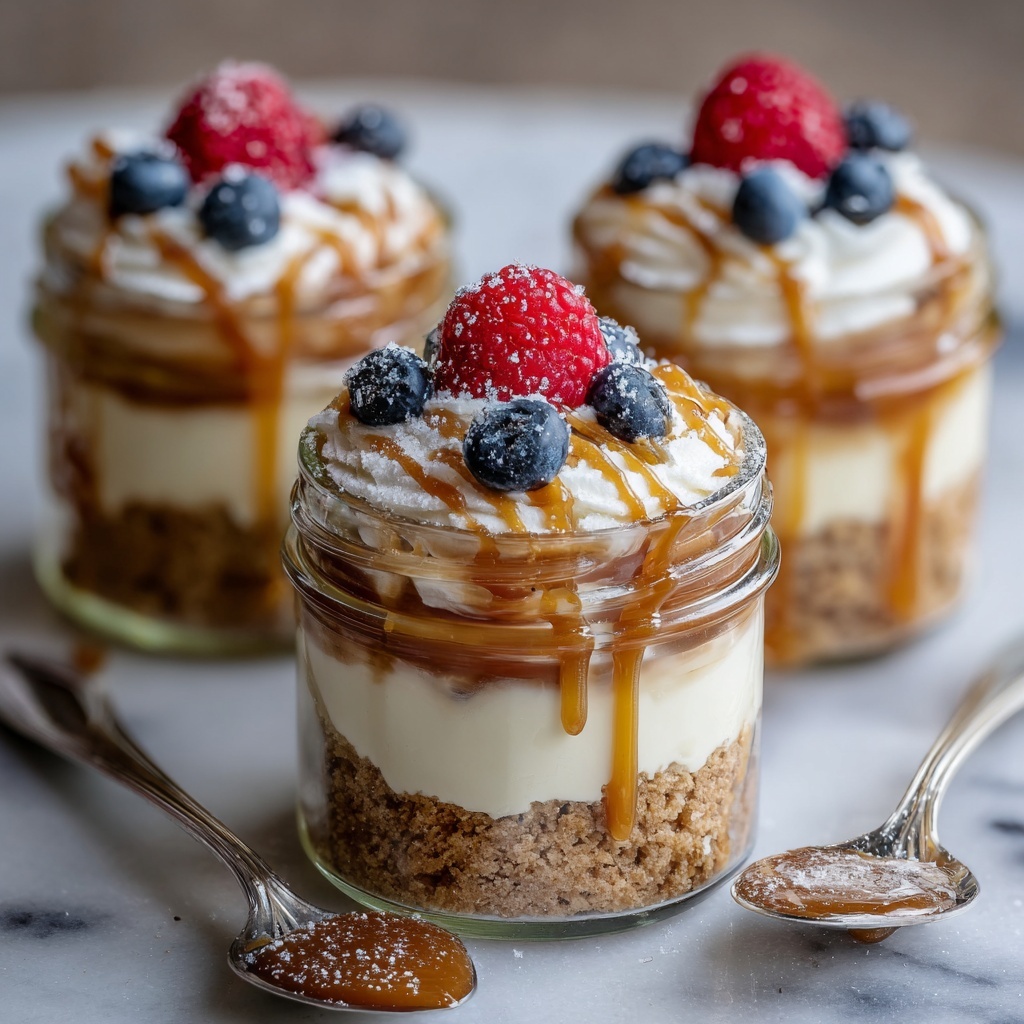
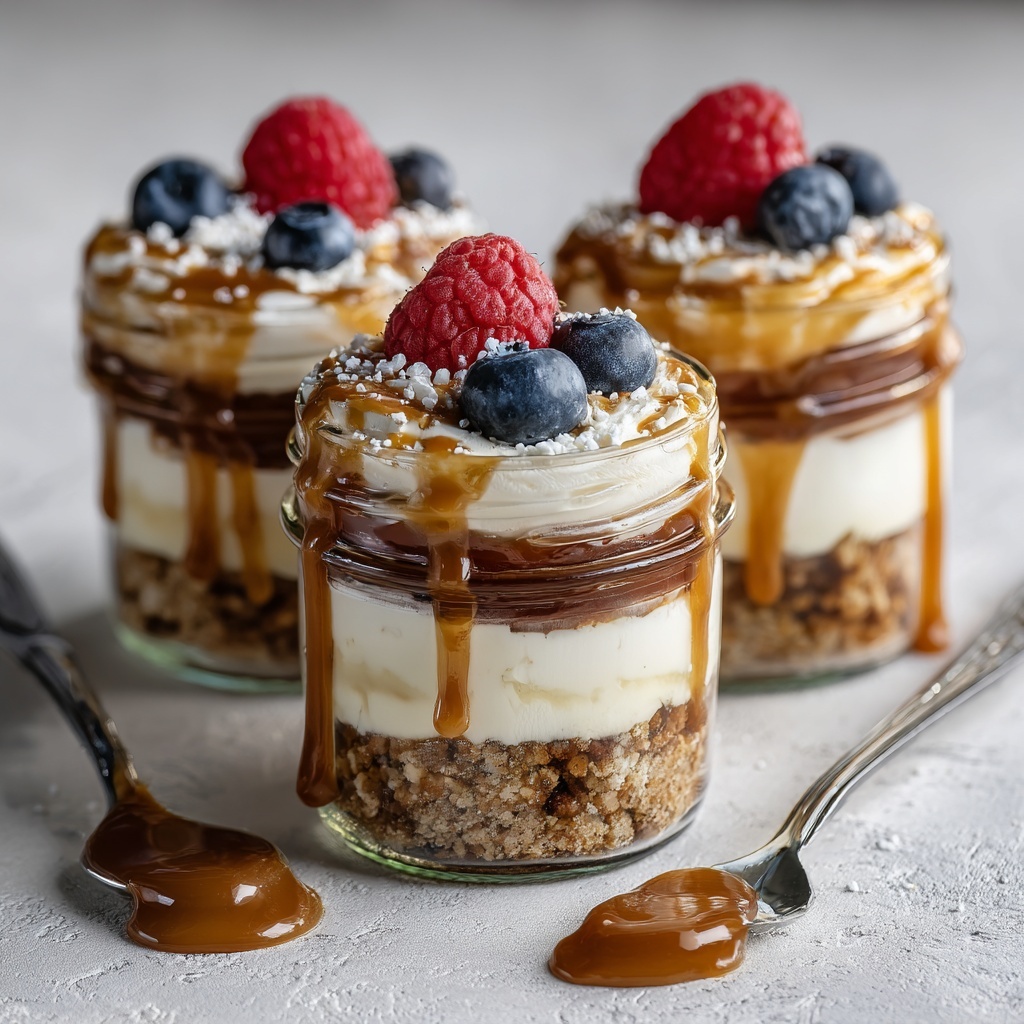
Layer roughly a quarter cup of the cheesecake filling over the set crust in each jar. This is where you can get creative and add your favorite toppings like fresh berries, chopped nuts, or even a drizzle of caramel sauce for a touch of indulgence. Each jar becomes a personal-sized masterpiece of flavor and texture.
Step 4: Chill Until Set
Pop those jars into the refrigerator and let them chill for at least 2 hours. If you can plan ahead, leaving them overnight yields a firmer texture and enhances the flavors, making each bite pure bliss.
How to Serve Easy High Protein Cheesecake Jars Recipe
Garnishes
Garnishes can turn your cheesecake jars from simple to spectacular. Consider sprinkling chopped pistachios or toasted coconut flakes for crunch. Fresh mint leaves add a pop of color and a refreshing aroma, while a few raspberries or blueberries bring natural sweetness and a vibrant finish that’s as lovely on the eyes as on the palate.
Side Dishes
Though these cheesecake jars are often enjoyed solo, pairing them with a light side like a mixed berry salad or a handful of crunchy granola can elevate the experience. For a more substantial snack or part of a balanced breakfast, serve alongside a cup of herbal tea or black coffee for a delightful combo.
Creative Ways to Present
Want to impress guests or make your dessert feel more special? Serve the cheesecake jars layered in clear mini mason jars or pretty glass containers that show off the crust and creamy filling. You could also add edible flowers or swirl a bit of fruit compote in before chilling for a gourmet touch that’s sure to wow everyone.
Make Ahead and Storage
Storing Leftovers
If you have any leftovers, these cheesecake jars keep wonderfully in the refrigerator for up to 3 days. Cover them tightly with lids or plastic wrap to prevent them from drying out or absorbing other fridge odors. The flavors actually firm up and meld more after a day, making them even tastier.
Freezing
Freezing is an option if you want to prepare the jars well in advance. Store the jars with lids in the freezer for up to 1 month. Thaw in the fridge overnight before serving to keep that creamy texture intact. Just note that toppings like fresh berries are best added fresh after thawing for maximum flavor and freshness.
Reheating
Since this is a chilled dessert, reheating isn’t necessary or recommended. Instead, allow any thawed jars to come to a cool room temperature for about 10 minutes before enjoying if you find the cheesecake too firm straight from the fridge.
FAQs
Can I use a different type of protein powder?
Absolutely! Whether it’s whey, plant-based, or collagen protein powder, just choose a flavor that complements the cheesecake well, like vanilla or unflavored, to keep the taste balanced.
Is there a dairy-free version of this recipe?
Yes, you can substitute cream cheese and Greek yogurt with dairy-free alternatives such as cashew cream cheese and coconut yogurt, but keep in mind the texture may vary slightly.
How do I make the crust gluten-free?
This recipe is naturally gluten-free if you use almond flour or gluten-free graham crackers. Just double-check labels to avoid any hidden gluten.
Can I prepare these jars without refrigeration time?
The chilling step is key to setting the cheesecake filling properly and achieving the ideal texture, so it’s best not to skip it if possible.
What toppings do you recommend for added protein?
Chopped nuts like almonds or walnuts, chia seeds, or even a dollop of nut butter can boost protein and add a wonderful crunch or creaminess to your jars.
Final Thoughts
There’s something incredibly satisfying about this Easy High Protein Cheesecake Jars Recipe that makes it a winner for so many occasions. It’s easy to make, deliciously creamy, and packs a nutritional punch you can feel good about. Give yourself the treat of these delightful jars—you’ll be hooked from the first bite, and they’re perfect to share or keep all to yourself.
Print
Easy High Protein Cheesecake Jars Recipe
- Prep Time: 15 minutes
- Cook Time: 8-10 minutes (if baking crust) plus chilling time
- Total Time: 2 hours 15 minutes (includes chilling time; overnight recommended)
- Yield: 6 jars
- Category: Dessert
- Method: Baking
- Cuisine: American
- Diet: Low Fat
Description
These Easy High Protein Cheesecake Jars are a delicious and nutritious dessert featuring a creamy protein-packed filling atop a crunchy almond flour crust. Perfect for a quick snack or healthy treat, these individual jars are simple to prepare, customizable with your favorite toppings, and packed with muscle-building protein from Greek yogurt and vanilla protein powder.
Ingredients
Crust
- 1 cup almond flour (or crushed graham crackers)
- 2 tbsp melted coconut oil or butter
- 1–2 tbsp sweetener of choice
Filling
- 8 oz low-fat cream cheese, softened
- 1 cup Greek yogurt (2% or non-fat)
- 1–2 scoops vanilla protein powder
- 2–3 tbsp sweetener (maple syrup, honey, or sugar-free)
- 1 tsp vanilla extract
- Optional: 1–2 tbsp lemon juice for a zesty lift
Toppings (optional)
- Berries
- Nuts
- Drizzle of caramel
Instructions
- Make the Crust: In a bowl, mix almond flour, melted coconut oil or butter, and sweetener until the texture resembles damp sand. Evenly press about 2 to 3 tablespoons of this mixture into the bottom of each small jar (4–6 oz). Chill the jars in the refrigerator for 10 to 15 minutes or bake them at 350°F (175°C) for 8 to 10 minutes until golden and firm.
- Mix the Filling: Beat the softened cream cheese until smooth and creamy. Gradually blend in Greek yogurt until fully combined. Add vanilla protein powder one scoop at a time, mixing thoroughly, then stir in your chosen sweetener and vanilla extract. If desired, mix in lemon juice for a refreshing zest.
- Assemble: Spoon about ¼ cup of the cheesecake filling over the chilled crust layer in each jar. Add your favorite toppings such as fresh berries, nuts, or a drizzle of caramel sauce to enhance flavor and texture.
- Chill: Place the jars in the refrigerator and let them chill for at least 2 hours, allowing the cheesecake to set properly. For best results and a firmer texture, chill overnight before serving.
Notes
- You can substitute almond flour with crushed graham crackers or digestive biscuits for the crust.
- Adjust the sweetness of both the crust and filling to taste using your preferred sweetener.
- For a dairy-free version, try replacing cream cheese and Greek yogurt with plant-based alternatives.
- Use jars or small containers of 4 to 6 ounces to serve individual portions.
- Overnight chilling improves the cheesecake’s texture and flavor.

